
Adobe After Effects Download for Free - 2024 Latest Version
| 18.4 | |
| Windows, Mac, Linux, iOS, Android | |
| Free | |
| Adobe Creative Cloud | |
| 106,398 | |
| Photos and Video Editing Tools |

Adobe After Effects sets the industry standard when it comes to creating motion graphics and visual effects (VFX). It’s the top choice for professionals, students, and hobbyists alike for adding elements to videos, ads, and video games. Its capabilities include keyframe animation, 3D animation, and creating visual effects such as rotoscoping, compositing, and tracking motion.
After Effects seamlessly integrates with other Adobe Creative Cloud apps, making it easy to import elements needed to create your visual effects, and then export them directly to Premiere Pro to integrate them into your video.
While Adobe After Effects is a subscription-based premium tool, if you follow the instructions below, I’ll show you how to download it free for 7 days.
Download Adobe After Effects for Free!
How to Download and Install Adobe After Effects on Your PC for Free
- Go directly to the official Adobe After Effects page.
- Click the Free Trial button.
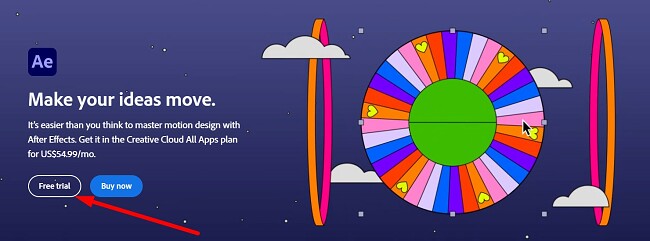
![Adobe After Effects Free Trial]()
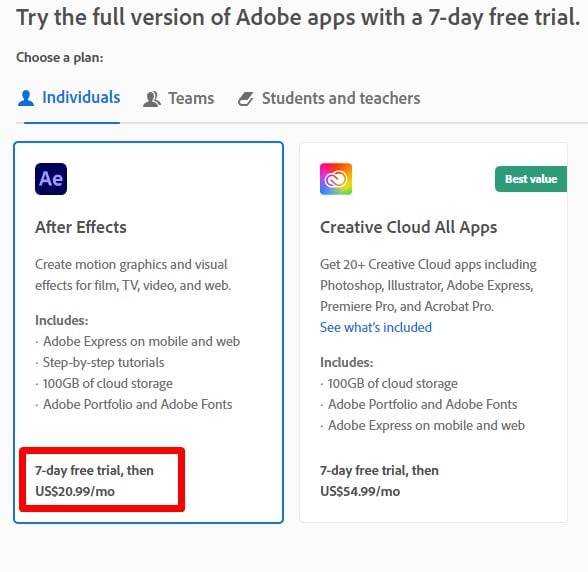
- Adobe will give you two package options:
- Download Adobe After Effects, and you’ll also get Adobe Express, Adobe Fonts, Adobe Portfolio, and 100 GB of cloud storage.
- Download the complete Creative Cloud package, which includes Photoshop, Illustrator, Premiere Pro, and more.
Both options include a 7-day free trial. Choose the package you want, and press the Continue button.
4. Enter a valid email address in the field to register your account.
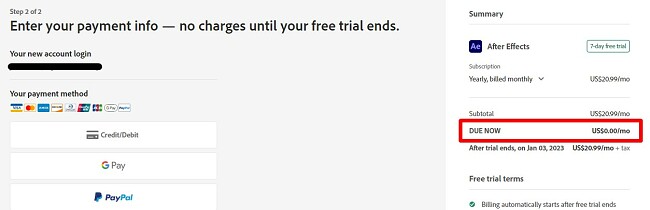
5. While you won’t be charged until after the 7-day free trial ends, you have to enter a payment option to activate the free trial. Choose a credit card, Google Pay, or Paypal, and enter the required information. When you’re done, press the Agree and Subscribe button.
6. If there is already an Adobe account registered to your email address, you can enter the password now. Otherwise, fill in the required fields to register your new Adobe account, then click the Continue button.
7. Once your payment method is confirmed, the Creative Cloud app will automatically download to your computer.
8. When the installation is complete, Creative Cloud will automatically begin downloading and installing After Effects on your computer.
Adobe After Effects Overview
Adobe After Effects is a must-have program for anyone with an interest in video editing. From students and hobbyists to amateurs and professional filmmakers, After Effects will help bring your vision to reality.
The software is packed with a professional-grade toolset and templates that can help unlock the creative genius.
One of the most impressive features is the integrated AI that can help correct many common errors without you needing to do too much
While After Effects has many tools that are easy to use, there are plenty of advanced tools and features that may take some time to master. On that end, Adobe has an excellent tutorial that is available for anyone who wants to learn how to best use the tools.
Some of the most common uses of After Effects are creating cinematic movie titles, video intros, and smooth transitions. It’s compatible with third-party plugins, which extend the range of features and functions that you can accomplish.
The workspace is an intuitive 3D space that makes it easy to link with other Adobe products, such as Photoshop, Premiere Pro, Illustrator, and more.
Adobe After Effects Features
As its name suggests, After Effects specializes in enhancing videos with post-production effects, offering an ideal way to add the finishing touches to your video production. It’s a powerful tool that allows you to create complex and dynamic animations more easily. It can be used to create:
- An animation that follows the movement of a layer
- Loop animations
- Random animations
- Animation that are driven by data
- Animation that responds to user input
Here are just a few more of the top features that you won’t want to miss:
Work with Compositions
The most important thing to understand with After Effects is what they call Compositions. These are the frameworks for your video projects. A standard composition includes several layers comprising of all the components that create your finished project. It can be multiple video clips, audio and sound effects, visual effects, text, pictures, and whatever else you include in your productions.
Once you’ve added the layers, you can manipulate the length of each layer, where it sits on the timeline, and arrange them so that the layers are showing in the correct order.
Use Keyframe Animation to Create Motion Graphics
Keyframe animation is a technique used in animation and motion graphics to create movement by points in time that define the position, rotation, scale, or other properties of a layer.
To create a keyframe animation in After Effects, you first set a keyframe for the property you want to animate. This defines the starting value for the property. You then move the current time indicator (CTI) to a different point in time and change the value of the property. After Effects will automatically create a new keyframe at the current time.
When you play back the animation, After Effects will interpolate the values between the keyframes to create a smooth animation. The type of interpolation used will depend on the property being animated. For example, linear interpolation will create a straight line between the keyframes, while ease in/ ease out interpolation will create a smooth curve.
This is a versatile technique that can be used to create a wide variety of animations. It gives you complete control over the movement of your layers, so you can create complex and nuanced animations that would be difficult or impossible to create with other methods. It’s completely customizable, allowing you to easily change the timing and duration of your animations, and you can add or remove keyframes at any time. Keyframe animation is a relatively easy technique to learn and even beginners can create basic keyframe animations with just a few clicks.
Content Aware Fill
After seeing the Content Aware Fill feature’s success with Photoshop, Adobe has added it to After Effects. It allows you to seamlessly remove unwanted objects from the background and fill in the space behind it without any distortion. There are some limitations as to what you can remove, especially if the background is constantly changing. You should use Content Aware Fill with objects on a simple or textured background for the best results.
If you have Photoshop or a Creative Cloud account, you can use it to improve the quality of your content. Create a reference frame and upload it to Photoshop. Then you can use the Photoshop tools to change the background, giving you something that is easier to work with. Next, upload your editing version back to After Effects, and it will use the updated frame to improve its own AI calculations and improve the quality of your video clip.
Next Gen Roto Brush Automates Rotoscoping
The Next-Gen Roto Brush represents a significant advancement in the field of rotoscoping. Powered by Adobe Sensei, Adobe’s AI and machine learning framework, this powerful tool offers several advantages over traditional rotoscoping methods.
Firstly, it introduces automatic tracking capabilities, enabling it to track objects in footage, even if they are in motion or changing shape. This can save you a lot of time compared to the manual frame-by-frame rotoscoping required in traditional methods. Secondly, the Next-Gen Roto Brush excels in accuracy. By learning and adapting to the specific characteristics of the object being rotoscoped, it produces more precise mattes than traditional methods. Additionally, it reduces the effort required from users, automating many tasks that would typically be performed manually.
Key features of the Next-Gen Roto Brush include the ability to paint strokes on both the foreground and background of footage, with the tool automatically generating a matte based on these strokes. There’s also a Refine Matte tool for fine-tuning mattes, allowing you to remove unwanted areas or enhance accuracy. Furthermore, a set of matte cleanup tools, such as the Spill Suppressor, Fringe Cleaner, and Hole Filler, are included to remove unwanted artifacts from the matte.
Create Amazing Visual Effects in Post-Production
Are you making a film about a snowstorm in the middle of the summer? Perhaps you need a steady rainfall for a scene? You don’t need to wait for the seasons to change, or the weather to cooperate with your film schedule. After Effects has the tools and plugins you need to add realistic weather effects to your videos.
Using snow as an example, there are several ways to add falling snow to your project:
- Find a stock video clip of snow that you like and add it as a layer over your other video.
- Create a snowstorm using the particle system technique.
- Take a video of snow falling and add it to your video in post-production.
You can also use the VFX/Visual Effects to create 3D animation, change the background setting of your video, and add special effects.
AI Object Selection Tool Uses Machine Learning To Select Multiple Objects
The AI Object Selection Tool is a powerful new tool that uses machine learning to automatically identify and select objects in footage. This can be a huge time-saver, especially for footage with multiple objects.
Here are some of the benefits I found while using the AI Object Selection Tool:
- Save Time: The AI Object Selection Tool can quickly and easily select objects in footage, even if they are complex or occluded.
- Highly Accurate: It is able to create very accurate selections, even around the edges of objects.
- Versatility: The tool can be used to select a wide variety of objects, including people, animals, vehicles, and inanimate objects.
To use the AI Object Selection Tool, simply click on the Object Selection Tool icon in the Toolbar. Then, click and drag over the object that you want to select. The AI Object Selection Tool will automatically select the object. You can then use the Selection Refinement tools to fine-tune the selection.
Improved 3D Tools
The latest version of After Effects has improved 3D capabilities. The advanced tool upgrades are geared to help producers and editors design and composite 3D effects faster and more naturally without relying on plugins. While plugins are helpful, you can now handle all the 3D manipulations in one workspace without jumping back and forth between different apps to create a single 3D shot.
The 3D design space has the following features:
- 3D Transform Gizmo: The improved Gizmo gives you the option to scale, position, and rotate 3D layers.
- Updated camera tools for navigating in 3D: Move around the scene and view it from every angle. You can see where objects should be, whether you can move them, and if necessary, use the Gizmo tool to adjust their spacing, size, or location.
- Real-time 3D Draft Preview: Get real time renderings of your project with the fast Real-Time Engine (RTE) that gives consistent previews without lag.
- 3D Ground Plane: Stay oriented and understand the spacing in your videos when using the 3D Ground Plane while previewing your work. It gives valuable visual cues to help you ensure the lighting, camera positions, and 3D layers are all in sync with your 3D design.
Create Motion Graphics Templates
If you’re creating videos as part of a team or you want a collection of videos that follow a similar design, the Motion Graphics Templates can be a huge time saver. To create your motion graphics template, open the Essential Graphics panel (Window > Workspace > Essential Graphics), and a new workspace will open.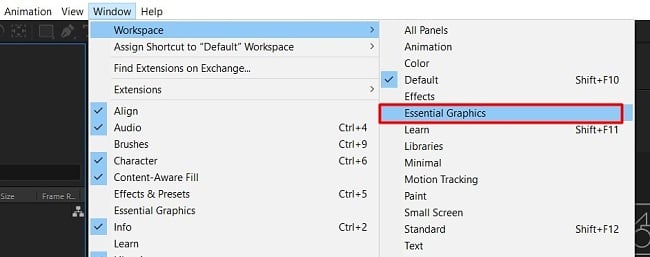
There are four main ways to use the essential graphics panel.
- Control Surface: You can change the parameters of your timeline and add shortcuts to make it easy to change selected elements.
- Master Properties: Add master controls that allow you to add layers or modifications that are found in other compositions.
- Export to Premiere Pro: Once the template is complete, you can save it as a .mogrt file and upload it to Adobe Premiere Pro. The template will contain all the original images, videos, and effects, making them easily editable.
- Grouping: You can merge font properties, group controls, and add new controls to include data from CSV and TSV documents.
Track Movement of Facial Features
The Face Tracker feature is a powerful tool that allows you to track the movement of facial features in footage. This can be used to create a variety of effects, such as:
- Adding facial animations to characters
- Tracking facial expressions for data analysis
- Creating realistic facial masks
- Removing unwanted objects from footage
It works by analyzing the footage and identifying key facial features, such as the eyes, nose, and mouth. Once the facial features have been identified, the Face Tracker tracks their movement throughout the footage. This tracking data can then be used to create a variety of effects. For example, you can use the Face Tracker to add facial animations to a character. By tracking the movement of the character’s facial features, you can create realistic lip syncing, eye movements, and facial expressions.
You can also use the Face Tracker to track facial expressions for data analysis. By tracking the movement of facial features, you can gather data about a person’s emotions or reactions. This data can then be used for a variety of purposes, such as market research or psychological studies.
Another benefit of Face Tracker is to create realistic facial masks. By tracking the movement of facial features, you can create a mask that follows the contours of the face. This can be used to remove unwanted objects from footage, such as blemishes or wrinkles.
Animate Text
Choosing the right text style plays a crucial role in the effectiveness of your video, especially in marketing or presentation scenarios. After Effects provides a wide array of fonts from the Adobe Fonts database, and it even allows you to bring in your own custom fonts. To check out the variety of font options, just click on the Text layer within your video timeline. You’ll find a dropdown menu with various character choices. When you pick a font, you can immediately see a preview of how it looks on your video.
To open the Text option, click on the >> on the top right corner of your workspace to open the different panel options. Then, select the Text option, and a new panel will open with all the tools you need for writing your text, choosing a font, color, size, and more.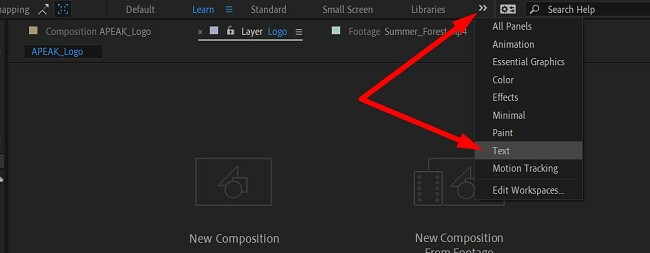
You can then assign special parameters to the text layers and choose from a host of animation options. The text layers have their own special parameters to go along with the standard transform properties that are found in every layer.
Text Scripting Uses JavaScript to Control Text Layers
Text Scripting gives you the ability to use JavaScript to control text layers to create a wide variety of effects and animations, such as:
- Dynamic text layouts
- Data-driven text animations
- Interactive text elements
Text Scripting gives you complete control over the appearance and behavior of text layers. Unlike with traditional methods, it allows you to create effects that would be difficult or impossible to create with traditional methods.
Customizable Export Options
Adobe After Effects offers a wide range of export options for both video and image formats. Some of the most common export options include:
Video formats:
| MP4 (H.264 or HEVC) | MOV (QuickTime) | AVI (DV or uncompressed) | WMV |
| MPEG-2 | ProRes | DNxHD |
Image formats:
| JPEG | PNG | TIFF |
| PSD | GIF | BMP |
In addition to these standard formats, After Effects also offers a number of specialized export options for use with specific workflows. For example, it can export directly to Adobe Premiere Pro, Cinema 4D, and other applications. When exporting from After Effects, you will be able to specify a number of settings that control the quality and size of the exported file. These settings include:
- Codec: The codec determines how the video or image data is compressed.
- Frame rate: The frame rate determines the number of frames per second in the exported file.
- Resolution: The resolution determines the width and height of the exported file.
- Bitrate: The bitrate determines the amount of data that is used to encode the video or image data.
- Quality: The quality setting determines the level of compression that is used.
The After Effects Interface
One of the main focuses of the latest After Effects was improving the user interface. After Effects can be quite intimidating when you first open it, and it will take some time to learn. Thankfully, Adobe includes multiple step-by-step tutorials that will explain how to use each of the features and tools, regardless of your background.
The workstation is divided into three panels: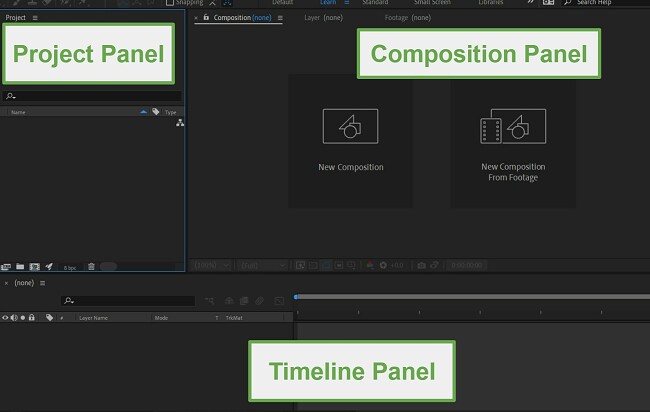
- Project Panel: This is where you’ll see all the different files that you uploaded to use in the project.
- Composition Panel: You can get a live preview of your project while you’re working on it.
- Timeline Panel: This is where you arrange the order of the layers, length, and order each of the video clips, add the media, and do the actual creation of your project.
Adobe has made a significant enhancement to After Effects regarding parameter control in drop-down menus. This may not initially appear significant, but it greatly enhances the usability of After Effects. This improvement proves particularly valuable when designing templates. In the previous setup, users had to rely on sliders to switch between various settings. However, the new update allows for personalized drop-down menus, offering the flexibility to customize them and even assign different names. This enhancement greatly streamlines workflow and enhances overall efficiency.
The tools are grouped together, making it convenient to use when trying to finish a particular editing function. You can click on the >> icon on the top right corner of the workstation to view all the different panels, such as Text, Animation, Paint, Motion Tracking, Effects, and more.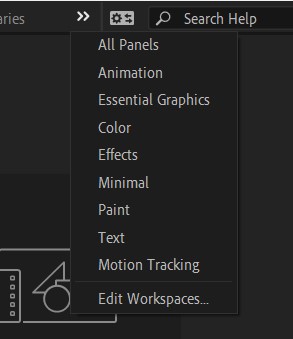
On the top of your screen is the option to change the composition screen to display how your video will look on different screen sizes, such as mobile devices and tablets.
The right side of your screen is where you’ll find all the different tools. The most common options are locked on the sidebar, although you can customize the workstation based on your preferences.
Compatibility
Adobe After Effects has apps for Windows, macOS, and some VR devices. While there is no After Effects mobile app, Adobe has two mobile apps that can edit videos and add some special effects:
- Adobe Express has a nice collection of tools to edit videos and include video effects such as reversing and changing speeds.
- Premiere Rush gives you the creative ability to create and add video transitions, customize titles, adjust color balance, and add audio. There is also a social share option, to export and publish your video directly from the platform.
Both apps are part of the Creative Cloud, so you can upload your projects to the cloud and open them in After Effects to add more advanced effects.
System Requirements for PC, macOS, and VR
Here are the minimum requirements required to run After Effects. In addition to the specs listed below, you need a stable internet connection.
PC
| Processor | Intel or AMD Quad-Core Processor |
| OS | 64-bit Windows 10 or later |
| RAM | 16 GB |
| GPU | 2 GB of GPU VRAM |
| Hard Disk | 15 GB of free space plus additional space required for installation |
| Monitor Resolution | 1920 x 1080 |
macOS
| Processor | Intel, Native Apple Silicon, or Rosetta2 with Quad-Core |
| OS | Big Sur (11.0) or later |
| RAM | 16 GB |
| GPU | 2 GB of GPU VRAM |
| Hard Disk | 15 GB of free space plus additional space required for installation |
| Monitor Resolution | 1440 x 900 |
VR
After Effects is compatible with Oculus Rift, HTC Vive, and Windows Mixed Reality, with Windows 10 with an Intel i5-4590 processor. The other technical requirements vary for each device.
How to Uninstall Adobe After Effects
If your free trial is complete and you don’t want to continue using After Effects, you can remove it from your computer by following these easy steps:
- Type Add or Remove Programs in the Windows search bar and click the Enter key.

![Adobe After Effect uninstall]()
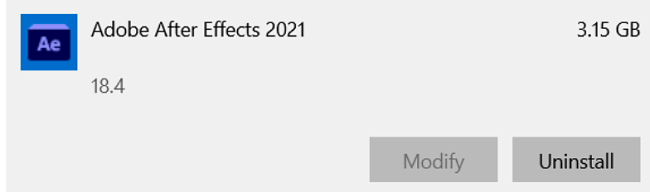
- Locate Adobe After Effects in the list of installed programs and click the Uninstall button.
![Adobe After Effect remove program]()
- The uninstallation wizard will open. Confirm that you want to remove the software, and it will be removed completely from your computer.
Alternatively, you can simply go to your Adobe Creative Cloud Desktop, Select After Effects, click on the three horizontal dots on the top-right corner, and then click Uninstall.
That will remove the software from your PC.
Additional Editing Software From Adobe
I’ve learned that our company, Adobe, offers a diverse range of editing programs that seamlessly integrate with one another, providing you with a wide array of tools and effects to enhance the quality of your work. By having an Adobe account, you gain the ability to collaborate effectively with others and easily integrate with over 300 different software and hardware partners.
- Adobe Premiere Pro: Adobe Premiere Pro is specifically designed to make editing for social media posts fun. You can take your content creation efforts further with this cool app from Adobe. Like After Effects, Premiere Pro comes packed with great features.
- Adobe Photoshop: Photoshop is the ever-popular app for all kinds of photo-editing, graphic design, and compositing to digital platforms. You can use the built-in AI technology to do quick edits and bring your ideas to life.
- Adobe Illustrator: The industry-standard editing software for vector images, Adobe Illustrator has a complete set of professional tools and excellent features. These features include pixel perfect design, a CSS extractor tool, and color synchronization.
FAQ
Is Adobe After Effects free?
How to render in After Effects
How can I cut a layer in After Effects?
How to export an After Effects project to mp4?
How to add a keyframe in After Effects?
How to animate text in After Effects?
Bottom Line
Adobe After Effects is the top program for creating motion graphics and visual effects (VFX). It combines AI, machine learning, and manual design tools to ensure your projects have the desired outcome. This includes a JavaScript based expression language, text scripting, AI selection tools, a next-gen roto brush, content-aware fill, facial recognition, advanced text animation and more.
You can try Adobe After Effects free for 7 days and get access to all its powerful features. This should give you enough time to get real experience with the features and start creating and exporting your visual effects and motion graphics projects.
Download Adobe After Effects now!
