
Adobe Photoshop Latest Version - Free Download and Review 2024
| 21.1 | |
| Windows, Mac, Linux | |
| Free Trial | |
| Adobe | |
| 782,305 | |
| Writing and Editing Tools, Image Editor, Editing Software, Photography, Creative Tools |
Reading time:
Posted on Jul 27, 2024

Photoshop stands out as the premier and most potent image editing software available today. It provides a comprehensive set of tools capable of elevating an ordinary photograph into a true masterpiece. There’s a whole host of tools that include changing backgrounds, adjusting facial features, creating 3D images, video editing, and much more.
Photoshop is a part of the Adobe Creative Cloud collection of apps, and therefore, it can seamlessly integrate with the other products, to allow you to combine multiple types of images, videos, and audio clips into your work.
While Photoshop is a premium tool, follow the instructions below and I’ll show you how to download your copy free for 7 days – and keep reading for my full review of Adobe Photoshop.
How to Download Photoshop for Free on PC
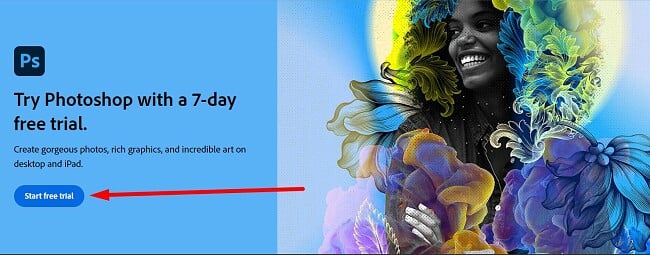
1. Click the link and the official Adobe Photoshop download page will open in a new tab.
2. Click on the Start Free Trial button.
3. Choose the package that fits your needs. The packages are: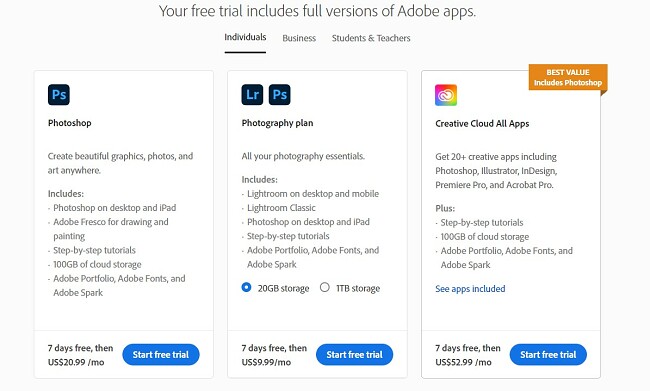
-
- Photoshop: Includes apps for desktop and iPad, complete with 1000 GB of cloud storage.
- Photoshop and Lightroom: in addition to Photoshop, you’ll get Adobe’s Lightroom apps, which come with Adobe Portfolio, Fonts, and Spark.
- The entire Creative Cloud collection. Large collection of tutorials, 100GB of cloud-based storage, and access to Adobe software like Acrobat Pro, Dreamweaver, InDesign, XD, Premiere Pro, and much more. I’m downloading Photoshop for this example, but the process is the same for all three options. Then, click the Start Free Trial button.
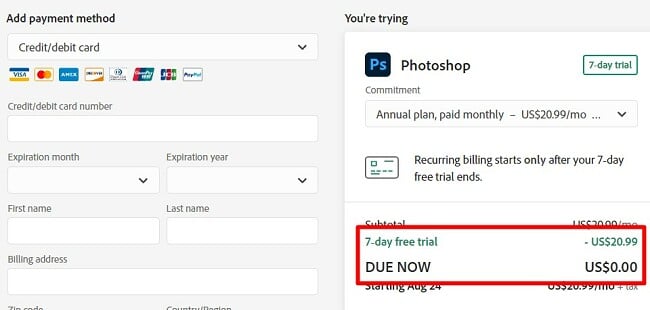
4. Enter a valid email address in the provided space and click the Continue button. Remember which email address you use, as this will be your Adobe username.
5. You will need to enter your credit card or PayPal information – but you won’t be charged until the end of your 7-day free trial.
6. After the payment method is approved, you can create a password and click the Complete Account button.
7. The installation file will automatically download to your computer. When it’s done, open it to run the installation wizard.
8. The Setup Wizard will open with a page about entering your password to begin the installation. Click Continue to start.
9. Adobe’s Creative Cloud will automatically begin to download. While installing, there will be several survey questions about your experience with Photoshop, your role, and your creative interests. It’s an optional survey, but if you answer the question, Adobe will use the answers to send you relevant tutorials, guides, and other pertinent information.
10. When the Creative Cloud installation is complete, it will automatically begin installing Photoshop. This large file can take around a half-hour to forty-five minutes to install, depending on your internet speed and computer.
Download the Photoshop Free Trial Today!
Photoshop Overview
Photoshop is a layer-based editing program. What this means is that for each action you take, a new layer is created. This makes it easier to edit the image and ensures that even if you make a mistake, it won’t ruin the entire project.
The program comes packed with tools that can adjust color tones, add texture, filters, text, hundreds of fonts, magic wands — the list just goes on and on.
There is no point in getting into a “how to use Photoshop” tutorial in this post, as there are entire books written on the subject. I will say that, for most questions you might have, YouTube will have some helpful videos that will help with basic editing and photo touch-ups.
Adobe Photoshop Features
This is a basic overview of some Photoshop features. I’ll get into more details in the Special Tools section below.
Working with Layers
Perhaps one of the most essential features of Photoshop is using layers to create your project. It not only gives you complete control over every aspect of your work but allows you to treat each object as an independent object.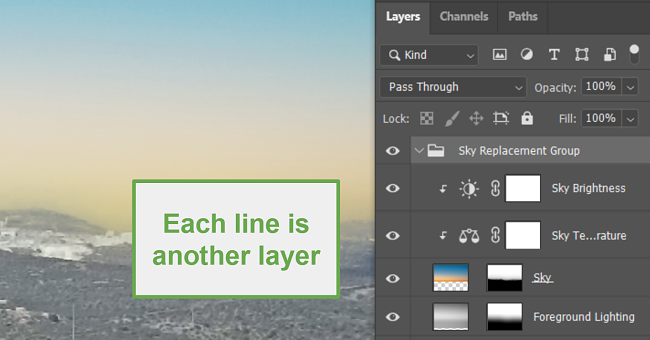
This means you can change colors, opacity, add borders, and easily move each object without affecting anything else on the page. Additionally, if you make a mistake, you only need to correct the one layer and not worry about the entire file.
Excellent collection of Selection tools
I’ve got some exciting information about Photoshop’s selection tools! These nifty tools are designed to effortlessly select various objects you wish to edit. Among the primary selection tools are the Lasso, Magnet Lasso, Polygonal Lasso, Magic Wand, Quick Mask, and Rectangular Marquee. Once you get the hang of these tools, you’ll find it a breeze to cut out objects from images, tweak colors, eliminate backgrounds, and achieve so much more with your edits!
Improve Quality of Photographs
In Photoshop, you’ll find user-friendly tools that simplify the process of removing imperfections from images. These tools allow you to effortlessly eliminate issues like red-eye, wrinkles, and other blemishes. Additionally, you can adjust body shapes, alter colors, crop and trim images, enhance sharpness, and explore a diverse range of filters, among other features.
Text Overlay
Photoshop offers an extensive range of font choices, colors, and diverse text styles to help you infuse the ideal ambiance into your project. Among the available options are fisheye, bubble in, bubble out, bridge, and reverse styles. Moreover, Photoshop supports SVG OpenType fonts, which have gained immense popularity for their ability to adapt to responsive designs suitable for both computers and mobile devices. Additionally, Photoshop has recently introduced emoji fonts to its repertoire.
Video Editing
Among the latest additions to its array of features, Photoshop now comes equipped with a video editing component. Through the use of a multitrack editing board, you have the ability to merge multiple files, trim, splice and crop videos, insert text overlay, and apply filters. Additionally, you can incorporate an audio track into your project, with the flexibility to adjust its volume, fade it in and out, or mute it altogether.
Special Features and Tools
The past few Photoshop updates have a strong focus on using AI and machine learning to simplify and speed up the editing process. Two of the newest features are Generative Expand and Generative Fill.
Generative Expand: A powerful tool for image editing and creation
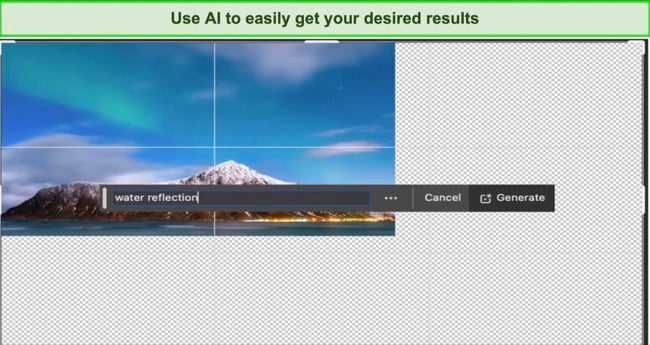
Generative Expand is a new feature in Photoshop that allows users to extend their images beyond the borders of what they captured. This can be done with just a few simple clicks, making it a very easy-to-use tool.
Select the Crop tool and change the “Fill” box to Generative Expand. Then increase the dimensions of your image, to include the area that you want to expand. Then, write your prompt, it’s best to use simple language, so you’ll get exactly what you want. In the example below I wanted to add a water reflection to the mountains.
Generative Expand shows results in just a few seconds. This makes it a great tool if you want to quickly create new images or expand existing images.
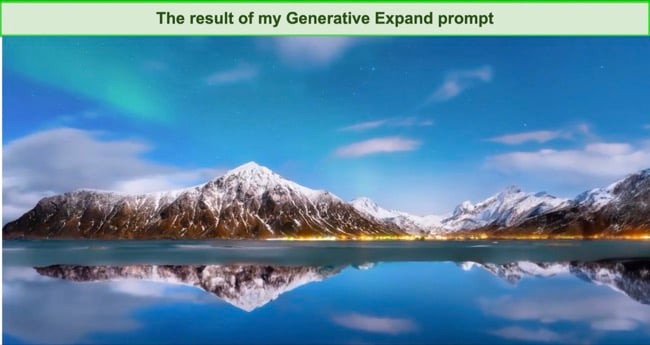
I found Generative Expand to be particularly useful for converting images from one orientation to another. For example, I was able to easily convert a portrait-oriented image to a landscape-oriented image, without losing any of the important details.
This is a powerful and versatile tool with many practical applications such as creating a brochure with the perfect aspect ratio, designing a responsive website header with a unique and eye-catching design. It also works in 3D, so you can expand the canvas of a rendered image and add more data before cropping it.
Generative Fill – The Easiest Way to Add or Remove Elements
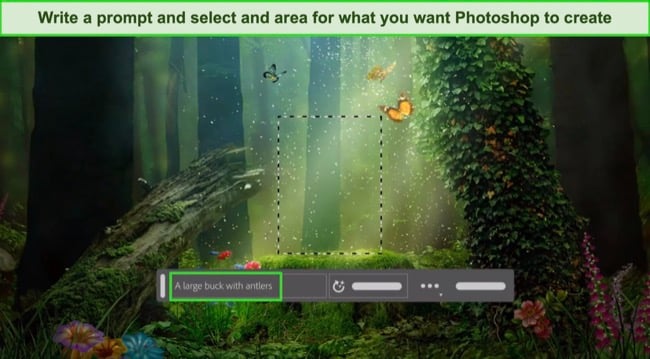
Generative Fill is a new feature in Photoshop that makes it even easier to add or remove people, objects, or other elements from a picture. Instead of tracing or highlighting images, you can use AI to do the work for you. This tool has the potential to revolutionize the way we edit images, making it easier and faster to create realistic and professional-looking results.
One of the key advantages of Generative Fill is its simplicity. To remove an object, users simply select the object and click “Remove.” Generative Fill will then automatically fill in the empty space with new content that matches the surrounding area.
Adding objects is a bit more complex, but it is still relatively easy to do. Users simply need to select the area where they want to add the object and type in a text prompt describing the object. Generative Fill will then generate a new object that matches the text prompt and seamlessly blends it into the image. Once you understand the prompts, you will unlock the ability to create images such as animals walking like people, landscapes or buildings that only exist in your imagination, and more. When you open the feature, select an area on your canvas for the image to go, then write your prompt, and in a few seconds it will appear.
Here is a simple example, adding a buck with antlers in the forest:
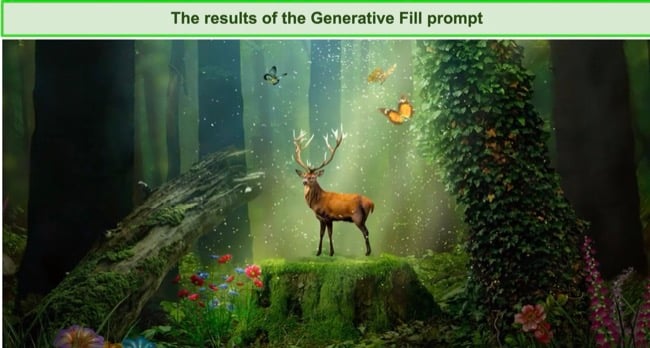
While Generative Fill is still under development, it has the potential to be a powerful tool for a variety of image editing tasks. Photographers can use it to remove unwanted objects from their photos, graphic designers can use it to create new and innovative designs, and anyone can use it to express their creativity and create unique and interesting images.
Neural Filters
Neural filters are one of the newest and most exciting additions to the software. It’s a workspace that makes it easy to change a person’s appearance by making them look older or younger, change their mood by turning a frown into a smile, or glaring eyes into happy ones. It uses AI machine learning, powered by Adobe Sensei, and generates new contextual pixels to alter the image.
Surprisingly, the filters are not that hard to use, and you can easily manipulate the images. The face tools use sliders, and you can adjust them to change happiness, anger, and surprise levels. However, if you go too extreme, the image will lose its natural look, so it’s a good idea to play around with the sliders until you get the proper expression and moods.
Many of the filters are still in Beta, which means that there is still room for improvement.
Here is the original selfie I took:
And after playing around with the filters, I added a little smile, took some years off my face, and shortened my hair.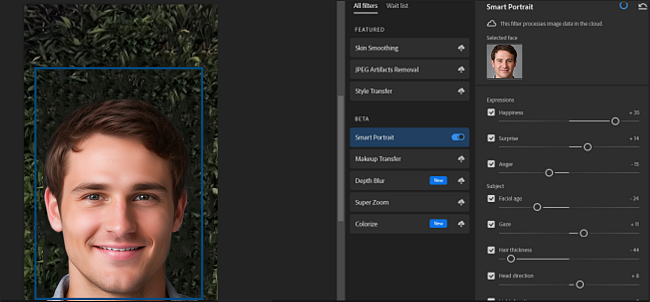
Improved Tools for Photographers
These days, Photoshop is known for its drawing tools, selection, and font tools – but when it first came out, Photoshop was for photographers. Adobe has gone back to its roots, so to speak, by upgrading its photo editing features. This includes support for raw camera files and excellent tools for correcting flaws and adding in natural effects.
You’ll have everything from basic selection tools that can add or remove objects to more advanced tools such as lens-profile-based geometry correction and histogram adjustments. Here are a few other new upgrades that can improve the quality and appearance of your pictures.
-
Change the Sky
It is a bit surprising that it took so long for Photoshop to add this feature. But now, instead of working with making tools and layers, you can turn that cloudy sky into a bright blue sky with a click of the button. There are also plenty of customization tools available so you can get your sky looking perfect.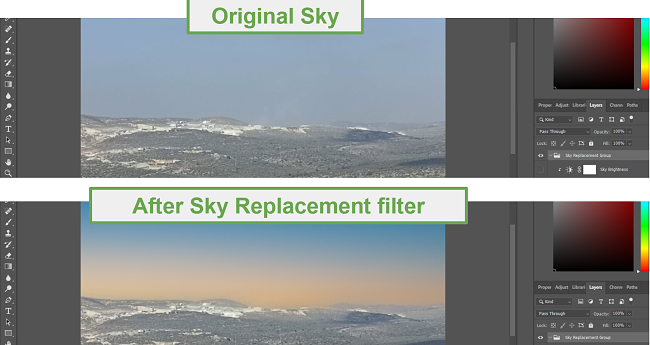
-
Use AI to Fix Lens Blur
Photoshop has always had a blur tool, but it has been improved with AI. Now, the blur tool understands the color scheme in the pictures, which helps ensure that you won’t have an off-color blur. Another advantage is the tool gives you control over out-of-focus or blurry items in the background.
-
Expand your images
The content-aware crop tool is perfect for when you take a picture in portrait mode but need to display it in landscape mode. Often, the picture isn’t wide enough, and you’re left with extra white space on the sides. Unlike the Generative Expand feature, you can’t write prompts to create or add new images or backgrounds to expand your images. This tool will fill in the sides of your image with matching content that is already on the image. This works best with easy to duplicate patterns such as the sky, buildings, and the beach. Things that aren’t easily duplicated, like people, won’t look as good.
-
Adjust a person’s facial features
The Face-Aware Liquefy tool is similar to the Neural filters because it makes it easy to change the subject’s facial features and even the shape of the head. The biggest difference is that while Neural filters work with AI and add contextual pixels, Liquefy works with the pixels already in the image.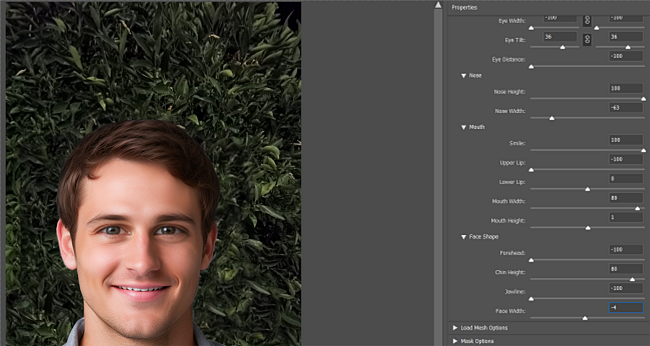
-
No more blurry pictures from shaky cameras
If you have a blurry picture, thanks to a shaky hand, or perhaps you snapped the shot while riding a roller coaster, Photoshop has a filter for you. Adobe has developed an intelligent mechanism that can detect the direction of your shaky picture, whether it’s horizontal, in an arc, going back and forth, or by rotating and realigning the pixels to sharpen your image and remove the blur.
Improve Font Match and Design
Photoshop has done many cool things with fonts over the years. Their latest updates will save you time and energy and allow you to maintain consistency with different documents. You can highlight the font you’re looking for, and Photoshop will give you the best matches.
If you open a file or documents with fonts that aren’t in your font library, Photoshop will run an automatic search online and install them for you.
If you have a font on a document, but you’re not sure which of the hundreds of fonts it is, the Font Match feature will identify the font for you.
A search function lets you filter fonts by classifications like Serif, Script, and Handwritten. Based on these attributes, you can see all similar fonts, choose your favorites, and preview any font by hovering over it with your mouse.
Gradient Tools with Advanced Features
The improved gradients tool offers a number of new features and enhancements that make them more powerful and versatile than ever before. It can be used to create a variety of interesting and visually appealing effects. The advanced capabilities include:
- New gradient types: Photoshop now includes a number of new gradient types, such as radial and angular gradients. These new gradient types make it possible to create more complex and interesting effects.
- Smoother transitions: Produce smoother transitions between colors, resulting in more natural-looking gradients.
- More customization options: Control the placement and spacing of color stops, to get more control over the appearance of your gradients.
Here are some tips for using the improved gradients in Photoshop:
- Experiment with the different gradient types to see what kind of effects you can create.
- Use the gradient preview window to see how your gradient will look before you apply it to your image.
- Use the color picker to create custom colors for your gradients.
- Use the gradient editor to fine-tune the appearance of your gradients.
Multi-Track Video Editing
Photoshop has come a long from its early days as a photo editing software. One of the biggest improvements is the addition of video editing tools. Now you can add the same types of editing layers to videos that you can add to an image. Each video track is treated as a separate layer, allowing you to make changes or work on it separately from the other clips.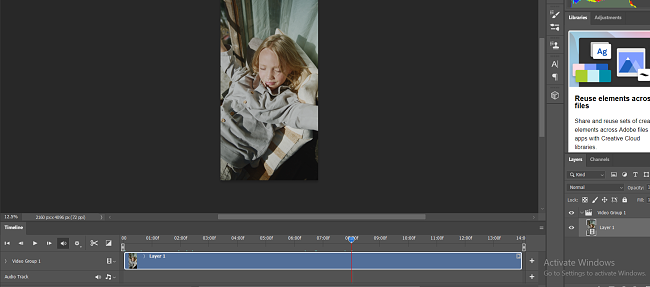
Photoshop has all the basic video editing tools so you can split, trim, splice, and merge multiple videos. You can also add an audio track, fade it in and out, adjust the volume, or mute it.
The editing options include fixing overexposed or underexposed videos, cropping, and adding a wide selection of filters. Photoshop also gives its users access to the same editing tools that are included in Adobe’s main video editing tool, Premiere Pro. This allows you to work on multiple tracks and apply keyframing.
The one area that is a bit lacking is the transition options between videos is a bit limited, with the only option being a variety of fades.
All movie or video files are saved as PSDs by default, but you can export them with H.264, QuickTime, or DPX encoding. There are also multiple resolution options, depending on where your video will be shown. These include 720p, 1080p, and 4K.
Export and Share Your Work
Photoshop now integrates with your operating system to streamline the exporting and share options. To get started; click on the Up Arrow located on the top right-hand corner of the window: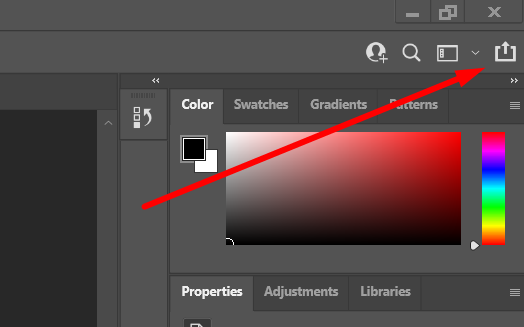
- Mac: Instantly export your projects to AirDrop
- Windows: Export the file to your email, My People, or any app that accepts photo files.
A Share option will also scale down the file size to fit the parameters for a quicker upload. You can upload directly to your preferred social media site or upload it to other Adobe apps where you can continue working on or completing your project.
Photoshop has many different ways of export options, including:
- Save the same file in multiple sizes
- Convert an existing design to sRGB, which is ideal for web display
- Add metadata, such as copyright information or a link back to your site, to protect your intellectual property
- Export a single Artboard or the entire project
- Use Quick Export to use your preferred format automatically
- Export files as PNG, JPG, GIF, or SVG
The Save for Web option is still available if you prefer the old ways of doing things, although the new style is faster and creates smaller files.
The Photoshop Interface
Photoshop improved its interface to make it more accessible for the average user with each new release. It has plenty of customizable options, including workspace options that are targeted for different editing styles. These include photography, painting, web-based images, videos and animations, and 3D. If you don’t see a workspace that fits your needs, you can always set up your own workstation with the panels, windows, and tools that you use frequently.
The interface can also recognize what type of work you are doing, automatically adjusting to fit your needs. For example, if you’re using a selection tool, such as the lasso or hand, or zoom, it will change the workstation to the Mask and Selection, which only shows tools that you can use while a selection tool is active.
Ease of Use
No one will confuse Photoshop with an easy-to-use editing program. However, there are some basic functions that even a novice can quickly pick up. Things like cropping, coloring, adding text, filters, and resizing are the same with most editing programs.
What makes Photoshop special is its collection of advanced tools that turn your photographs and paintings into works of art. The interface has undergone improvements, which does help the usability since it groups the tools by function, so you can quickly find what you’re looking for. There are also plenty of helpful tutorials, both on Photoshop and online, that will take you through the step-by-step process for using different functions and features. These include hanging background, removing blemishes, adjusting color balance, 3D rendering, working with smart objects, and much more.
While the learning curve is steep, and there is a lot to learn, once you’ve familiarized yourself with the tools, you’ll appreciate how intuitive the software is and how easy it is to use.
Getting Started
To start a new project, click on the New Document button on the top-left corner, and the dialog box will open. Now you can choose what type of template you want to work with, including options such as Textured Geometric Masks, Instant Film Mockups, and Photo Collage Layouts.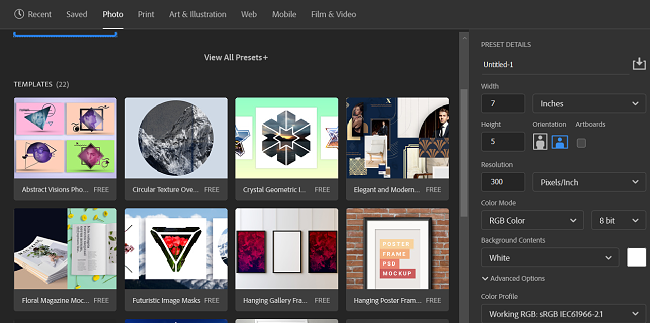
To make it easier to find the right template for you, adjust the filter to only show filters based on the category of your work. The available filters are:
- Photo
- Art & Illustration
- Web
- Mobile
- Film & Video
If you’re already familiar with starting a project on an older version of Photoshop, there is the option to use the classic start menu.
If you’re unsure how a feature or tool works, you can click on the Home button, which will show you a list of all the tutorials, user guides, and a list of new features. Another option is to click the magnifying glass icon on the top-right corner of the page and utilize the search tool. In addition to finding objects, like your images, Adobe stock photos, and files, you can also search for “how-to” guides.
Contextual Toolbar Streamlines Your Workflow
The Contextual Toolbar is a new feature in Photoshop that provides quick access to relevant tools and settings based on the current task you’re working on. It’s a great way to save time and streamline your workflow. First, it’s adaptive. This means that it automatically changes based on the tool or layer you have selected. This saves you from having to waste time searching for the tools and settings you need.
Second, the Contextual Toolbar is customizable. You can customize it to include the tools and settings that you use most often. This makes it even more efficient to work in Photoshop.
Lastly, as implied by its name, the Contextual Toolbar is contextual. This means that it provides relevant tools and settings based on the current task you’re working on. This can save you a lot of time and frustration, especially if you’re new to Photoshop or if you’re working on a complex project.
Here are some tips for using the Contextual Toolbar:
- Customize the Contextual Toolbar to include the tools and settings that you use most often. You can do this by clicking on the three dots in the top right corner of the Contextual Toolbar and then selecting “Customize Toolbar.”
- Learn the keyboard shortcuts for the tools you need. This will help you to work even faster and more efficiently.
- Use it in conjunction with other Photoshop features, such as the Actions Panel and the Presets Panel. This will help you to create even more powerful and efficient workflows.
Compatibility with Mobile and Touch
Developing touch-friendly apps for Photoshop is a big improvement, especially for users of computers like Microsoft Surface and iPads. You can zoom in or pan images through touch, and Photoshop recognizes different swiping gestures, such as two-finger for undo and three fingers for image scroll. While the touch apps aren’t perfect, and there are many features and functions that you still can’t use, it’s good to see that it is in the developmental stages and will only get better with time.
Although there isn’t a comprehensive Photoshop application available for Android and iOS devices, you can access the Photoshop Express mobile app as part of the Creative Cloud package. It doesn’t have the same capabilities as Photoshop, but you can open and view PSD files, add filters, create collages, insert cutouts, and more. It uses AI for some advanced features, such as the background, fixing eye blinks, face-aware liquefy, and removing unwanted objects from the image. When you’re done, you can save your work to your Creative Cloud account and continue working on the file in Photoshop.
System Requirements for PC and macOS
For the best Photoshop experience, make sure that you have a reliable internet connection and that your computer meets the minimum system requirements.
Windows with Multicore Intel or AMD Processor
| OS | Windows 10 (64-bit) or later |
| RAM | At least 8 GB, although 16GB+ is ideal |
| Graphics Card | GPU with DirectX12 support and at least 1.5 GB of free memory |
| Monitor Resolution | 1280 x 800 with 100% UI scaling |
| Available Space on Hard Drive | 4 GB to run Photoshop, plus additional space for the installation |
Windows with ARM processor
| OS | Windows 10 (64-bit) or later |
| RAM | 8 GB |
| Graphics Card | 4 GB |
| Monitor Resolution | 1280 x 800 with 100% UI scaling |
| Available Space on Hard Drive | 4 GB to run Photoshop, plus additional space for the installation |
macOS with Multicore Intel Processor
| OS | Big Sur (11.0) or later |
| RAM | 8 GB |
| Graphics Card | Must have at least 1.5 GB of GPU memory and Metal support |
| Monitor Resolution | 1280 x 800 100% UI scaling |
| Available Hard Drive Space |
4 GB to run Photoshop, plus additional space for the installation |
macOS with ARM-based Apple Silicon Processor
| OS | Big Sur 11.2.2 or later |
| RAM | 8 GB |
| Graphics Card | Must have at least 1.5 GB of GPU memory and Metal support |
| Monitor Resolution | 1280 x 800 100% UI scaling |
| Available Hard Drive Space | 4 GB to run Photoshop, plus additional space for the installation |
How to Remove Photoshop From Your Computer
In the (unlikely) event that you decide that Photoshop isn’t the best choice for you, there are 2 easy ways to completely delete Photoshop. The first way is through the Creative Cloud app.
- Go back to the Creative Cloud app and find the Photoshop logo.
- Click on the three dots and then UNINSTALL.
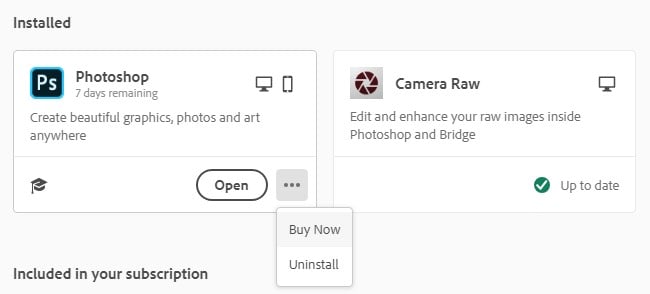
![Remove Photoshop with Creative Cloud]() Creative Cloud can uninstall Photoshop
Creative Cloud can uninstall Photoshop
The second method is to delete Photoshop directly through Windows.
- Start typing Add or Remove Programs in the Windows search bar.
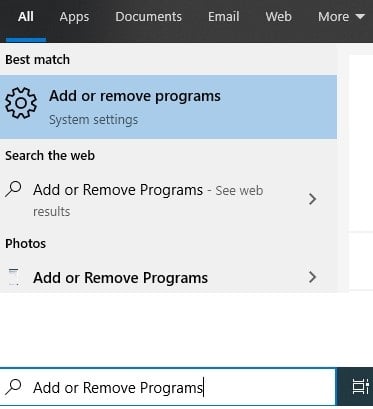
![Remove Photoshop from Windows]()
- Scroll down to Adobe Photoshop and click uninstall.
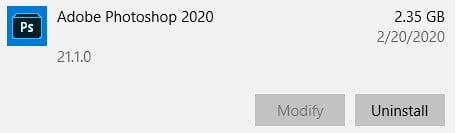
![Uninstall Photoshop]()
Additional Adobe Creative Cloud Apps
There are more than 20 apps in the Creative Cloud that can be used to create, edit, and produce professional photography, design, video, web, UX, and more. Here are just a few of the most popular apps you can download.
- Illustrator: A must-have program for any graphic designer. Illustrator is a vector-based design studio that you can use to create logos,, banner ads, book illustrations, web designs, and more. Since the program uses vectors instead of pixels, you can enlarge your designs without affecting the quality.
- InDesign: Design the layout and page design for print and digital media with the intuitive InDesign software. It has all the tools and fonts needed to create professional graphic designs.
- Premiere Pro: Use the multi-track editing software to produce videos for film, TV, and the internet. Premiere Pro has all the editing tools needed to add special effects and audio clips to your work, and it’s easily integrated with Adobe Creative Cloud apps, to easily include your work into the video clips.
FAQ
How to resize an image in Photoshop?
There are a few different ways to resize an image. One option is to choose one of the selection tools and drag the corners of the image until you get the size you want. However, this can stretch or distort the image, especially if you’re not sure what you are doing. Another option is to go to the image layer, and select Image Size. Then, in the Fit To drop-down menu, choose a size or enter the desired width and height. If you want to ensure that the image’s proportions don’t change, click the chain link icon next to Width and Height. If you want to change the aspect ratio, click the icon to unlink the width and height.
How to remove background in Photoshop?
Photoshop has several tools for removing background, depending on the complexity of the patterns. Some backgrounds, like changing the sky, can be done quickly using photoshop’s AI capabilities. This will remove the sky in your image and you can choose a replacement that looks better. Other backgrounds require precision selection tools or the magic wand. Here are the steps for using these tools.
To remove a background using the Quick Selection Tool:
- Open the image in Photoshop.
- Select the Quick Selection Tool from the toolbar.
- Click and drag over the background to select it.
- Once the background is selected, press Delete to remove it.
To remove a background using the Magic Wand Tool:
- Open the image in Photoshop.
- Select the Magic Wand Tool from the toolbar.
- Click on the background to select it.
- Once the background is selected, press Delete to remove it.
To remove a background using the Select and Mask workspace:
- Open the image in Photoshop.
- Go to Select > Select and Mask.
- In the Select and Mask workspace, use the tools and features to make a selection around the object in the foreground.
- Once the selection is complete, click OK to apply the changes.
How to add fonts to Photoshop?
While Photoshop has an impressive library of fonts and styles, if you need or want a font that is not available, you can download it and install it to your computer. Next, go back to your Photoshop interface and select the Horizontal Text tool. You will see your newly installed font in the menu bar at the top.
How to change background color in Photoshop?
There are few different ways to change the background color of an image using Photoshop. It’s important to remember that. If you have a layer selected, the background color will be applied to that layer. Otherwise, the background color will be applied to the entire image. The most basic option is to follow these steps:
- Open the image in Photoshop.
- Go to Image > Image Properties.
- Click on the Background Color swatch to open the Color Picker dialog box.
- Select the desired background color.
Another option is to use the improved gradient tool to create a gradient background. To do this, select the Gradient tool from the toolbar and set the foreground and background colors to the desired colors. Then, drag the Gradient tool across the image to create the desired background colors. If you want to change the background color of a transparent image, you will need to add a new layer before you can fill it with color. To do this, go to Layer > New > Layer, and then follow the steps above.
How to resize a layer in Photoshop?
It’s easy to change a single layer or a group of layers, without affecting the entire image or other layers. This feature is important for a variety of graphic design and photo editing projects such as resizing text, adjusting the perspective, or getting the perfect balance for all your layers. One way to resize a layer is to input your preferred dimensions in the layer’s Width and Height fields located in the options bar.
If you’re not sure of the dimensions, or prefer to manually resize it, so you can see how it will look, select the layer that you want to resize and then go to Edit > Free Transform. Then, drag the handles on the corners of the layer to resize it and press Enter to accept the changes.
It’s important to note that resizing an image multiple times can affect its quality. One solution is to use Smart Objects to resize a layer. This will maintain the high quality image without destroying pixels.
Is there an unlimited free version of Photoshop?
Is there a Photoshop for beginners?
Can I buy Photoshop or do I need to make monthly payments?
If Photoshop is in the cloud now, do I have to be online to use it?
Can Photoshop open RAW images?