How to Cancel Adobe Lightroom & Get a Full Refund in 2026
Reading time: 13 min
Last Updated: Jun 2, 2026

I tested the Adobe Lightroom refund policy and was happy to receive a complete refund when I canceled my account, thanks to a proven 14-day money-back guarantee.
Adobe Lightroom is a top-notch image editing software. Its powerful tools are ideal for pictures taken by cameras and smartphones. However, it doesn’t necessarily have professional-grade graphic design features like other digital editors. Since it isn’t for everybody, I had to test the 14-day money-back guarantee to ensure that you don’t get stuck paying for software that has no value for you.
If you’re still looking for another digital editing software, I recommend checking out Luminar. It uses AI tools to make the same edits as Lightroom, only faster. It also doesn’t hurt that Luminar is significantly less expensive than Lightroom, and comes with a 7-day free trial.
Before I tell you about Luminar and other Lightroom alternatives, I’ll show you how to cancel your Lightroom account and get a full refund. The process is quick and easy, as long as you follow the instructions below.
Quick Guide: How to Cancel Lightroom and Get a Full Refund
- Log in: Visit Adobe.com and log in to your account.
- Account settings: Open the Help and Support section, and choose the Manage Plan option.
- Cancel Plan: Open your Lightroom subscription plan and cancel your account.
Step-By-Step: How to Cancel Adobe Lightroom
Adobe has a hassle-free 14-day money-back guarantee. It’s a great policy as it lets you test the software risk-free. If you see that Lightroom isn’t the right program for you, just cancel your account and get your refund without having to speak with a customer service agent or explain why you’re not happy with the software.
- Log In to the Adobe Website: There is no option to cancel your subscription through the Lightroom or Creative Cloud app. The only way to cancel an account is to open the Adobe.com website and log in to your account.

![]()
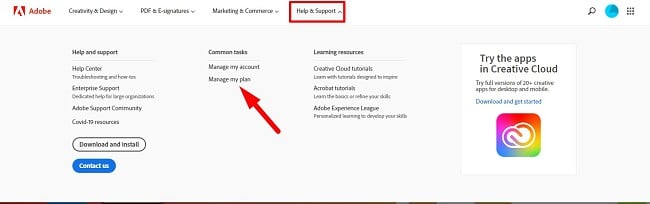
- Help & Support: Find the Help & Support option on the menu bar at the top of the page. A drop-down menu will open with several different help and support actions. Click on the Manage Plans link, and a new page will open with all your Adobe subscriptions.
![]()
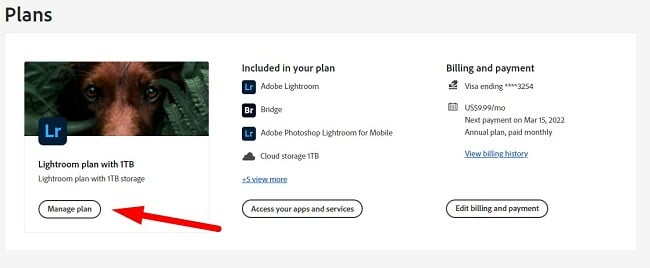
- Manage Plans: You will see a separate section for each of your Adobe subscriptions. Find Lightroom and click on the Manage Plan button located under Lightroom.
![]()
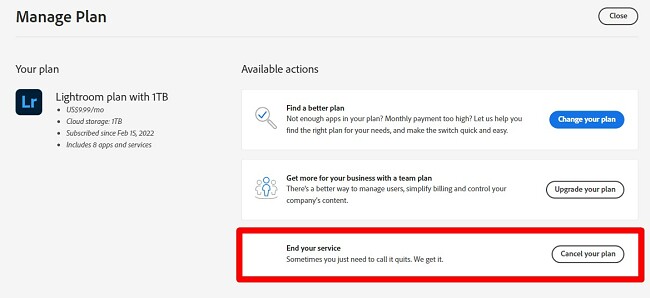
- Cancel Your Plan: There are a couple of actions that you can take to manage your Lightroom plan. Click on the Cancel Your Plan button to begin the cancelation process.
![]()
- Give a Reason: While this is a no-questions-asked asked money-back guarantee, Adobe still asks for feedback as to why you’re canceling your account. This has more to do with improving the services than convincing you to stay. You can choose any of the answers and click Continue. The reason given won’t affect your refund status.

![]()
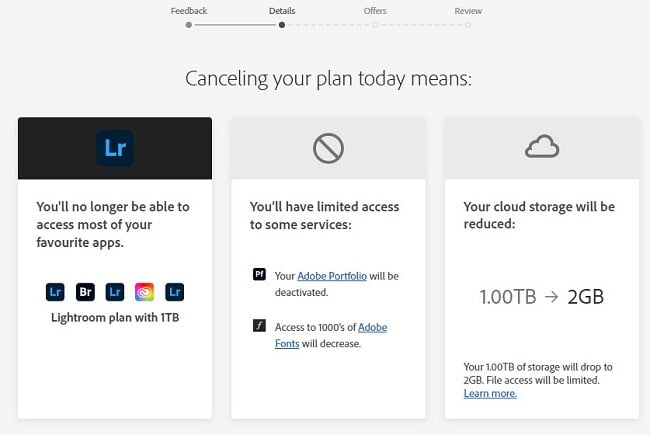
- Confirm: Before you cancel your account, it’s important to understand that you will instantly lose access to Lightroom. Additionally, your Creative Cloud storage will be reduced from 1TB to 2GB unless you have other Adobe subscriptions. Click Continue to proceed.
![]()
- Last Chance Offer: Lightroom will give a selection of last chance deals if you’re not sure about canceling your account. If you still want to cancel, click the No Thanks button.
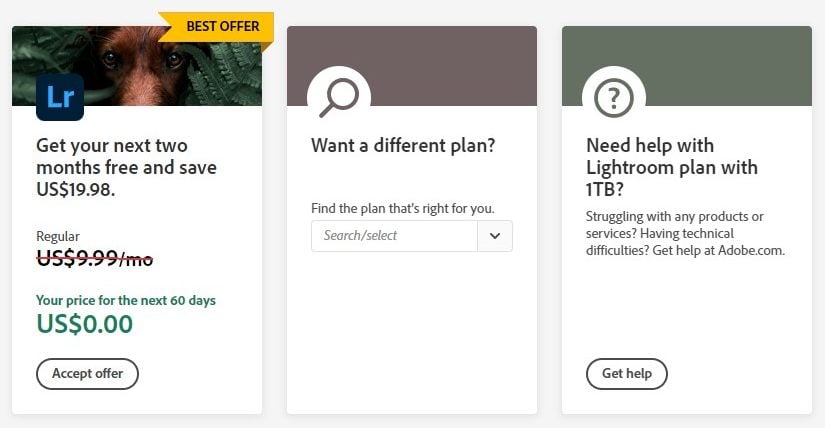
![]()
- Review: You are just about done with the cancelation process. Review the terms of cancelation, which include a complete refund if canceled within 14 days of purchasing the subscription. If you’re canceling the account after 14 days, you may still be eligible for a partial refund, although you will have to pay a cancelation fee. Press the Confirm button to cancel your account officially.
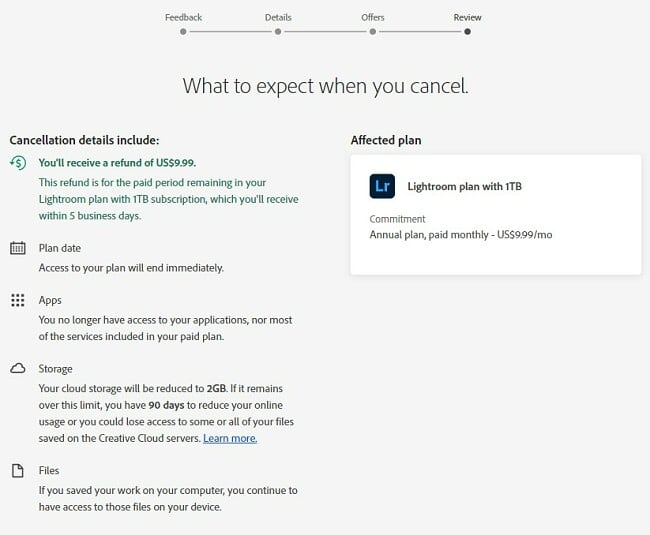
![]()
- Refund Confirmation: The confirmation page will open with a list of all the free Adobe apps that you can still use. It will also confirm the refund, which will be returned to your credit card within 5 business days.

![]()
Best Alternatives to Adobe Lightroom (Tested in 2026)
1. Luminar: Professional-Grade Digital Editing Tools and AI Auto Corrections

- Easy to use sliders make changes in real time
- Remove and replace the background with a single click
- Delete unwanted objects or people in the background
- Seamlessly add AR objects to enhance the picture
- Excellent selection of professional digital editing tools
- 7-day free trial
Luminar makes it easy to alter and improve digital images with incredible AI capabilities. Of all the editing software I tested, it was by far the easiest to learn and master.
The workstation is nicely organized, with all the tools docked on the right side and no unnecessary clutter. Luminar has advanced tools that can automatically recognize areas of improvement in your pictures, such as too much noise, glare, or exposure issues, and correct it with the click of a button. It’s extremely easy to use, and you don’t need a background in digital editing or graphic design to master the different tools quickly.
Most of the tools work by adjusting a slider to the right or left. You’ll see the changes applied in real-time, and if you don’t like how it looks, just adjust the slider until it looks perfect. The tools are divided into four categories:
- Essentials: All the basic photo editing tools that are needed for cropping, rotating, adjusting or removing colors, and adding structure are located here.
- Creative: Use your imagination to improve your pictures with filters such as adding sun rays, changing the sky, adding AR objects like hot air balloons, and more.
- Portrait: Glam up your pictures by removing skin blemishes, adjusting facial features, hairlines, body sizes, and adding bokeh filters that blur the background to put the focus on the main subject.
- Professional: Photographers and graphic designers will appreciate these professional-grade tools for editing any picture.
Luminar has a good selection of free and premium AI templates that automatically adjust your pictures. The template examines the pixels to recognize colors and can determine what areas need to be fixed or adjusted, and then it quickly applies the changes. These edits are non-destructive, so if you’re not happy with the outcome, you can revert back to the original picture and try a different template.
You can see in the example below, I took a picture of the sunset over the sea, and the glare of the sun is washing out the beauty and the colors from the water.
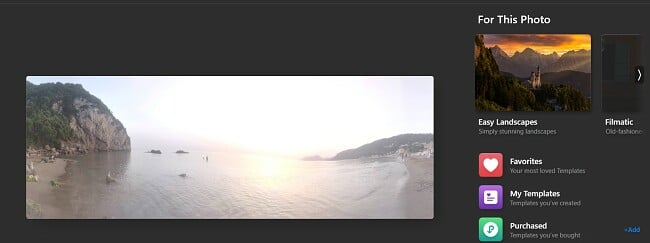
I added a template that reduced the glare and enhanced the colors. I like that the adjustments are subtle, so it doesn’t even appear that the picture has been manipulated.

The tool that removes unwanted objects and people from pictures has made it easier for me to take pictures with my wife, who likes to wait until there is no one around before taking the picture. Now, we can just upload the picture to Luminar, highlight the people we want to remove, and Luminar does the rest. Not only was it easy, but the results were very natural.
Whether you’re aiming to alter facial features, adjust colors, or any other modifications, Luminar makes every task straightforward. Each tool is equipped with a slider – simply shift it to the right or left until you achieve the outcome you want. If the result doesn’t meet your expectations, you can easily revert the slider to the center with no negative consequences.
When you buy Luminar, you can bundle it with other software that gives you even more editing tools, templates, and filters. Unlike Lightroom, which requires monthly payments, Luminar is a one-time purchase for a lifetime plan. The plans start with a 7-day free trial, and then you get a 30-day money-back guarantee, so you’ll have plenty of time to evaluate the software and ensure that it’s for you.
2. DxO PhotoLab: Fast RAW Processing and Intuitive Tools

- High-quality digital editing tools
- Automatic lens and image correction
- Fast processing of RAW images
- Machine Learning Programs uses AI for some edits
- Fully customizable workspace
- 30-day free trial
DxO PhotoLab has quickly become one of the better photo editing software programs. With its latest release, PhotoLab has updated its features and improved processing time for RAW images by as much as 1.6x.
Getting started is easy. You can customize your workstation by selecting the tools that you will be using most often, so you don’t have to waste precious time searching for them.
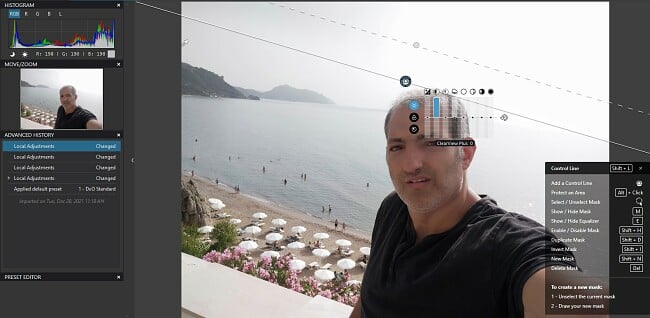
PhotoLab has a unique editing tool called “U Point.” It is an intuitive tool that makes editing large sections, such as the sky or background of a picture easy.

Choose a Control Point or Control Line and highlight the area you want to edit, and the AI technology uses it as a reference point for the edit. You can also select a radius around your Control Point, and U Point will examine the pixels, colors, and text in that area to make edits that maintain the image’s natural look. Other features of U Point include automatically adjusting the colors, adding shadows, fixing over or underexposed images, and much more.
With the release of the latest version of PhotoLab, DxO introduced DeepPRIME, a tool that works with RAW images. One of the significant improvements over the previous tools, known as PRIME, is that the processing time can be sped up by as much as 1.6x.
In addition to photo editing, DxO PhotoLab is a great program for storing and organizing your photo collection. You can add meta tags, keywords, tag people, and store each album in a different folder. There is also a built-in search engine that can find images based on the ISO, date of upload, and aperture.
There is a slight learning curve when it comes to some of the advanced tools, but DxO gives new users a free 30-day trial to help them get comfortable with PhotoLab before they have to commit to a subscription.
3. Adobe Photoshop: Comprehensive Collection of Digital Editing Tools

- Multiple selection tools allow you to be precise in your edits
- AI tools can fix lens blur
- Two tools for adjusting facial features
- Content-aware tools allow you to expand images
- Large selection of fonts and text overlay styles
- 14-day money-back guarantee
If you’re looking for more powerful editing tools than Lightroom or DxO PhotoLab, then you can’t go wrong with Adobe Photoshop. It is the gold standard when it comes to digital editing. The only problem is that it has so many advanced features it can take a long time to master. It can overwhelm someone who is simply looking to make small edits or enhancements to a digital picture.
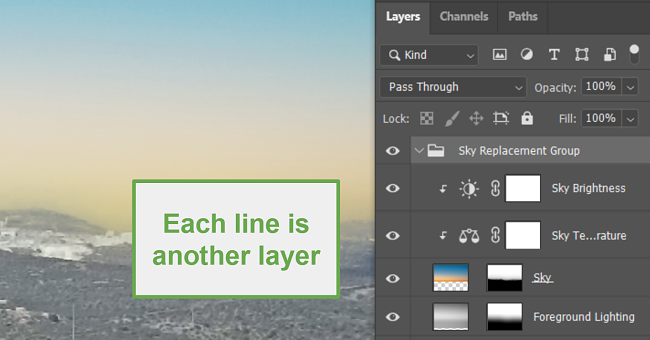
Photoshop is a layer based editing program. This means that you can work on each element, whether it’s an image, text, shadowing, or color, without affecting the other elements on the page.
Photoshop recently released some AI neural filters that can apply automatic upgrades to pictures, such as adjusting face and body size, expressions, removing blemishes, and adjusting skin tones.
We provide a range of tools in Photoshop aimed at enhancing and adjusting images. One notable feature is a specialized filter designed to remove blur from shaky photographs. Utilizing an intelligent algorithm, this filter identifies the direction of shakes in the image and effectively straightens and clarifies the photo.
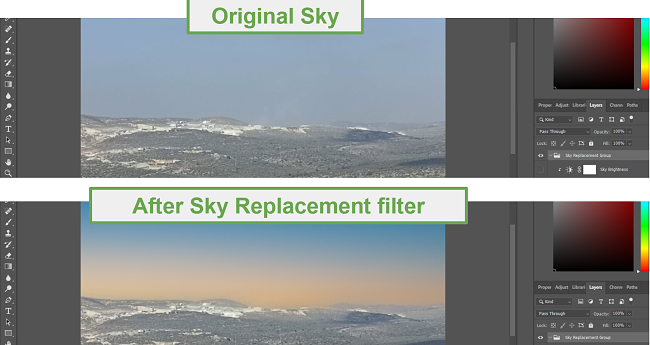
There is also a sky replacement tool, although it is not as advanced and easy to use as Lightroom or Luminar. There are some tools that allow you to adjust your new sky and add or remove clouds, including a sunset, or as in the example below, add color to make a beautiful sunset.
Photoshop has the same 14-day money-back guarantee as Lightroom. In fact, you can even bundle the two programs together, and if you’re not happy with them, cancel your subscription and get your refund.
Adobe Lightroom Money-Back Guarantee Policy
The 14-day money-back policy is a great way to test Lightroom and see if it’s the right program for you. The policy is applicable to both monthly and annual prepaid subscriptions. Canceling the account is a quick and easy process, and the refund is automatically applied, provided you follow the steps listed above.
It’s important to realize that the 14-day guarantee starts the minute you subscribe to the plan. This means that if you purchase the account at 10:00 AM on the 4th of the month, you won’t be able to claim a refund at 11:00 AM on the 18th. You can contact customer support and plead your case, but that will be judged on a case-by-case basis.
The refund policy is extended if you purchased an annual subscription with monthly payments. However, you will have to pay a cancelation fee of 50% of the remaining balance on your account. This is because of the steep discount you get when buying the annual package.
FAQ
How do I cancel and get my money back from Adobe Lightroom?
Can I cancel Adobe Lightroom anytime?
How long does Adobe Lightroom take to issue a refund??
The Bottom Line
I really enjoyed using Adobe Lightroom. The photo editing features were very easy to use, and it integrated seamlessly with other Adobe Creative Cloud apps, which allows for endless creative potential. However, I recognize that there are other digital editing programs out there that come with more budget-friendly subscription choices and a wide range of features. That’s why I was delighted to find out that Adobe Lightroom provides a simple cancellation procedure and makes getting a refund a smooth experience.
If you cancel your subscription and want to try a less expensive digital editor, check out Luminar and try it free for 7 days. It has advanced AI editing features that use templates to correct common errors and enhance the image colors. The edits are non-destructive and can be achieved by moving a slider to the right or left.
In addition to the free trial, Luminar has a 30-day money-back guarantee, so you can really test the software for yourself for an extended period of time.


Leave a Comment
Cancel