DNS Leaks: Ultimate Guide to Finding and Fixing them in 2026
Reading time: 16 min
First published: Feb 23, 2019
Updated 3 times since publishing

The term “DNS leak” is something many VPN users see used on a regular basis, but only a small percentage knows what this actually entails – most just know it as something that’s not good, and that a VPN should be able to prevent it (ideally).
With that said, a full comprehension of how DNS works, what DNS leaks are, and the many ways to prevent them is much more helpful, and puts you in a better position to make sure your connection is always secure.
Quick navigation:
- 01 What is DNS?
- 02 How DNS Works
- 03 DNS in Action
- 04 How Important is DNS?
- 05 DNS Leaks, Explained
- 06 How Do I Know if I have a DNS Leak?
- 07 A Faulty or Improperly Configured Network
- 08 Transparent DNS Proxies
- 09 IPv6 Leaks
- 10 How to Prevent Future DNS Leaks
- 11 Issues with Windows 8.1, 8, or 10
- 12 The Teredo Windows Feature
- 13 If Necessary, Switch Your VPN
So, let’s start by defining what DNS really is and go from there. Editor’s Note: We value our relationship with our readers, and we strive to earn your trust through transparency and integrity. We are in the same ownership group as some of the industry-leading products reviewed on this site: ExpressVPN, CyberGhost, Private Internet Access, and Intego. That said, our detailed reviews follow a strict methodology that examines all relevant performance factors to help you arrive at your own informed conclusion.
1 What is DNS?
DNS is an acronym for Domain Name System. At its most simple definition, DNS is what converts a domain name into the actual IP address when using the Internet.
For example, we know Google.com as Google.com, but the actual IP address of Google’s site is a series of numbers, since computers and networks can only communicate using numbers. DNS is what saves us from having to memorize long sets of numbers as website URLs, using their names instead.
Without DNS, every website address would basically look like a really long and complicated phone number. This is actually how the Internet was before a man named Paul Mockapetris came up with DNS in the early 1980s (thanks Paul!)
Wondering what all this has to do with your online privacy? Bear with me for a bit longer.
2 How DNS Works
Okay, so DNS links IP addresses to their respective domain names; this is a process in and of itself, with the info being stored on nameservers.
These special servers store DNS records, which is really just a tiny file that links the IP to its domain name. Nameservers are located all around the world, and each set is responsible for storing an assigned top-level domain, also known as a TLD.
For those who don’t know what a TLD is, it’s the final part of the domain name, such as .com, .net, .gov, .edu, etc.
3 DNS in Action
Now that you know what a DNS is, and what it does, let’s see the process in action.
When you type in a domain name and hit ‘enter’, your browser will first query your local resolving name server and “ask” if it has its DNS records in a cache.
That resolving name server is usually your ISP (Internet Service Provider). If the domain is a popular site like Google, it will already be in the cache, making the process short.
If that domain name and IP isn’t cached, the resolving name server will then query the root nameservers for the TLD for that domain, which then directs it to the provider in charge of it, and then relays back to your browser. This all happen in milliseconds.
4 How Important is DNS?
In many ways, this allows China to have their own Internet, keeping all traffic “in-house,” as every DNS query remains within the country’s own network, allowing the government to monitor (and censor) any and all traffic using this default DNS.
Perhaps unsurprisingly, Russia has been building momentum to do the same. The country has been planning several DNS tests already, with many speculating that their ultimate goal is to do what China has done, but do so under the guise of “guarding against foreign attacks” in case another country tries to disrupt the country’s Internet as a whole.
In the end, Russia’s government will likely control their own DNS network – and the entire country’s Internet.
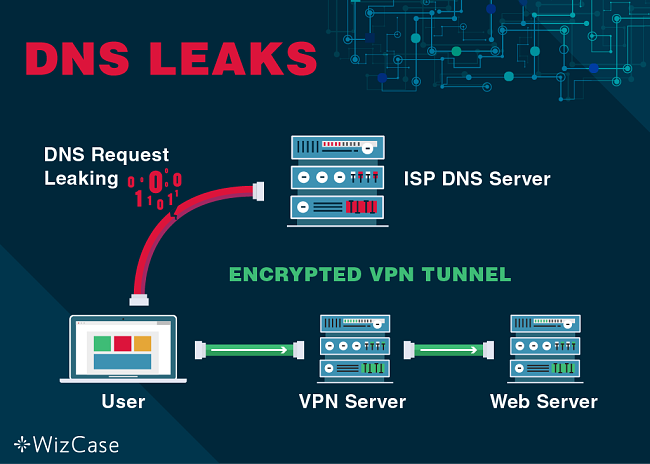
5 DNS Leaks, Explained
So here’s where DNS relates to your online privacy.
When using the Internet in a normal fashion – and without the use of a VPN – whenever you navigate to a certain domain name, your ISP can see it.
ISPs and DNS servers retain data about their users, while keeping info about which of your IP addresses made requests to a host. If your own DNS provider can watch and store this information with their servers, there is always an inherent risk of a DNS leak.
So, what is a DNS leak? It is a problem which occurs in a network configuration and results in quick loss of privacy as it sends DNS queries through unprotected channels instead of using your VPN connection.
Here’s how the process usually goes:
- Open a browser window.
- Type “Google.com“.
- Your ISP DNS servers then retain the following information:
- Your computer’s IP address.
- The target hostname.
- The target server IPs.
Bottom line, a DNS leak is a both a privacy and security concern, as any queries are sent using a DNS request through an unencrypted network. This can sneak up on VPN users who otherwise think they have ensured their privacy by using the VPN.
When you use any reputable VPN service, the DNS request is routed across the VPN tunnel to the DNS servers in your VPN instead of those in your ISP. By doing this, you will remain anonymous as you surf the web.
However, should your VPN have a DNS leak, you will no longer enjoy the anonymity, and your ISP will be able to see exactly what you’re doing online.
This situation makes your VPN worthless when it comes to privacy. I’ll say it again: if you use a VPN that allows DNS leaks, you might as well not even use it; it’s practically pointless. Ensuring that your DNS is not leaking is essential to an effective and viable VPN.
6 How Do I Know if I have a DNS Leak?
The majority of VPNs don’t have some beacon that goes off and tells you when there’s a DNS leak. You have to do this check yourself, and this can be done a number of ways.
The easiest way is to simply visit a DNS leak test site, such as DNSLeakTest.com. Just head over on your browser, take either the simple or extended test, and go from there.
You can also run a test using a command line, and by utilizing Akamai, one of the world’s biggest web content traffic providers.
Simply run: nslookup whoami.akamai.net
Ideally, the result will show the IP address of your VPN provider – not your local ISP allocated IP.
7 A Faulty or Improperly Configured Network
This is arguably the most common cause of DNS leaks especially if you access the internet using different interfaces. For example, if you’re using your home router, public hotspots, or a WiFi coffee shop connection then before you can open the encrypted tunnel in your VPN, the device will first connect to your local network.
Now, once you ignore the proper settings, you leave yourself open to various data leaks. We discovered that the protocol which determines your device’s IP address within your network automatically assigns a DNS server to deal with all your browsing requests. Such a server is not always safe, and once you use your VPN, your DNS requests will bypass any encrypted tunnel causing DNS leaks.
Some software programs, like Windows, has their default settings to send the request to the ISP’s DNS servers instead of using your VPN tunnel. That’s why it’s essential to perform a thorough DNS leak test to ensure that you recognize all the IP numbers.
Editor’s Note: Transparency is one of our core values at WizCase, so you should know we are in the same ownership group as ExpressVPN. That said, our detailed reviews follow a strict methodology that examines all relevant performance factors to help you arrive at your own informed conclusion.
8 Transparent DNS Proxies
A newer privacy threat that has emerged involves what’s known as transparent DNS proxies.
There are now several ISP’s that now use these. Transparent DNS proxies allow ISPs to intercept DNS lookup requests, which basically makes you use their DNS service for any queries.
This can happen even if you have altered your settings to use an ‘open’ DNS service like OpenDNS. So, if you think that your DNS queries are not being sent to your ISP’s DNS server when using one of these services, be aware that they still can because of this.
Again, using a VPN with no DNS leaks will prevent this.
9 IPv6 Leaks
Although this is not technically a DNS leak, we feel it’s appropriate to address the perils of an IPv6 leak, which is sneaking up on more and more people unknowingly.
For those not yet aware, IPv6 is the newest version of internet protocol, which is currently IPv4 for many people and devices. Although first developed in 1998, IPv6 is still rolling out slowly, even though it will eventually replace IPv4. IPv6 allows for more complex IP addresses, while also providing better speeds, security, and so on.
IPv6 is the default on many devices and operating systems, but when a connection using IPv6 interacts with IPv4, it can cause some concerns in terms of privacy, since the two can’t actually communicate directly.
Most popular VPN protocols were developed using IPv4, so that’s the connection you get when using one. When a user connected with a VPN tries to communicate with an IPv6 server or peer, their actual IP address can end up getting leaked, exposing the location of their computer or device. While IPv4 traffic goes through the encrypted VPN tunnel, any IPv6 traffic is left out in the open.
There are a few ways to address this.
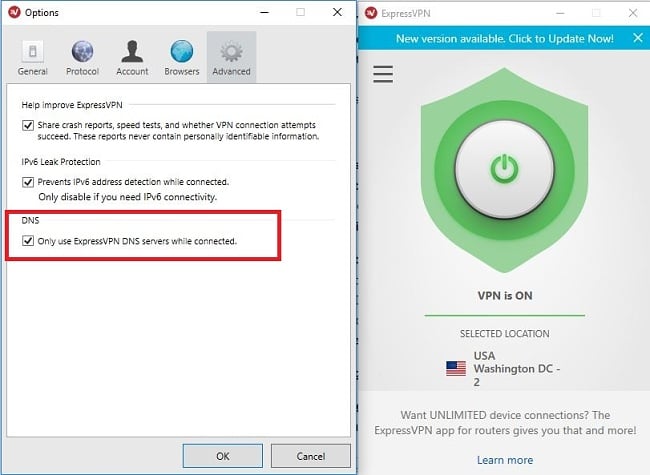
- One is simply choosing a VPN with verified IPv6 leak protection.
- The other is to disable IPv6 on your operating system, or simply disable IPv6 traffic on your router. Refer to your operating system or router’s manual for how to do so, it’s a fairly simple process either way. If you negate to address IPv6 security in addition to DNS leaks, your Internet activity will still be visible.
10 How to Prevent Future DNS Leaks
Now that you know what DNS leaks are, and the threats to your privacy they pose, listed below are several different methods you can take to guard against any DNS leaks in the future. These range from directly changing your default DNS server, to using the right VPN.
Changing Your DNS Server
There are actually several ways to completely change your own DNS server for any computer or device, allowing you to choose your own. This includes a choice of several DNS servers as well. Unfortunately, many of these DNS servers – many of which bill themselves as better options that allow for “free thought” due to their ability to bypass geoblocks and censors – still leave your DNS queries out in the open.
One of the few that doesn’t is OpenNIC, which you can read about at their site.
The most sweeping way to change your DNS server is simply to change it on your router, which will use the same DNS server for all your devices that run through it.
To do so, log into your router’s settings, scroll to the DNS settings, and enter in your preferred DNS address into the appropriate fields. Most routers will have three separate choices. To prevent leaks, enter in your preferred DNS into the first two fields, and for the third option, enter “10.0.0.0”, which will block your IP if it tries to use it. Otherwise, it would use your ISP’s default DNS server, which is obviously not what you want in this situation.
You can use this process on individual devices and computers as well, but again, doing it to your router will take care of any device connected in your home.
Using a VPN Monitor
Although this is typically reserved for corporate and business use, you can always use VPN monitoring software to keep tabs on your VPN connection, which includes monitoring DNS leaks, IPv6 leaks, and so on.
These monitors can send you real-time alerts of any security concerns, and also track the overall performance of your VPN in terms of speed. Again, this is often more of a solution for those in charge of large networks for a business, or one with multiple users.
Using a Firewall to Block any Non-VPN Traffic
One sweeping (yet complicated) way to avoid any non-VPN traffic and bypass DNS leaks is to completely block any traffic not routed through a VPN by using Windows firewalls.
You’ll have to do this for each program that uses the internet, such as a browser, download manager, etc. While this is a little more hands-on, it does provide an added sense of security and assurance that your connection will never be revealed by accident.
- Connect using your VPN, and then open the Network and Sharing Center.
- You’ll see two networks under “View Your Active Networks“. This will be your VPN connection, and one called “Network“, which is your ISP Connection. If they aren’t already, make sure your VPN is set to “Public Network“, and the ISP connection set to “Home Network“.
- Open your Control Panel and then click System and Security. From there, open Windows Firewall. Click Advanced Settings, and make sure you’re logged in as the system administrator, otherwise you can’t change the necessary settings.
- You’ll now see a window called Windows Firewall with Advanced Security. Click on “Inbound Rules“. This will open the option for a New Rule. Clicking this will open New Inbound Rule Wizard. Choose Program, and then click Next.
- You’ll now need to select the program you wish to block all non-VPN traffic to, then click next. Now click on Block the Connection. Click on Domain and Private, and leave Publick unchecked. Do the same for Outbound Rules.
Now it’s time to test it all out. Open program you made the rule for, (likely your browser) and make sure it’s still working properly when the VPN is connected. Begin a file download, and then disconnect your VPN.
If things are set up right, the download should die immediately, rather than switching to your basic ISP connection and continuing. This is proof that the connection will only work via VPN.
If it works, repeat all of the above steps with any other program that uses your Internet, and you’ll be all set.
11 Issues with Windows 8.1, 8, or 10
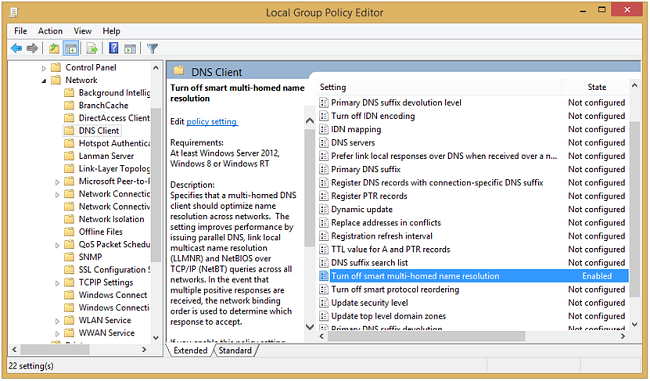
Windows operating systems introduced the “Smart Multi-Homed Name Resolution” tool, meant to boost internet speeds. It sends all DNS requests to the available servers, but initially, it would only accept DNS responses from non-standard servers if your favorites didn’t respond.
This is not suitable for VPN users as it profoundly increases the risk of DNS leaks. What’s even more shocking is that for Windows 10, such a feature will, by default, accept all responses from the DNS server which responds quickest. When this happens, the problem is not only in DNS leaks, but also, it leaves you quite vulnerable to spoofing attacks.
So, How Do You Fix This Issue?
This is arguably the most challenging type of DNS leak you’ll have to fix, especially if you’re using Windows 10. This is a heavily built-in feature of Windows that’s quite difficult to change. If you’re using a readily-available OpenVPN protocol, you stand at a higher chance of correcting this problem.
The Smart Multi-Homed Name Resolution can be manually switched off in the Windows’ Local Group Policy Editor. To do so, you’ll need to use the Windows Home Edition.
However, it’s important that we remind you that even when you turn it off, Windows will still send all your DNS requests to the available servers. That’s why we recommend using an OpenVPN protocol as it adequately addresses this issue.
12 The Teredo Windows Feature
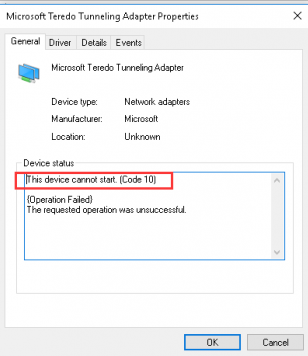
Unfortunately, for you as a VPN user, it’s just a glaring security loophole. Since it’s a tunneling software protocol, it continually takes precedence over the encryption tunnel of your VPN. It bypasses it and ends up causing a lot of DNS leaks!
The Ultimate Fix

netsh interface teredo set state disabled
Now, you may come across a few issues once you switch off Teredo but it prevents traffic from bypassing your VPN’s encryption tunnel keeping you ‘properly hidden’.
13 If Necessary, Switch Your VPN
This has been inferred already, but worth repeating again. Not every VPN is the same, and that’s in regards to more than just performance, price, security, etc. There are a ton of VPNs out there that do not offer any leak protection, be it IPv6, or DNS. Esto significa que aunque pienses que tu conexión y ubicación están ocultas, un pequeño descuido y puede ser revelado.
The best way to avoid this? Do your research on VPNs that offer adequate leak protection. All the VPNs that do provide this are always upfront about it, and sure to include it in their features. In many cases, a kill switch can help avoid leaking, but it’s not sufficient on its own – always seek out VPNs that provide true leak prevention. Only then can you be fully secure and private.
Final Thoughts
By noting the above problems, you can easily avoid DNS leaks in future. Again, keep in mind that if these problems go unsolved or unnoticed, your internet connection might never be safe even if you’re using a VPN.
It’s therefore crucial for you to check your system for DNS leaks to make sure that you are always protected, which starts by using a VPN with true leak prevention.


Leave a Comment
Cancel