How to Completely DELETE Your Facebook Account in 2026
Reading time: 19 min
First published: May 27, 2019
Updated 9 times since publishing

Deleting your Facebook account shouldn’t be a challenge. Unfortunately, as the company is reluctant to let its users leave, the process is very long-winded and complicated. Whether you want to take a break from Facebook or completely delete your account, this step-by-step guide will help you do it easily within just a few minutes. Editor’s Note: We value our relationship with our readers, and we strive to earn your trust through transparency and integrity. We are in the same ownership group as some of the industry-leading products reviewed on this site: ExpressVPN, CyberGhost, Private Internet Access, and Intego. That said, our detailed reviews follow a strict methodology that examines all relevant performance factors to help you arrive at your own informed conclusion.
Accounts Center Rollout
As of January 2023, Meta introduced the “Accounts Center” to users, changing how settings are managed across its apps such as Facebook, Instagram, and Messenger. This centralized hub is intended to simplify the control of settings and preferences across these platforms.
How to Access the Accounts Center:
- On Desktop: Click your profile picture in the top right corner to open “Settings & Privacy,” then select “Settings.” Look for “Accounts Center” at the top of the menu.
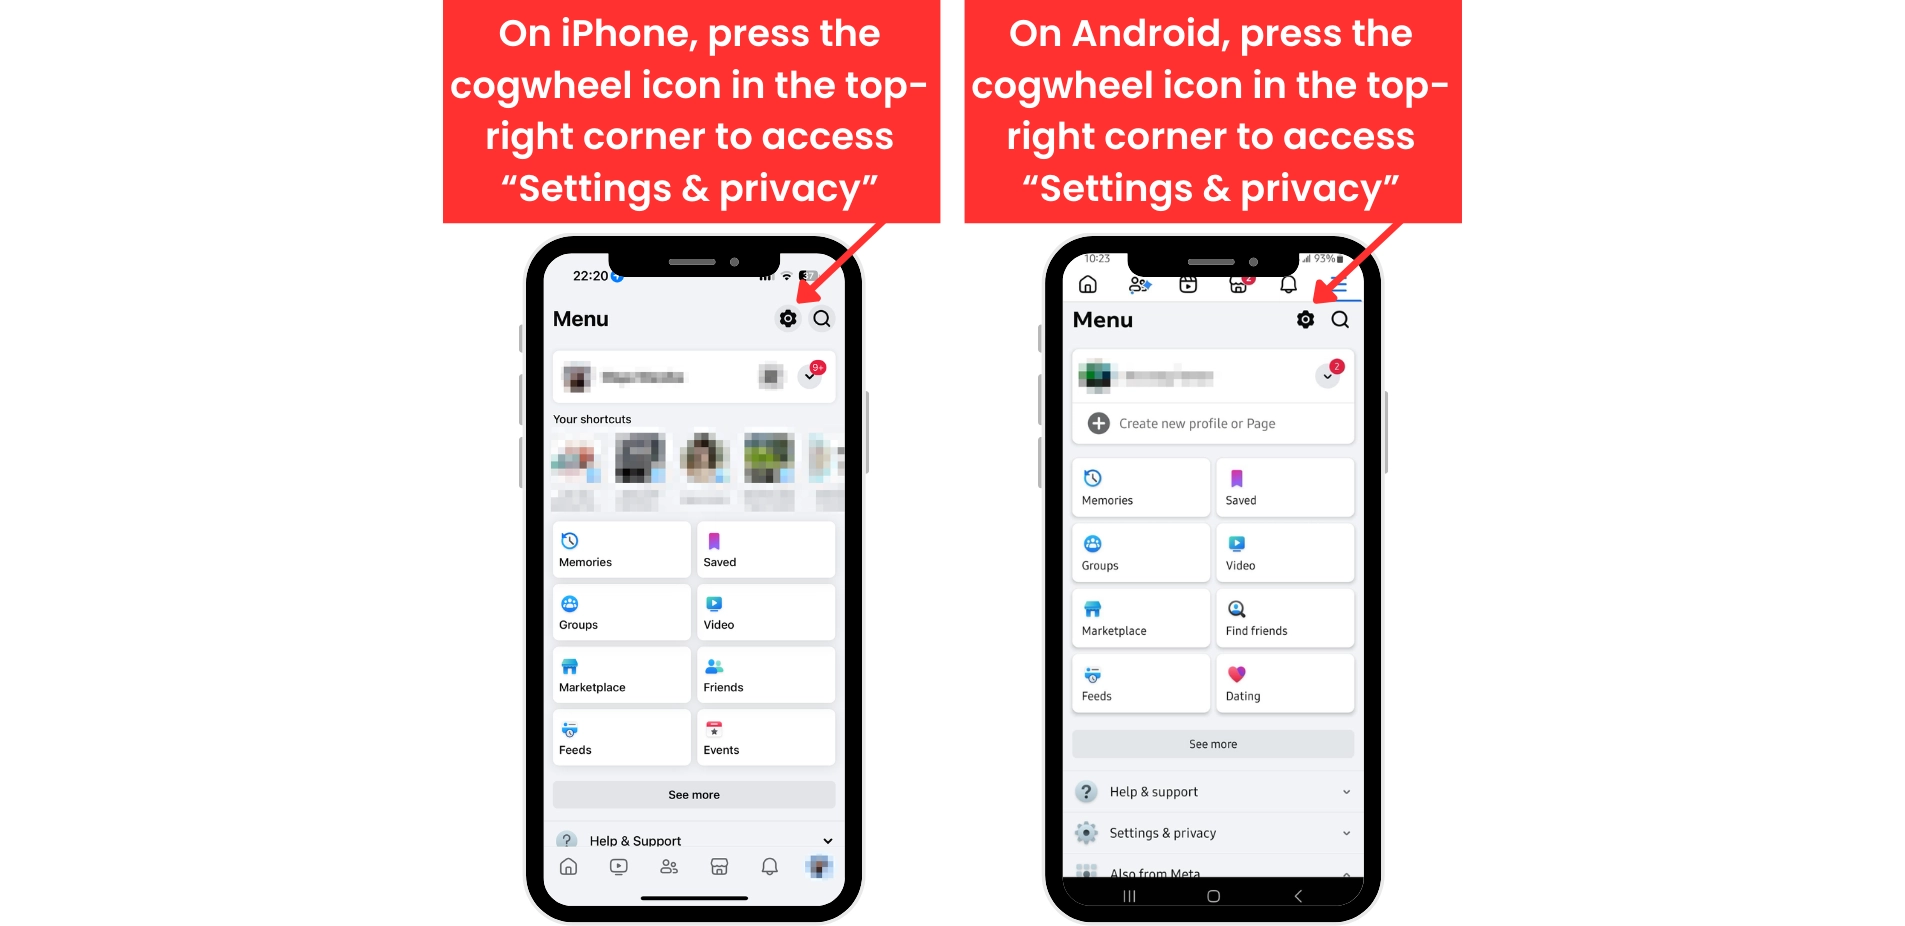
- On Mobile: Tap the hamburger menu icon (in the bottom right corner of the app on iPhone, or top right on Android), open the “Menu,” then tap the cogwheel icon in the top right to access “Settings & privacy.” “Accounts Center” will be at the top of this menu.
How to Permanently Delete Your Facebook Account
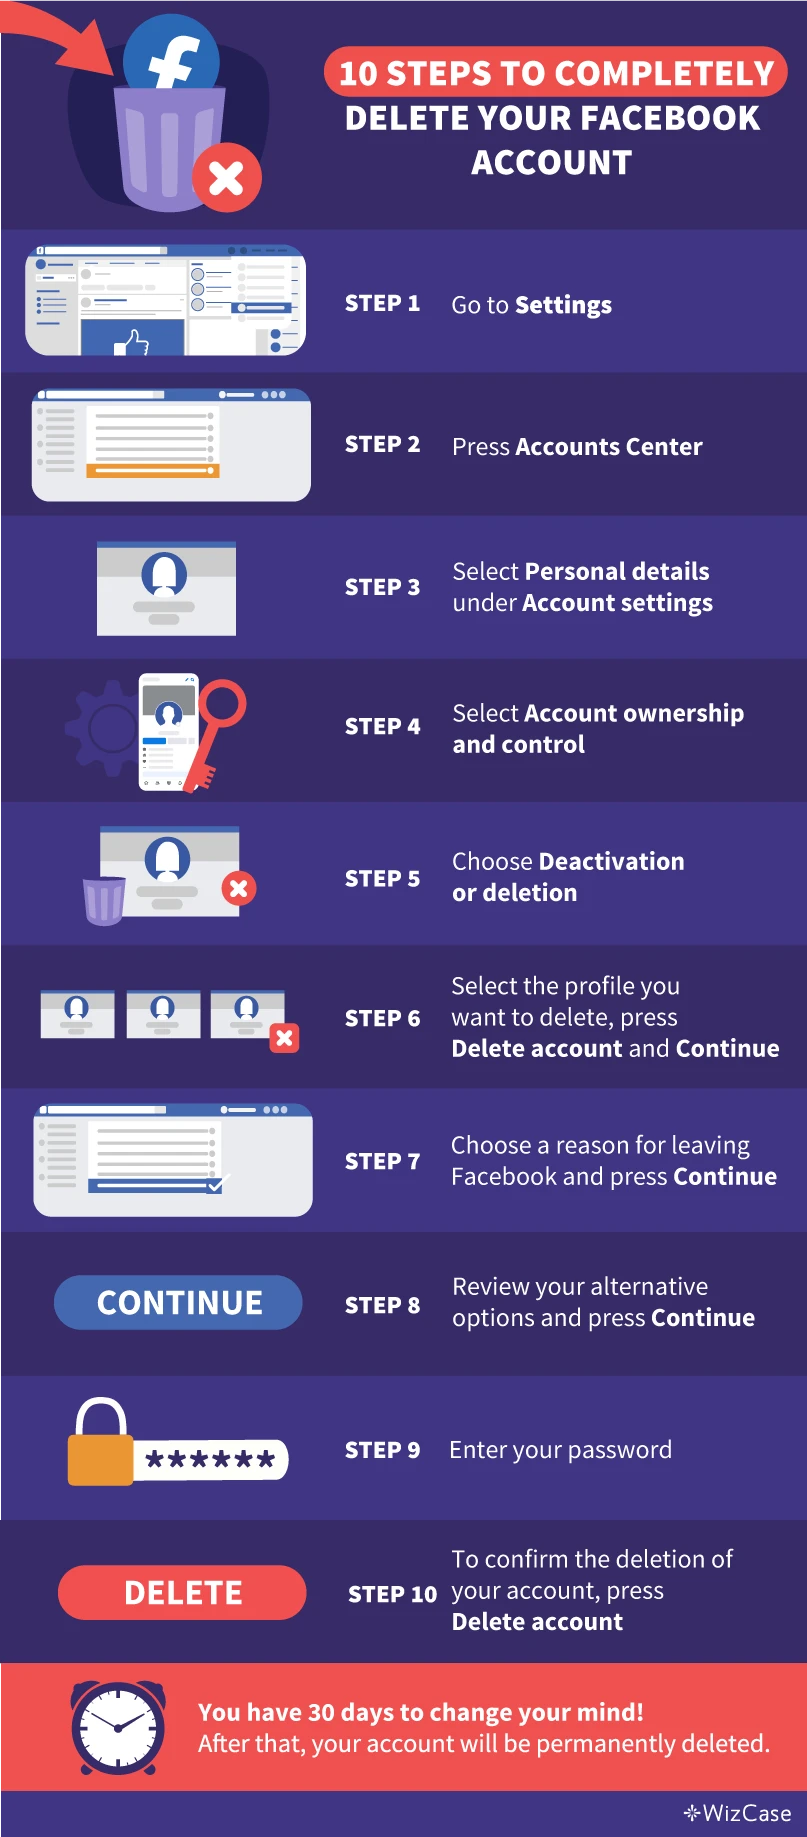
Important! Facebook offers a 30-day grace period for every user wanting to delete their account. Within this period, you can log in to your profile or any third-party app linked to your Facebook account (like Candy Crush or Spotify) and reverse the deletion process.
You can take precautionary steps before you decide to permanently delete your Facebook account, like restricting who can view your profile or regularly removing cookies collected by the platform. They won’t fully secure your data, but if you’re not ready to quit Facebook yet, these extra safety measures will ensure only the most essential information is stored on the servers.
How to Delete Your Facebook Account on Desktop and Mobile
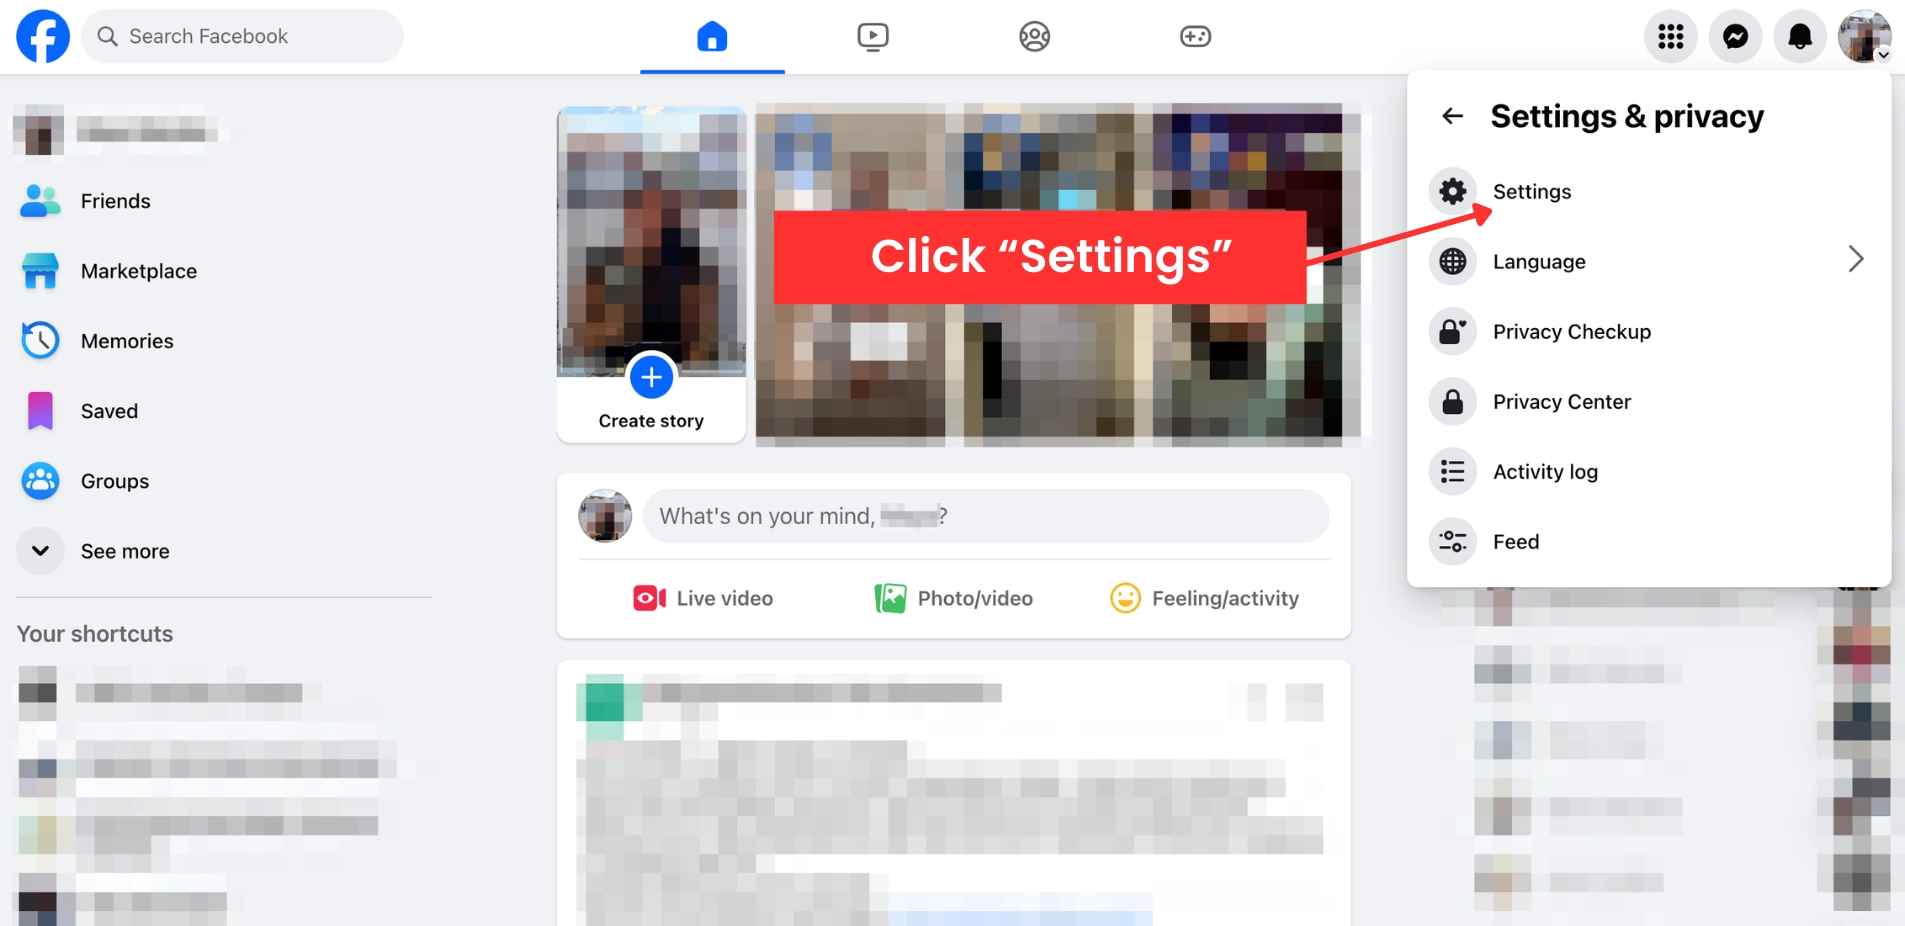
- Access “Settings & Privacy.”
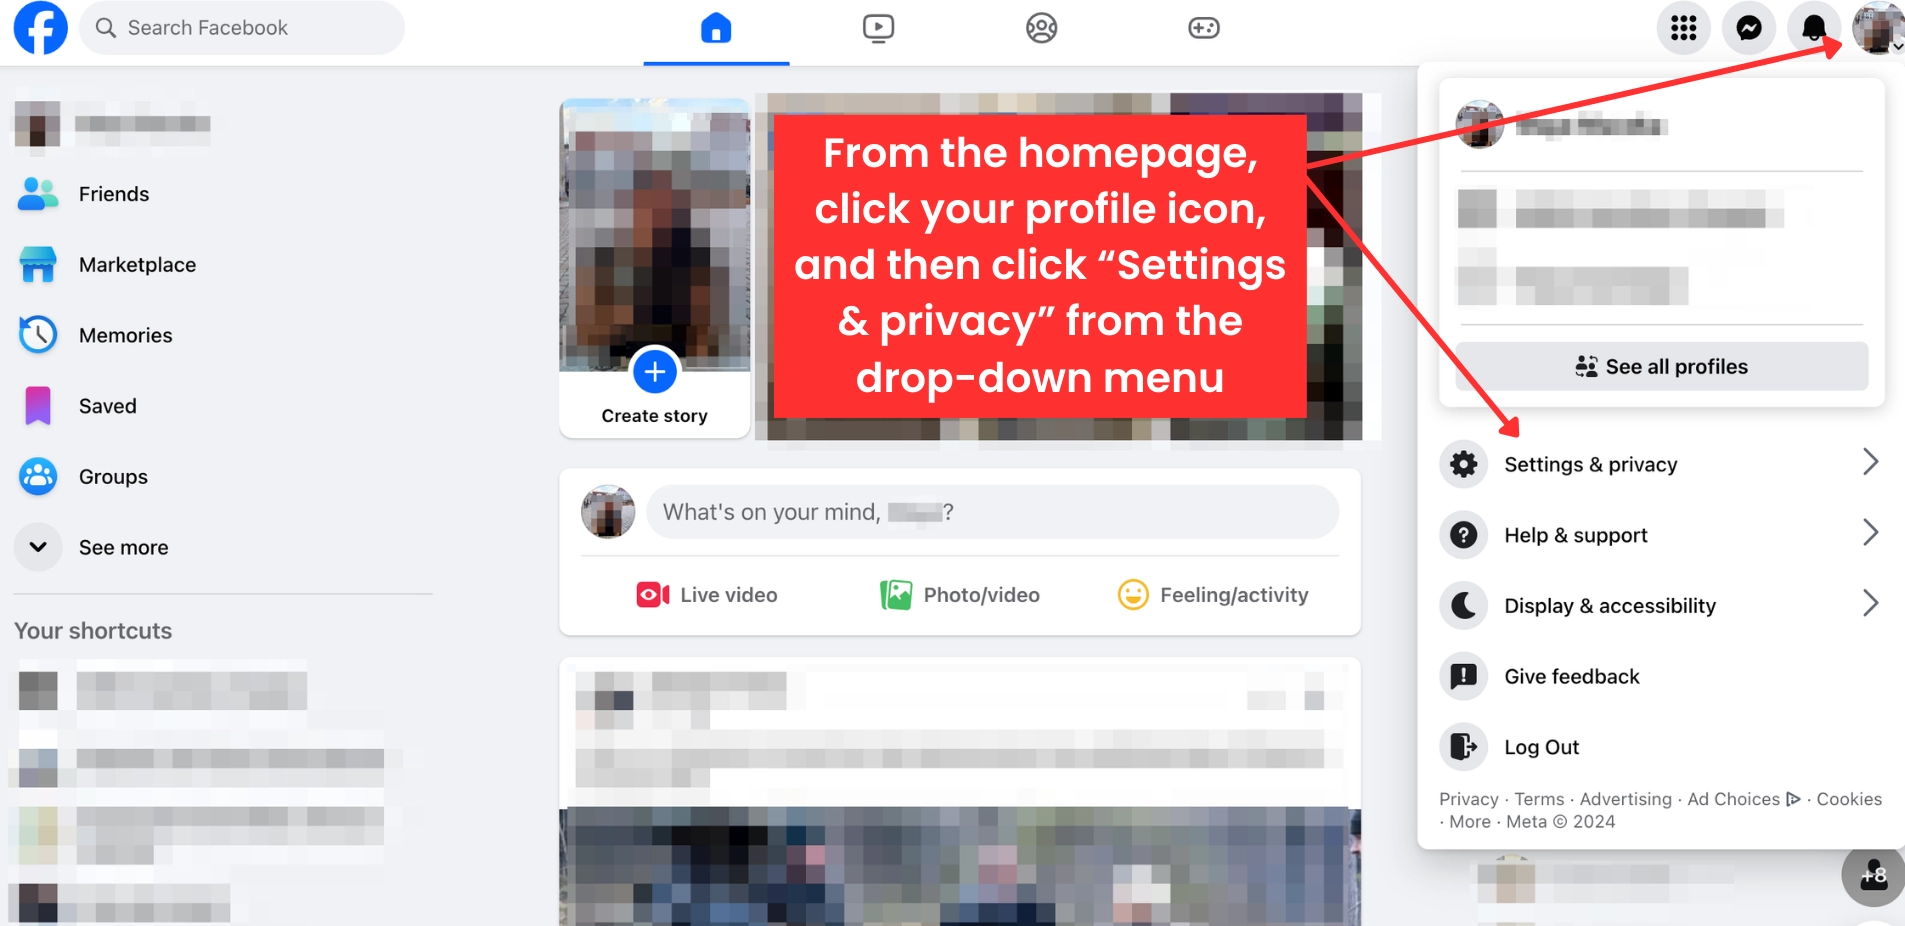
- On Desktop: Click your profile picture in the top right corner to open “Settings & Privacy” and then click “Settings.”
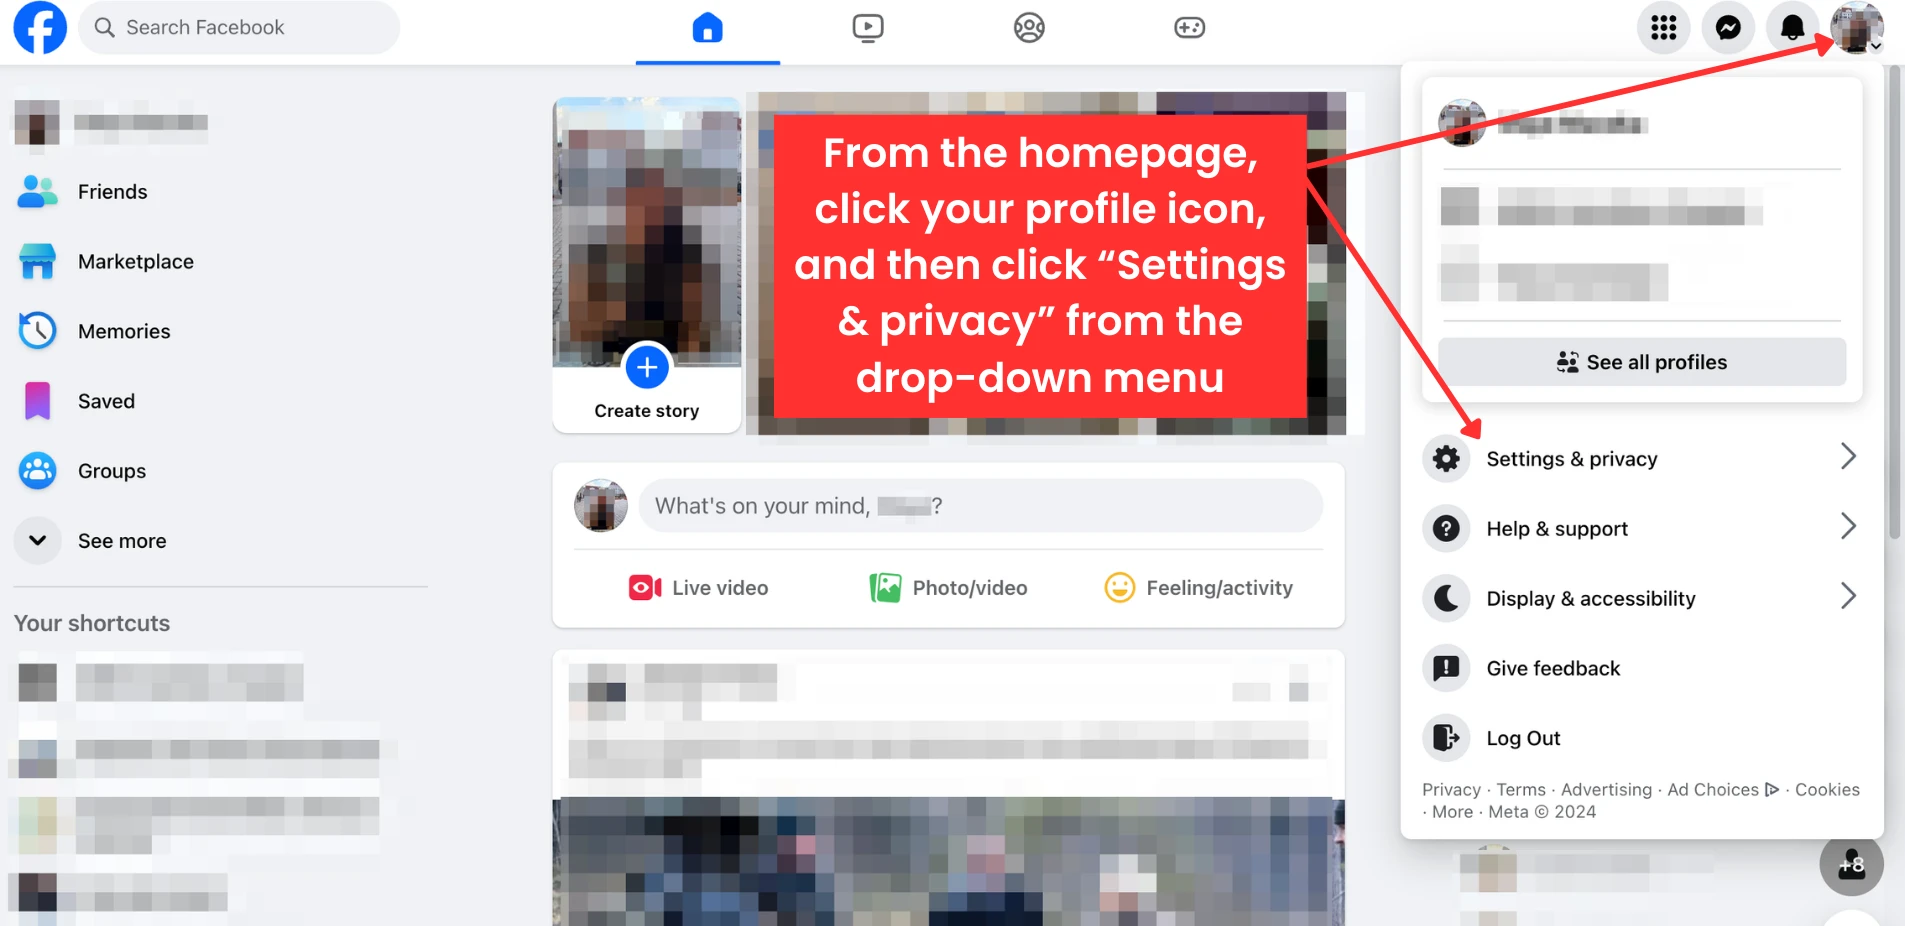
![Screenshot of Facebook profile menu]()
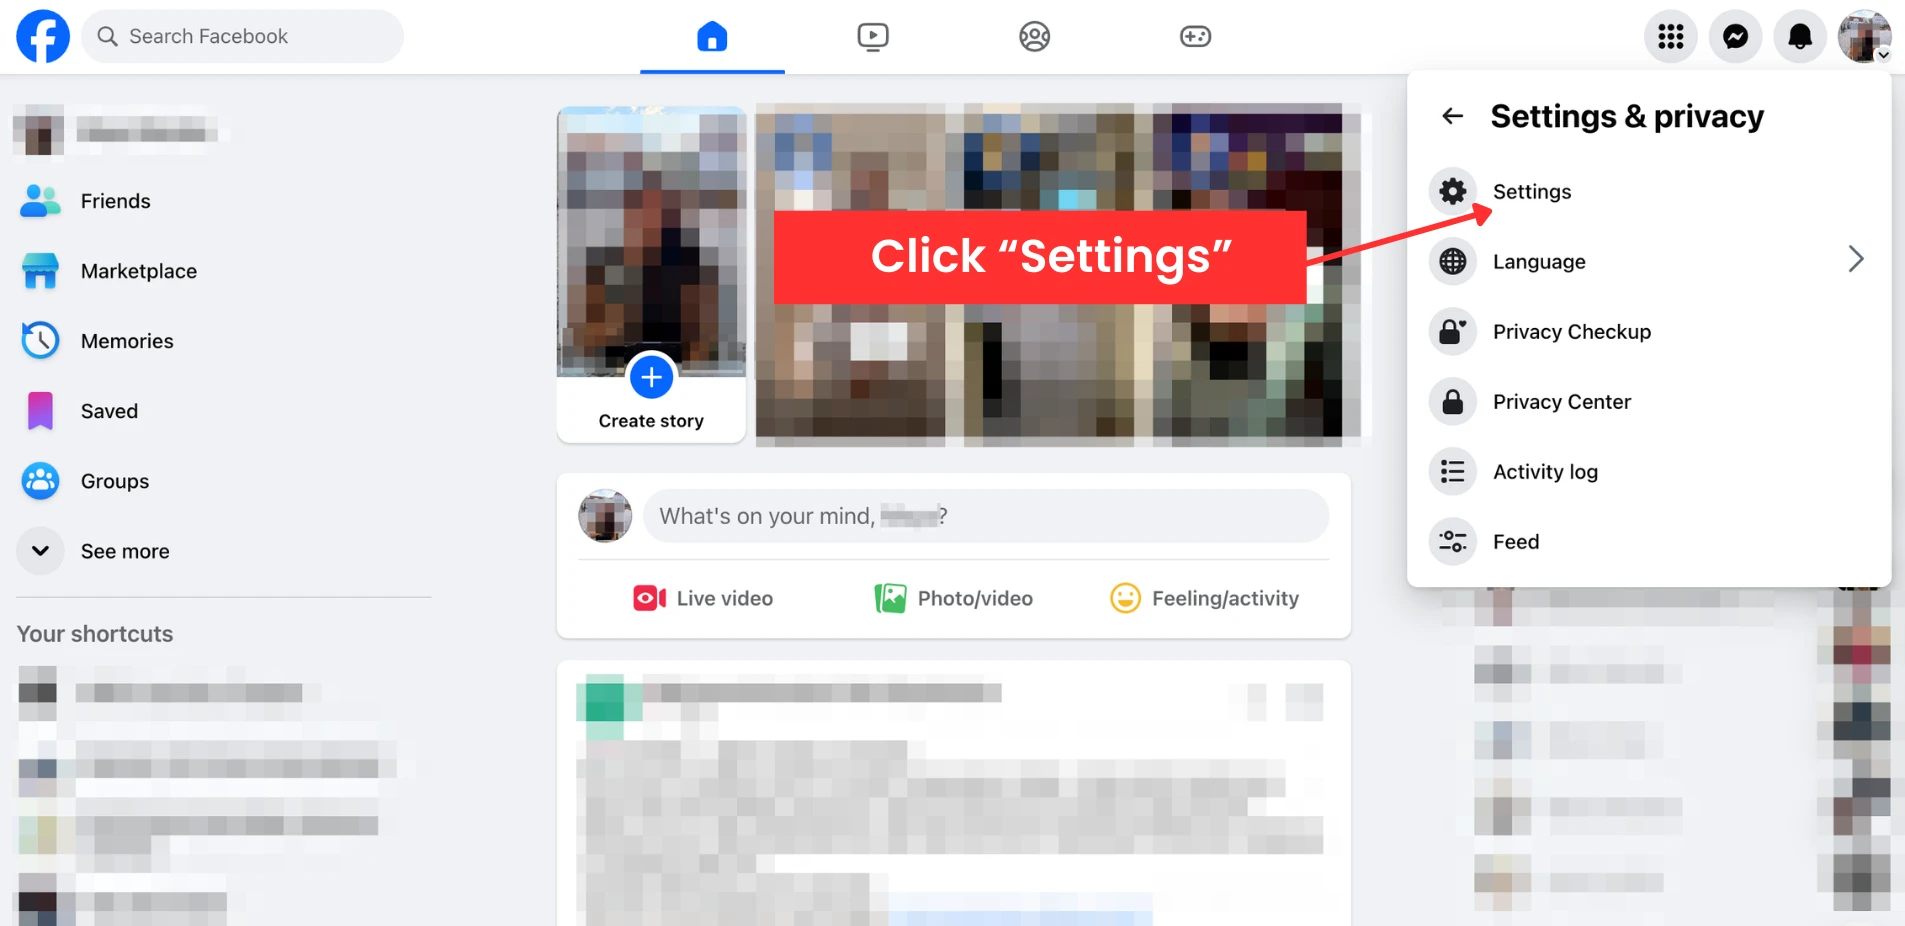
![Screenshot of Facebook Settings menu]()
- On Mobile: Tap the hamburger menu icon (in the bottom right corner of the app on iPhone, or top right on Android), open the “Menu,” then tap the cogwheel icon in the top right to access “Settings & privacy.”

![Screenshot of iPhone and Android with hamburger icon.]()

![Screenshot of iPhone and Android cogwheel icon.]()
- On Desktop: Click your profile picture in the top right corner to open “Settings & Privacy” and then click “Settings.”
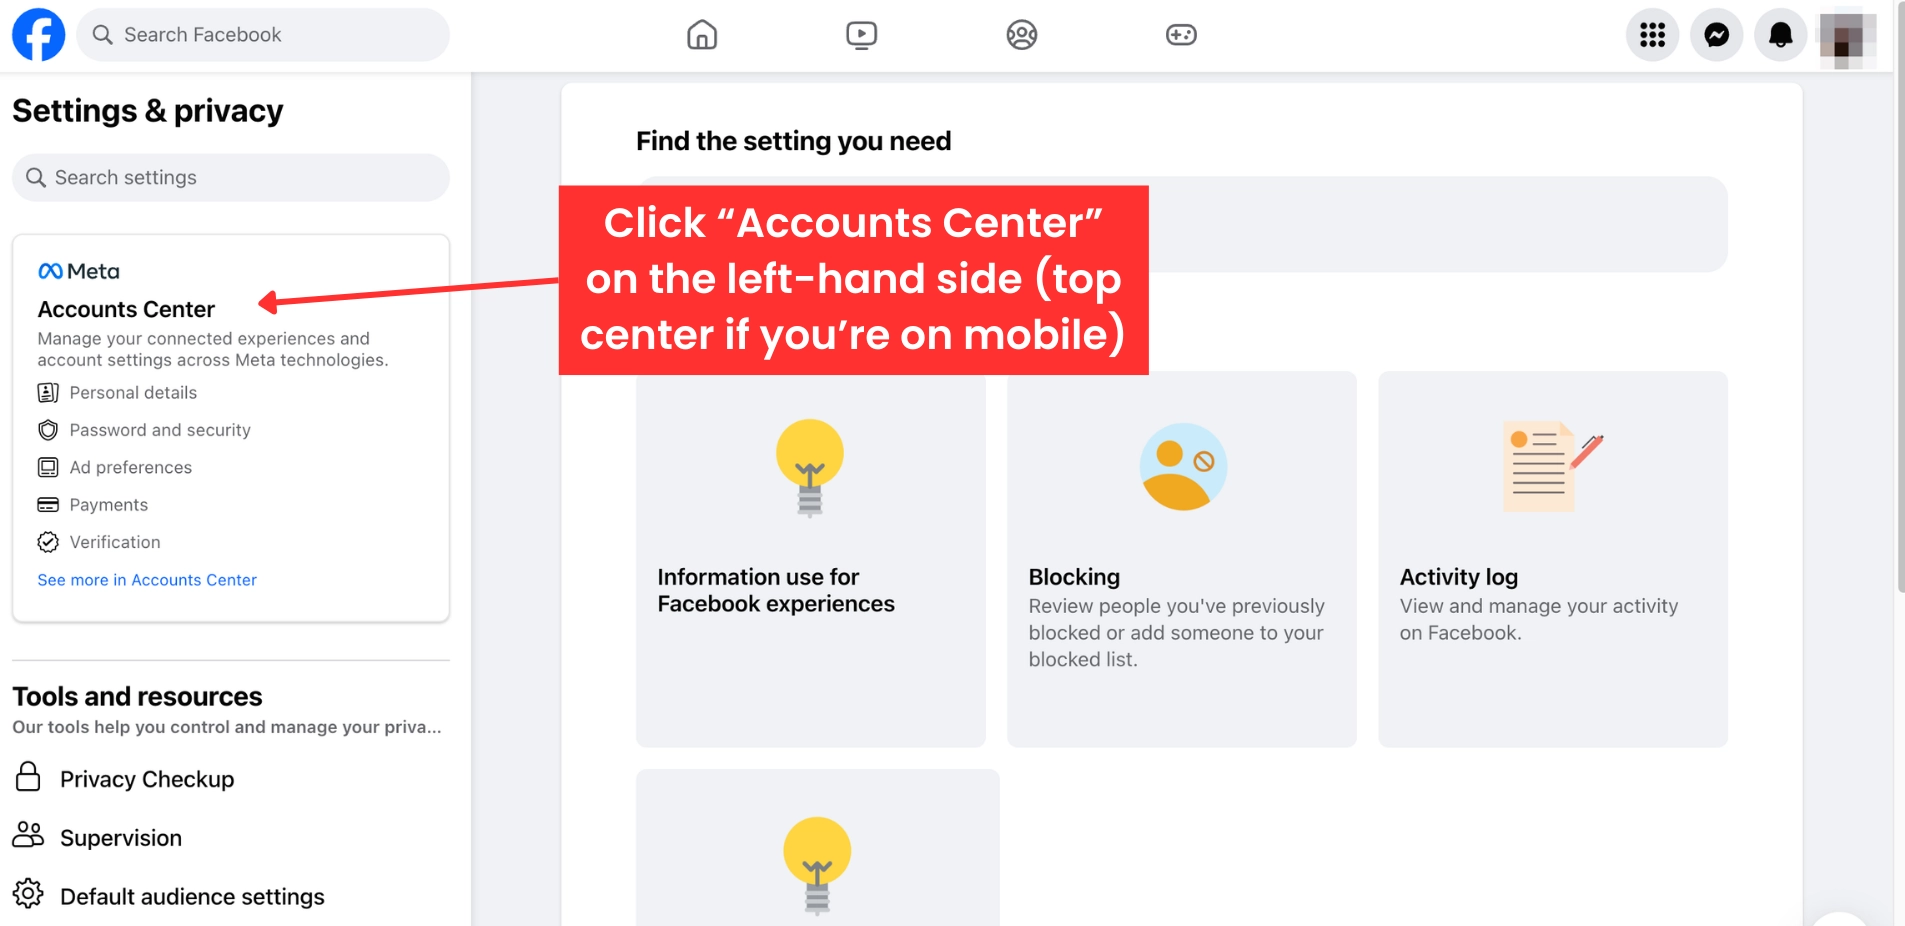
- Click or tap “Accounts Center” at the top of your screen.

![Screenshot of Facebook settings and privacy on website.]()
- Select “Personal details” under “Account settings.”
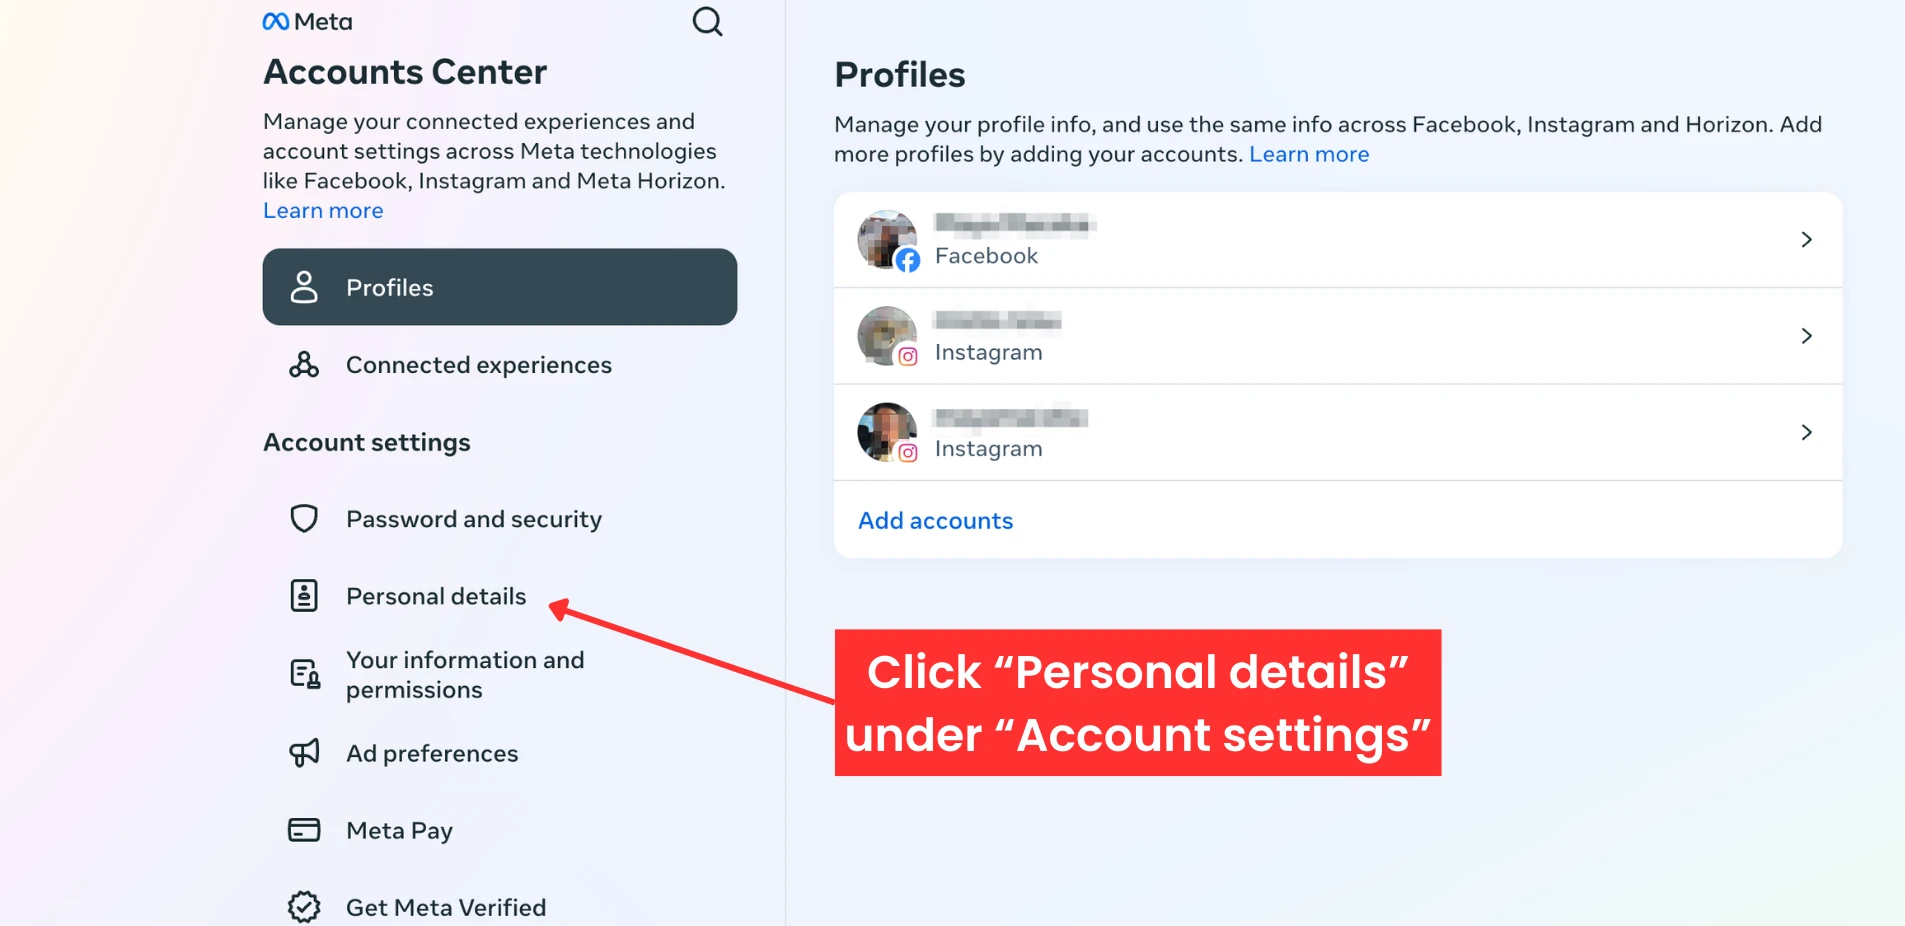
![Screenshot of Facebook accounts center.]()
- Click “Account ownership and control.”
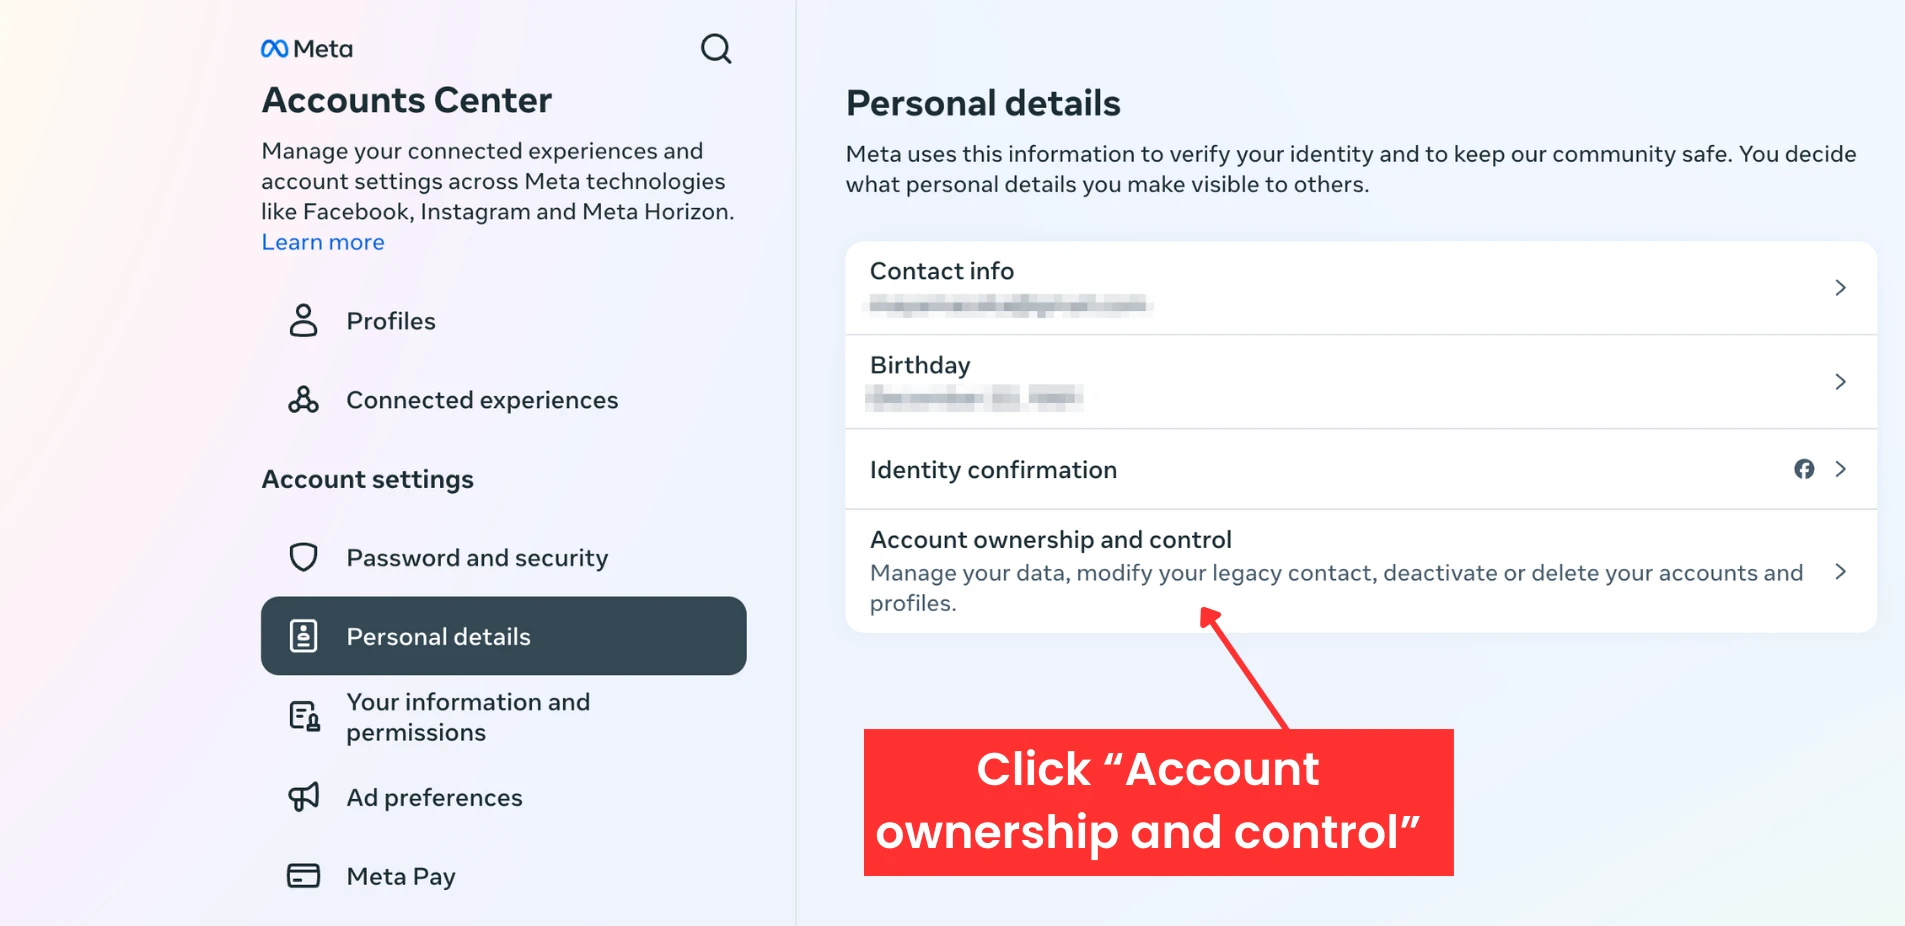
![Screenshot Facebook accounts center of personal details ownership]()
- Select “Deactivation or deletion.”
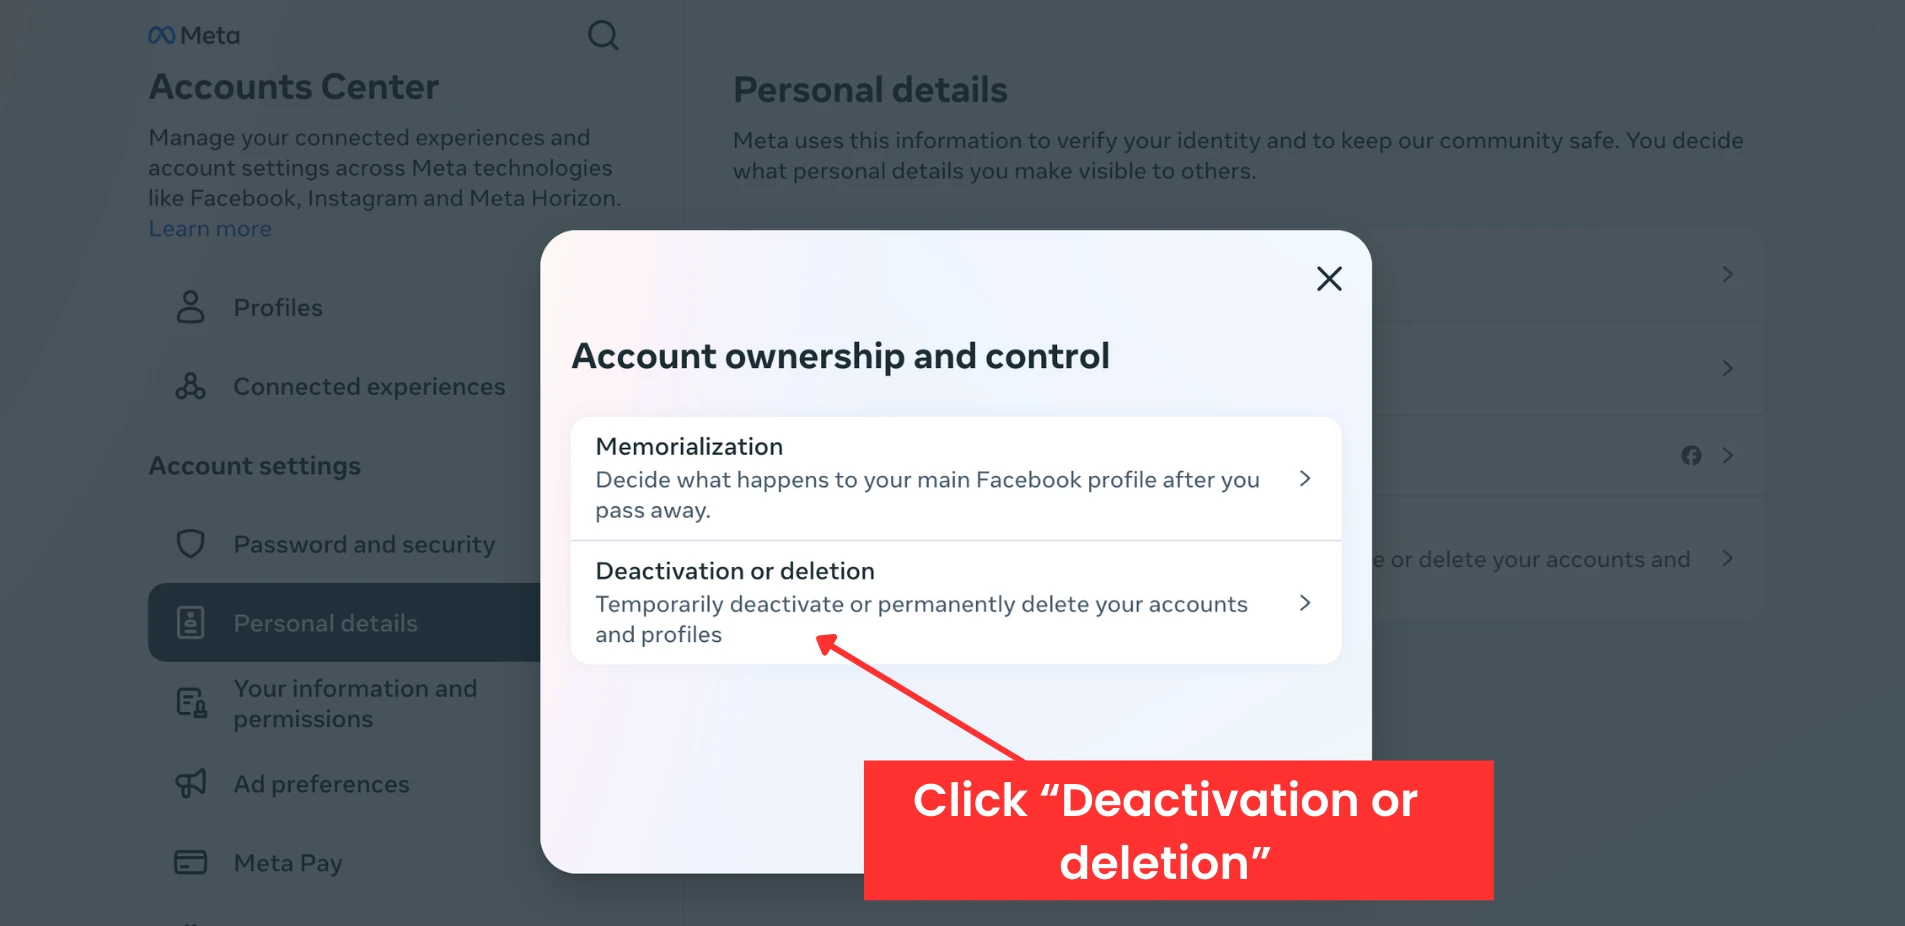
![Screenshot of Facebook account ownership and control.]()
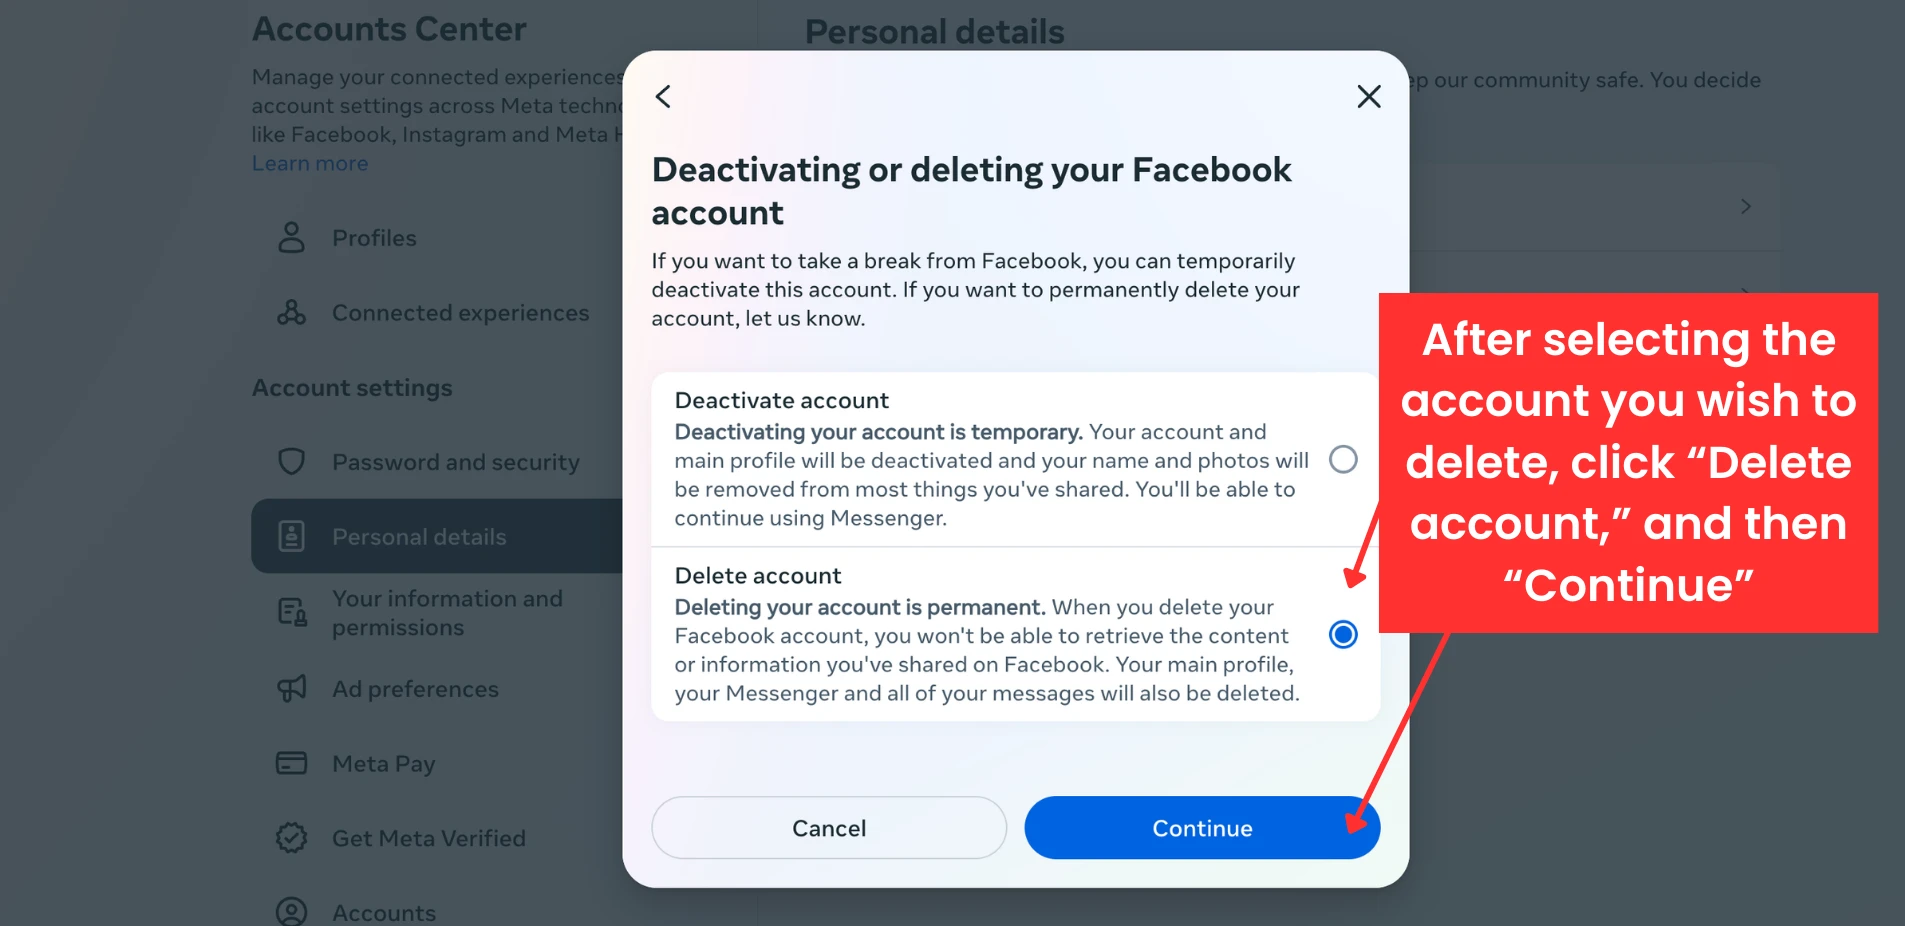
- Select the account or profile you want to delete. Click “Delete account” and “Continue.”
![Screenshot of Facebook deactivating or delete Facebook account.]()
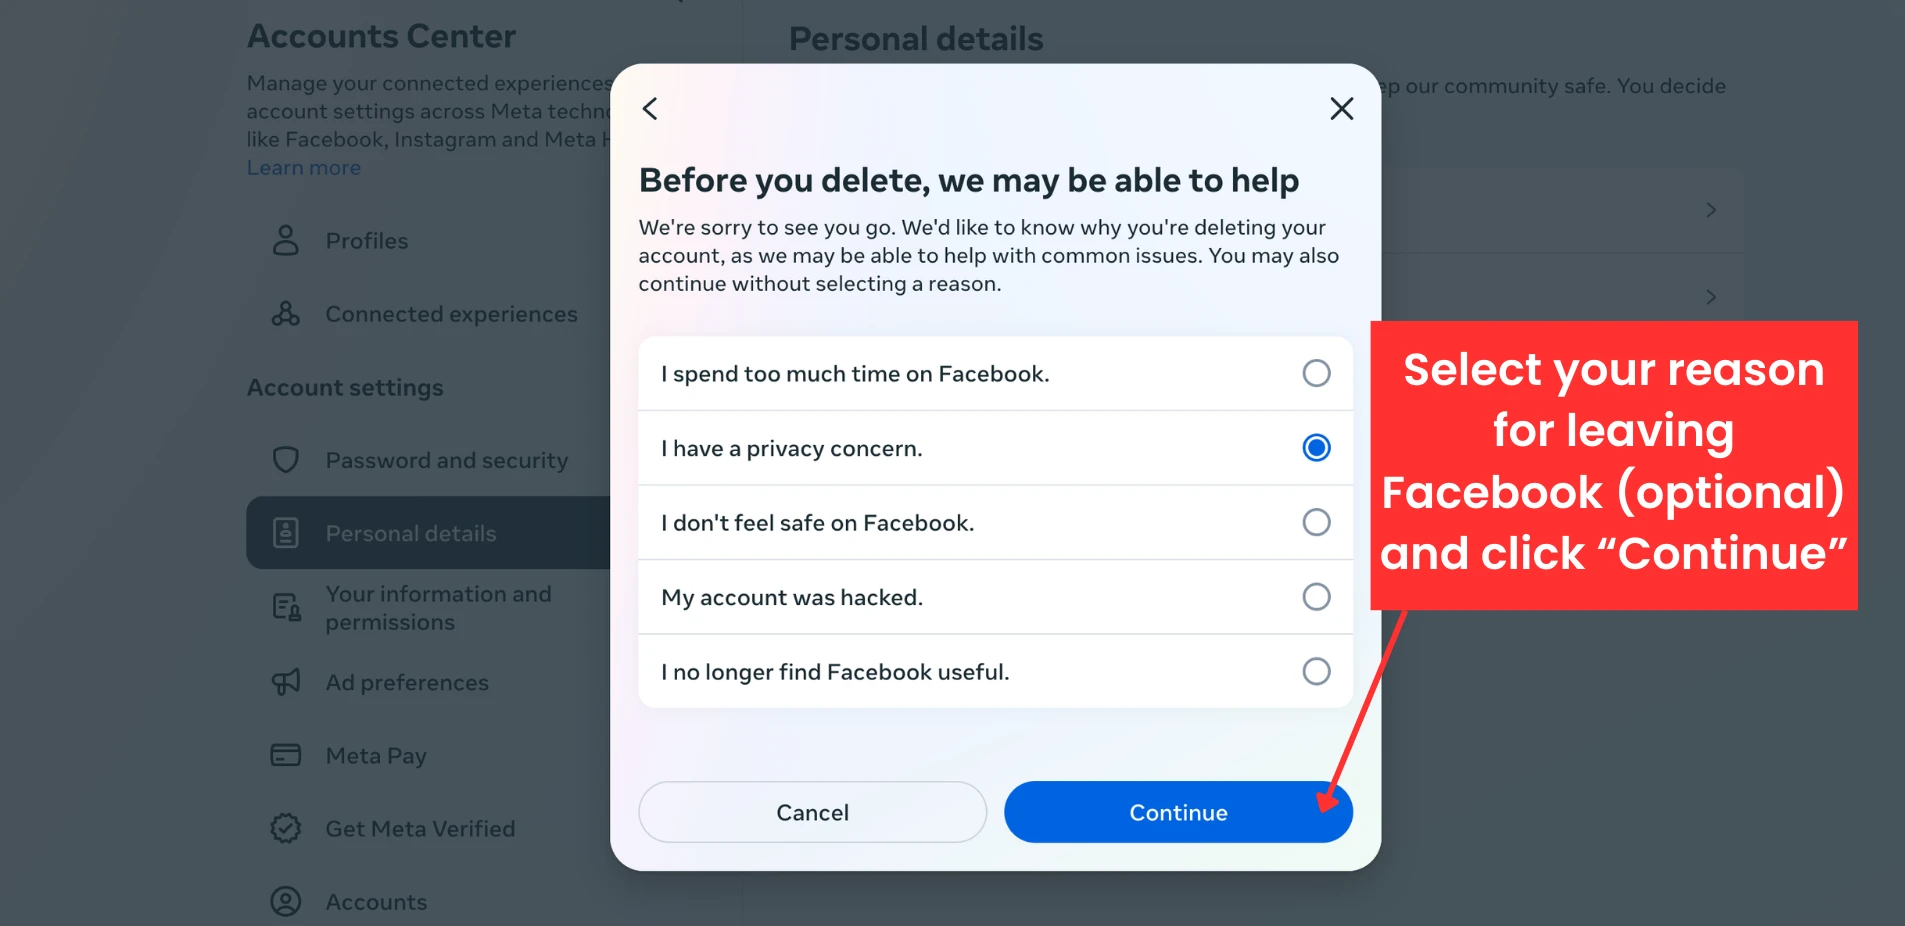
- You can choose a reason for leaving Facebook and click “Continue.” This step is optional and can be skipped if you prefer.
![Screenshot of Facebook delete account confirmation.]()
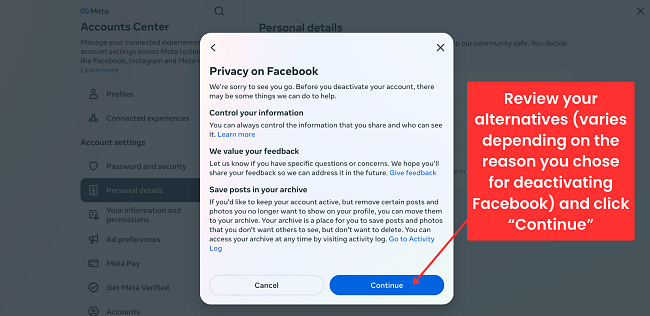
- Review your alternatives and options. These include deactivating Facebook (to keep using Messenger), archiving your posts, downloading your information, transferring a copy of your information to another service, and reviewing apps linked to your account. Click “Continue” after making your selections or to proceed without changes.
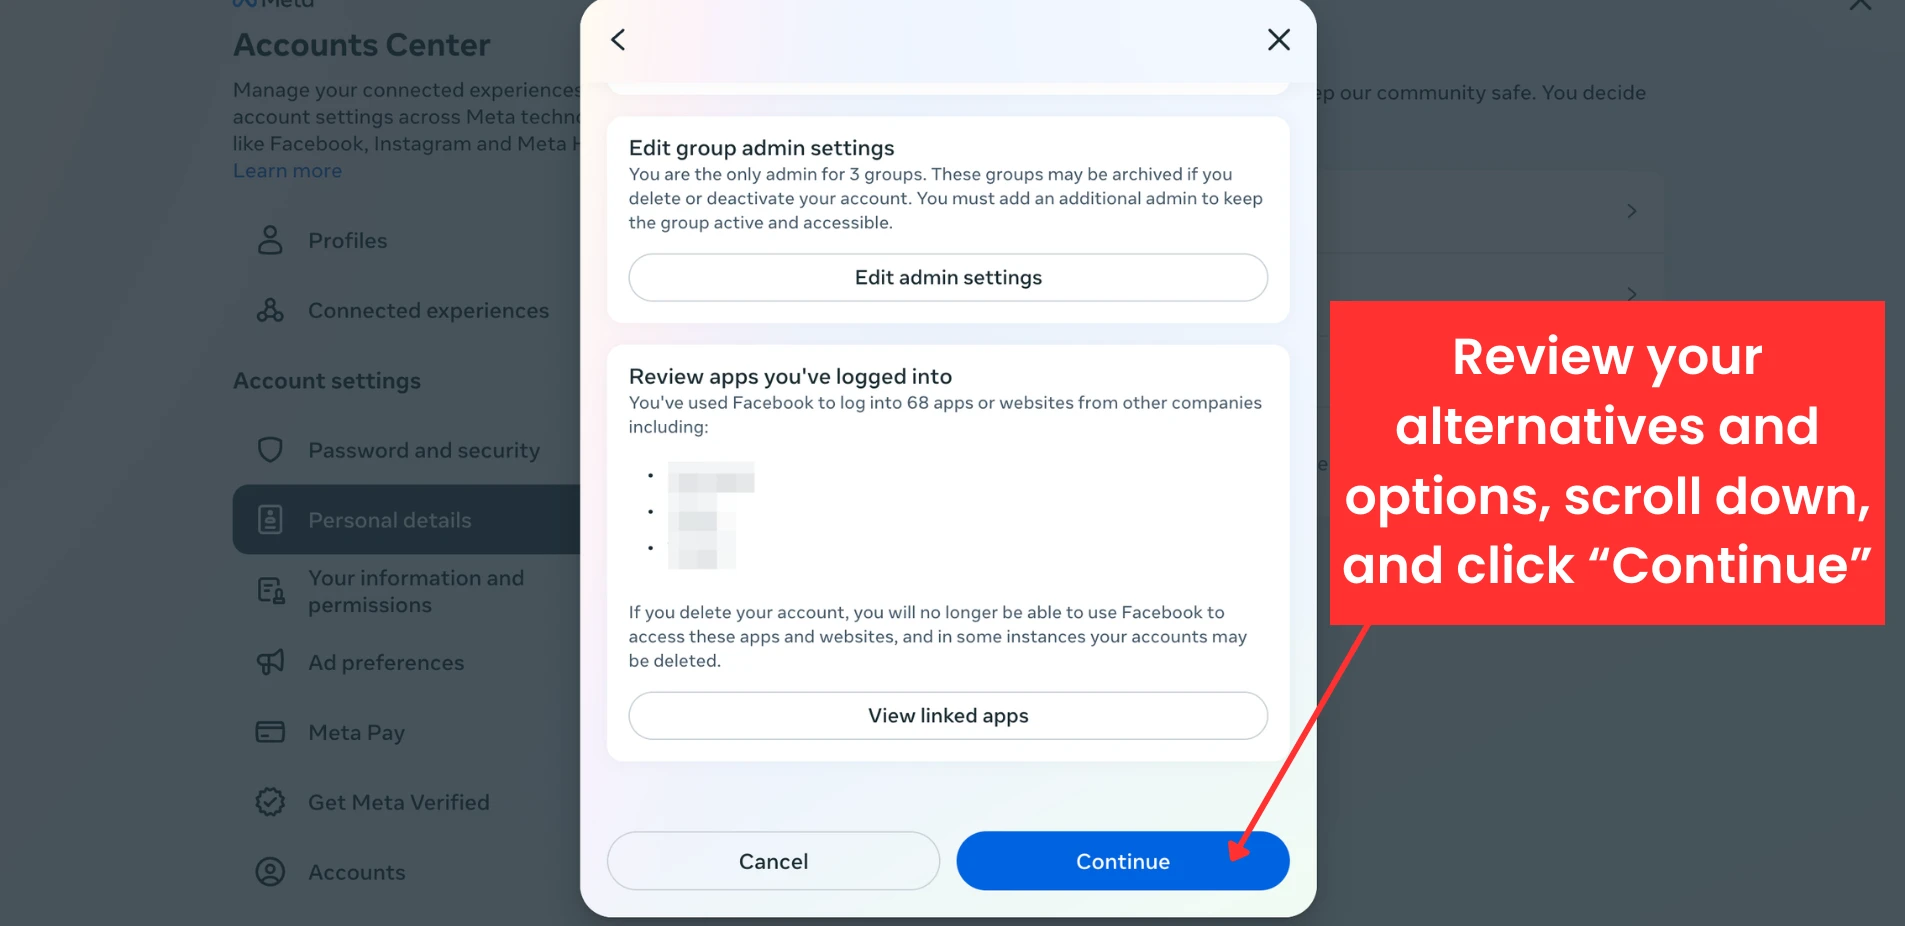
![Screenshot of Facebook review alternatives and options.]()
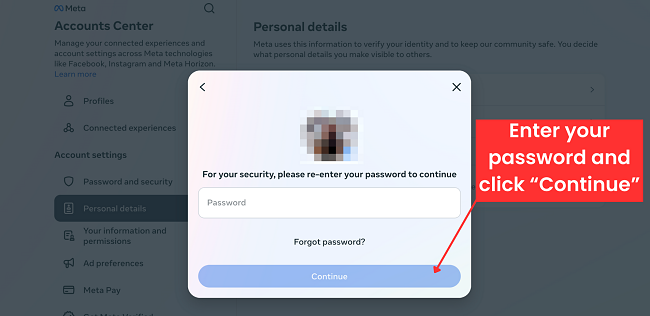
- Re-enter your password to confirm your identity and your decision to delete the account.

![Screenshot of Facebook account delete verification]()
- Confirm the permanent deletion of your account by clicking “Delete account.”
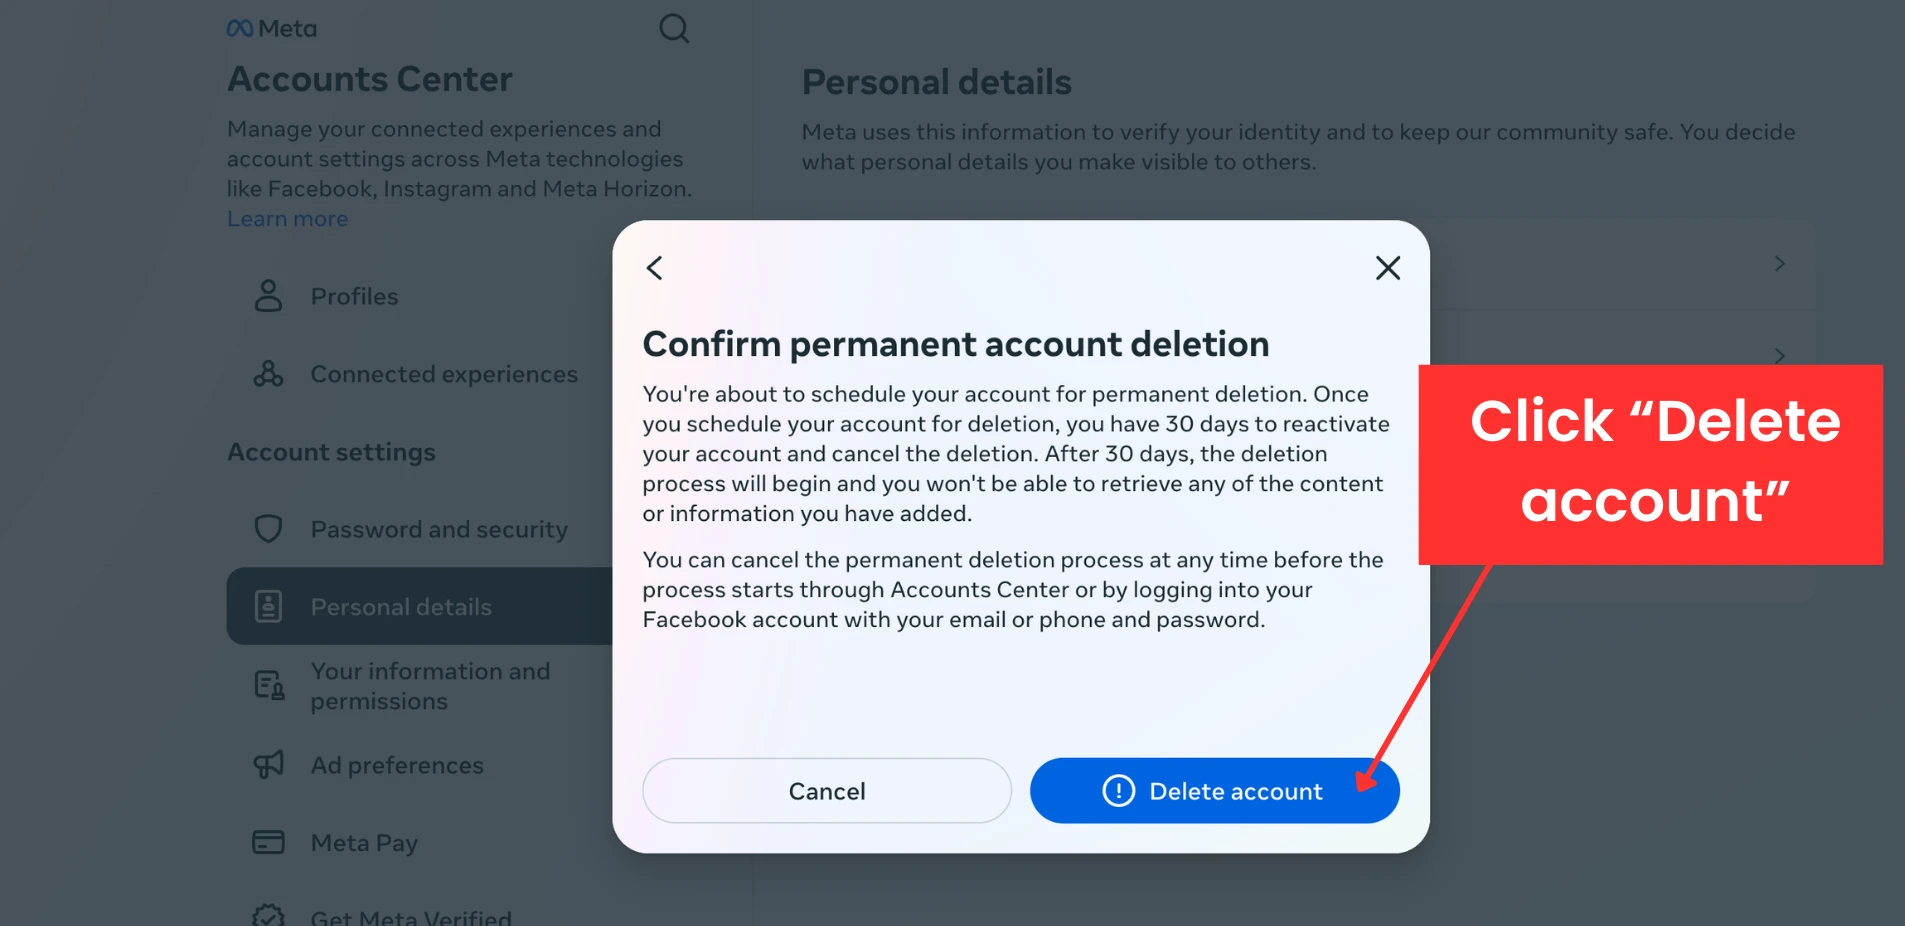
![Screenshot of Facebook confirm permanent account deletion]()
How to Download an Archive of Your Facebook Account
Once you’ve made a download request, it will appear as “Pending.” When ready, the file will be available in the “Available downloads” section of your “Download your information” page for four days. Note that this page is located in either your “Accounts Center” or “Facebook Settings” depending on your Facebook account.
You will receive notifications via email and Facebook when your download is ready or if you have initiated a data transfer, when it is complete. You can find details of completed transfers in the “Previous Transfers” section of the Transfer Your Information tool.
- Access “Settings & Privacy.”
- On Desktop: Click your profile picture in the top right corner to open “Settings & Privacy” and then click “Settings.”

![Screenshot of Facebook profile menu]()

![Screenshot of Facebook Settings menu]()
- On Mobile: Tap the hamburger menu icon (in the bottom right corner of the app on iPhone, or top right on Android), open the “Menu,” then tap the cogwheel icon in the top right to access “Settings & privacy.”

![Screenshot of iPhone and Android with hamburger icon.]()

![Screenshot of iPhone and Android cogwheel icon.]()
- On Desktop: Click your profile picture in the top right corner to open “Settings & Privacy” and then click “Settings.”
- Click or tap “Accounts Center” at the top of your screen.

![Screenshot of Facebook settings and privacy on website.]()
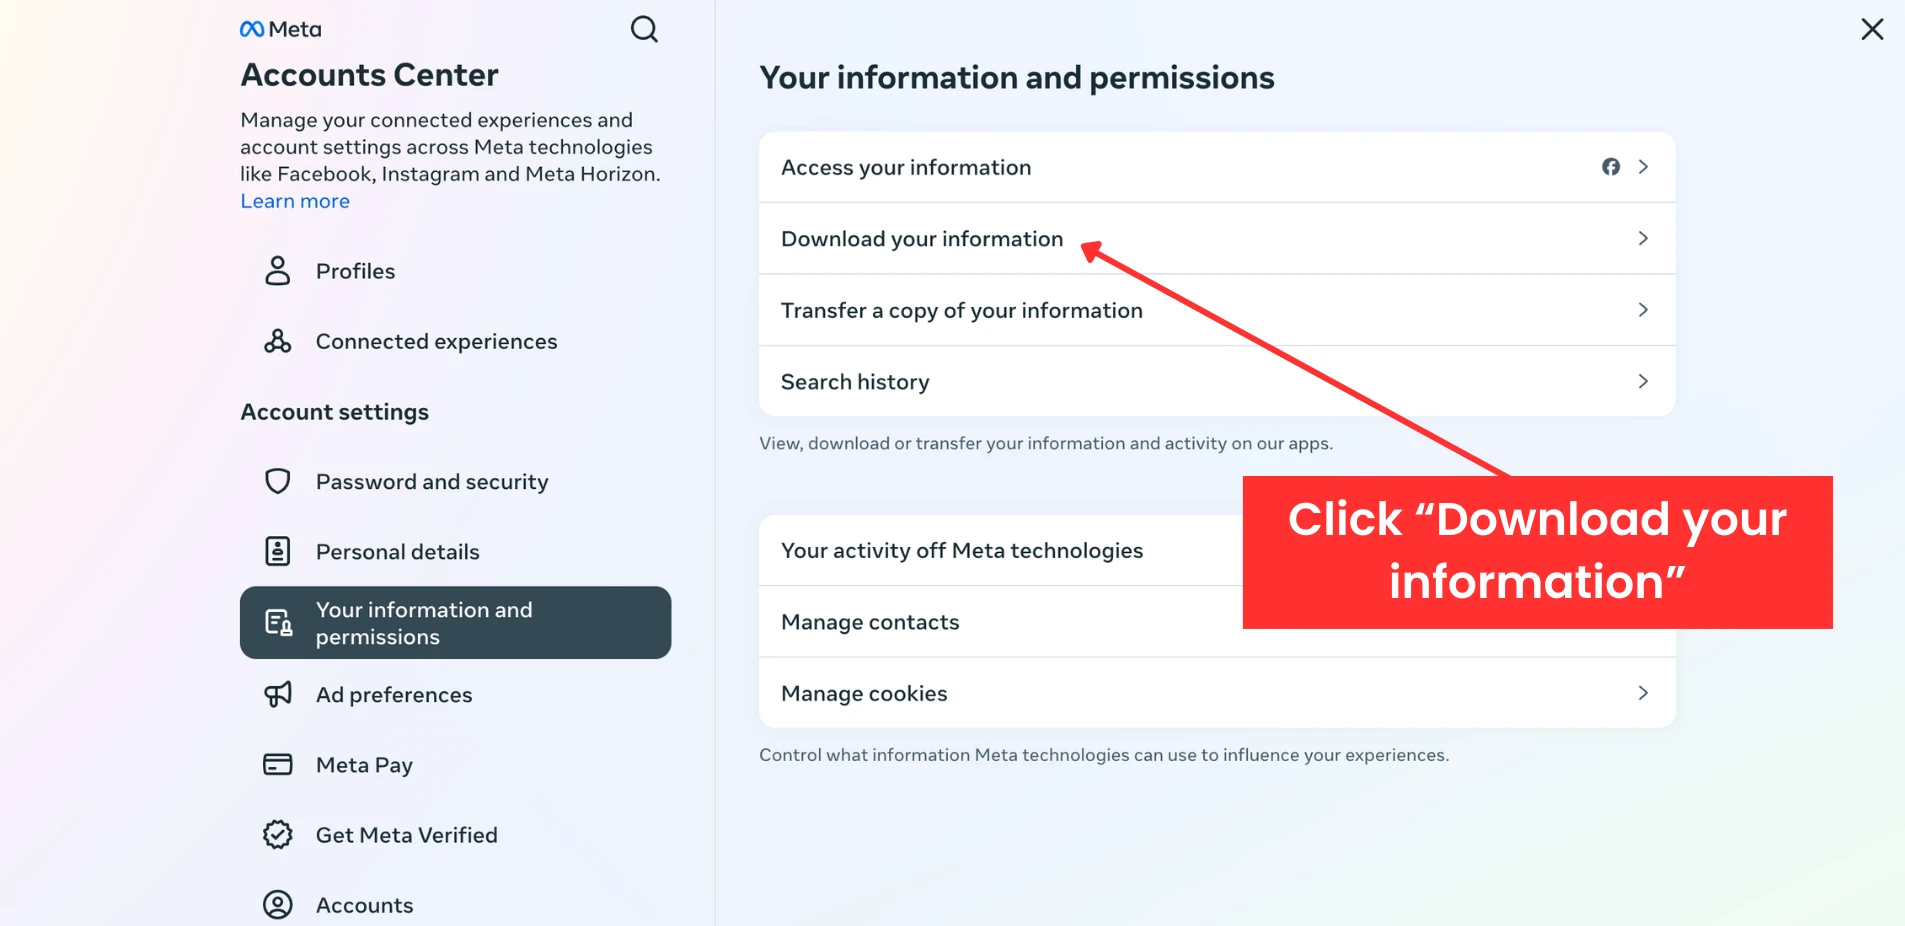
- Click “Your information and permissions.”

![Screenshot of Facebook accounts center.]()
- Select “Download your information.”
![Screenshot of Facebook download your information]()
- Click “Download or transfer information” to confirm.
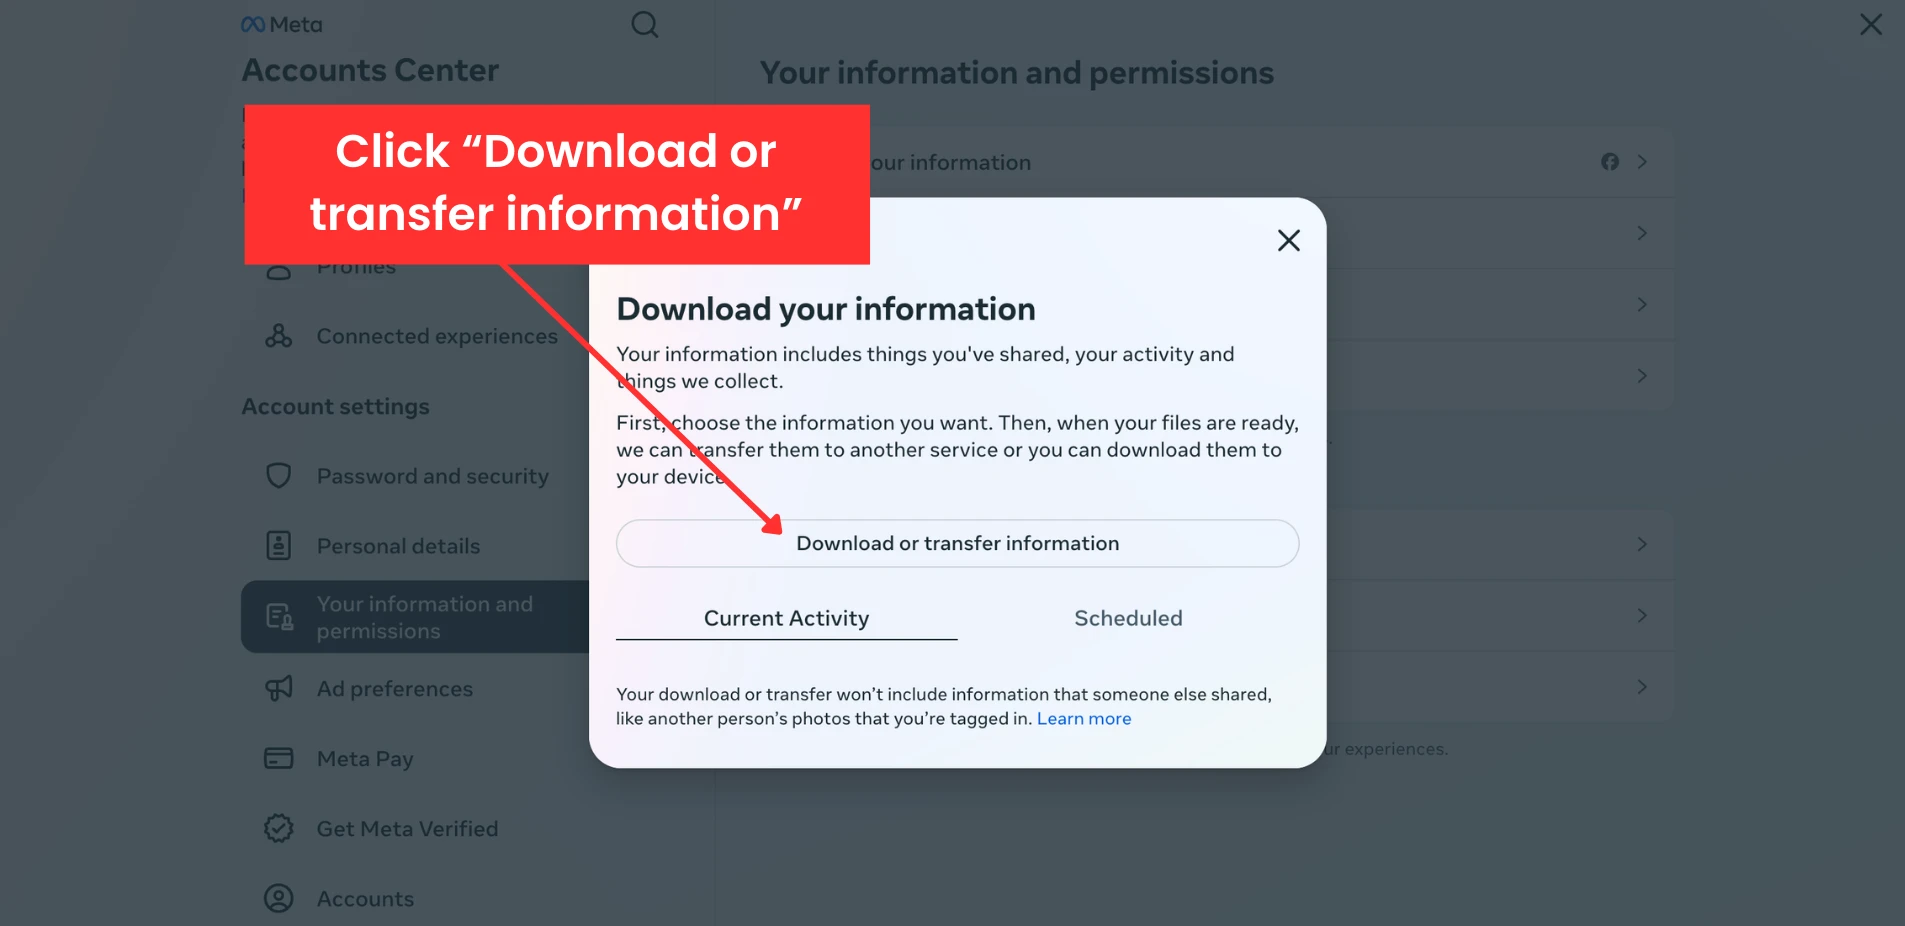
![Screenshot Facebook download or transfer your information.]()
- Select which profiles’ information you want to download, then click or tap “Next.”
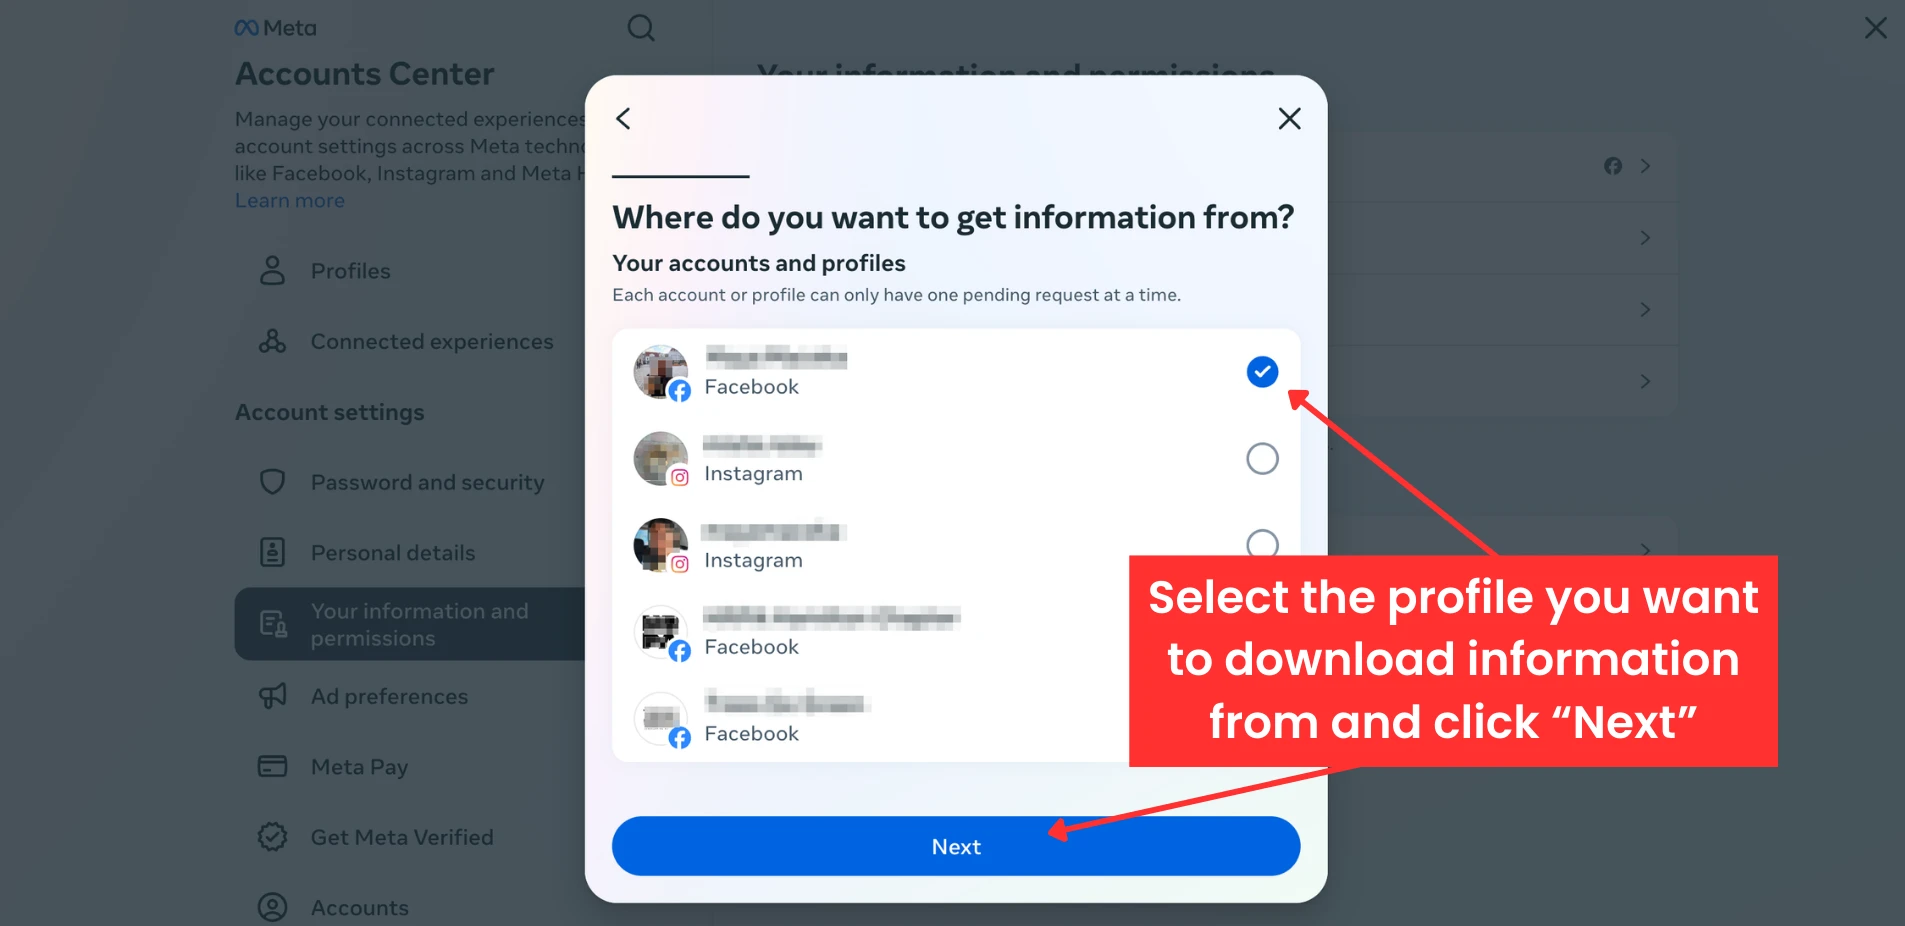
![Screenshot of select profile to download information.]()
- Decide how much information you want and from which date range. You can choose all available information (minus data logs) or specific types of information, like only your photos or messages.

![Screenshot of Facebook download all available information.]()
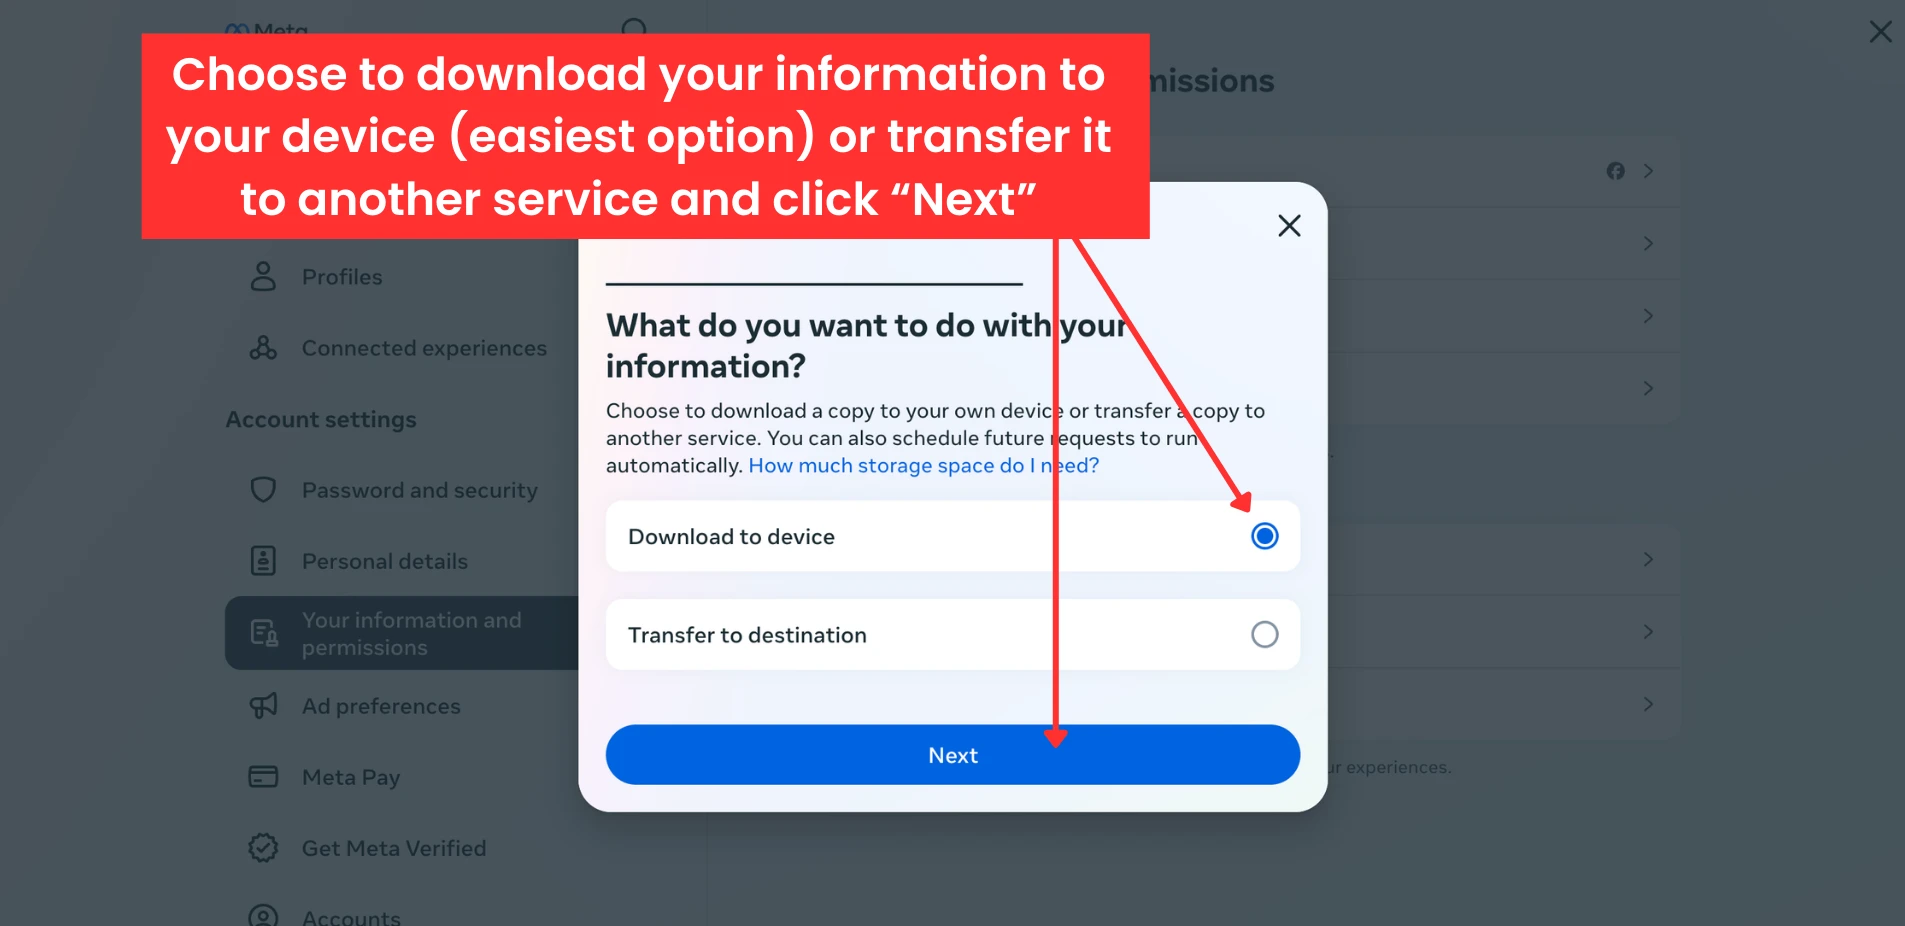
- Choose to download to your device or transfer information to another service. For transfers, specify the destination and schedule, if applicable.
![Screenshot of Facebook download information to device]()
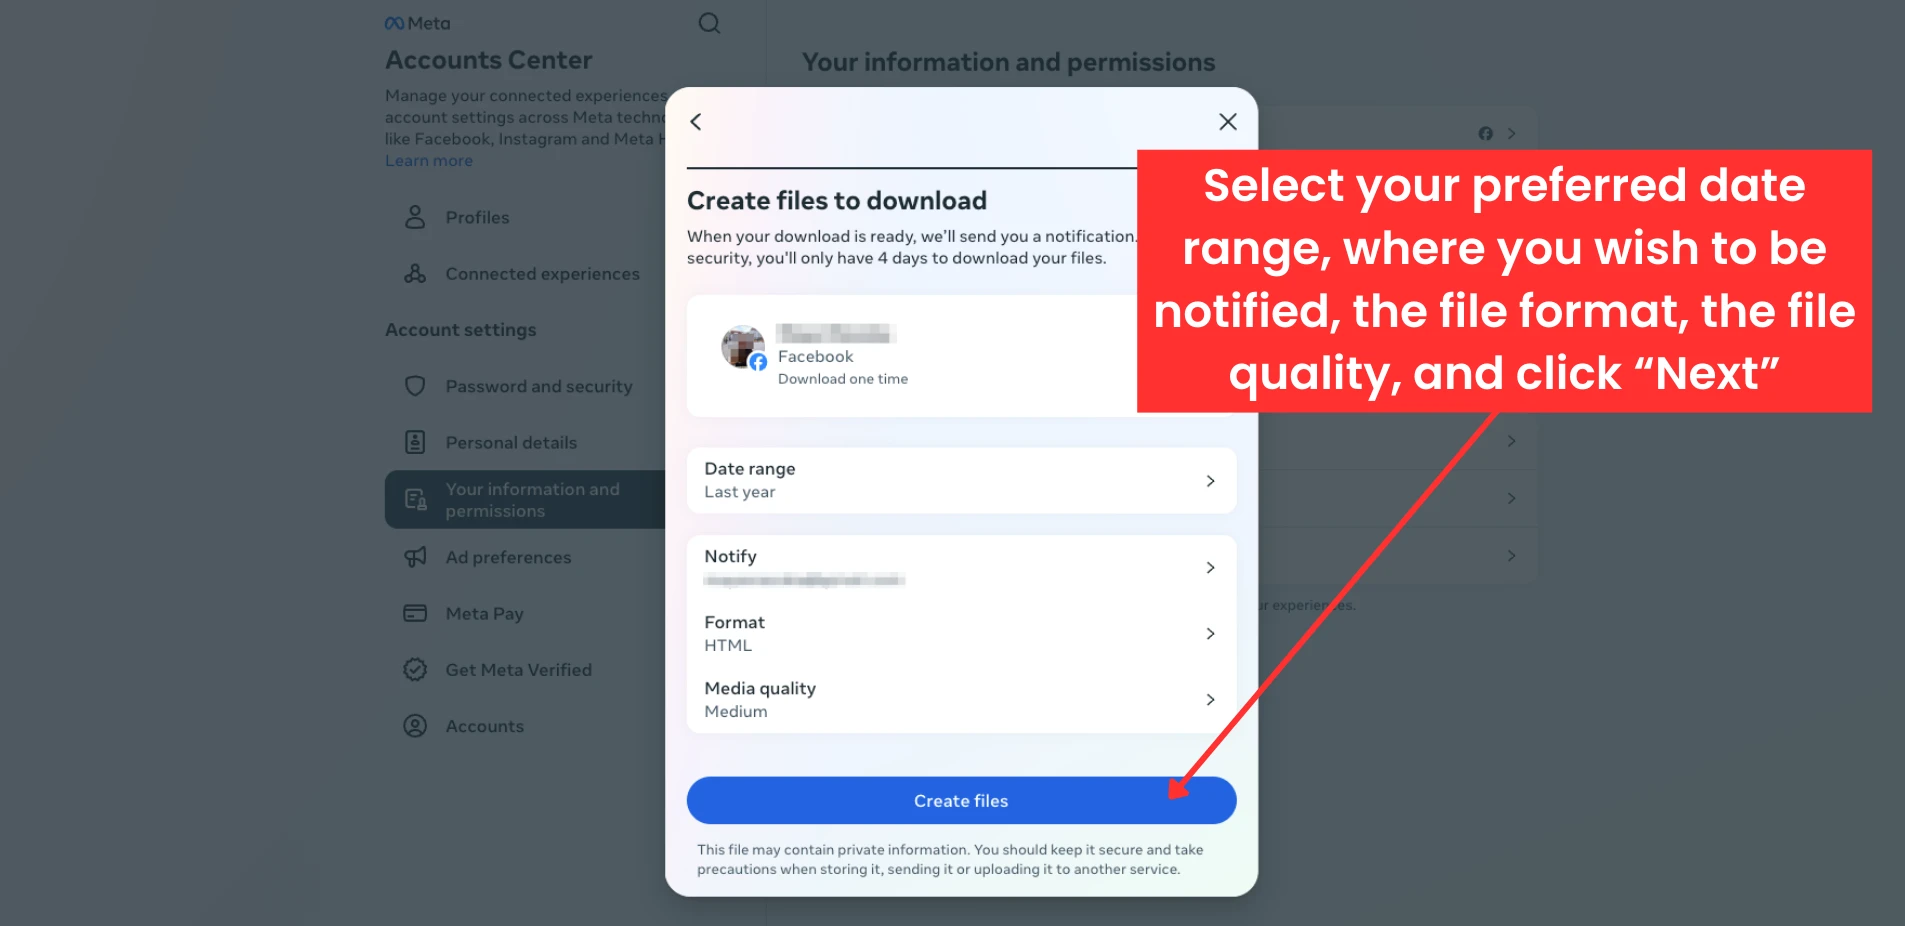
- Create your files by choosing your custom options:
- Date range: You can choose the date range of the information you wish to download.
- Notify: You can choose which email address that’s associated with your Facebook account will receive the notification when your file is ready for download
- Format: You can choose the format of your file. HTML is suggested for easy viewing. JSON is suggested for data portability, as the files will be smaller.
- Media Quality: You can choose the quality of the media in your file. Medium is selected automatically.
![Facebook create files to download.]()
- If prompted, enter your Facebook password, then click or tap “Submit request.” You should see your request listed under “Current Activity.” You will have the option to cancel until it’s ready to download.

![Facebook download your information activity.]()
Changed Your Mind? Here’s How to Recover Your Deleted Facebook Account
Facebook provides a 30-day grace period if you change your mind about deleting your account. During this time, you can log back into your account and stop the deletion process. After this period, your account and all associated information will be permanently deleted, and it will not be possible to recover any data.
How to Cancel Facebook Account Deletion
- Within 30 days of initiating the deletion, log into your Facebook account using your usual login details.
- Once logged in, you will see an option to cancel the deletion. Click on “Cancel Deletion” to restore your account.
What’s the Difference Between Deleting and Deactivating Your Facebook Account?
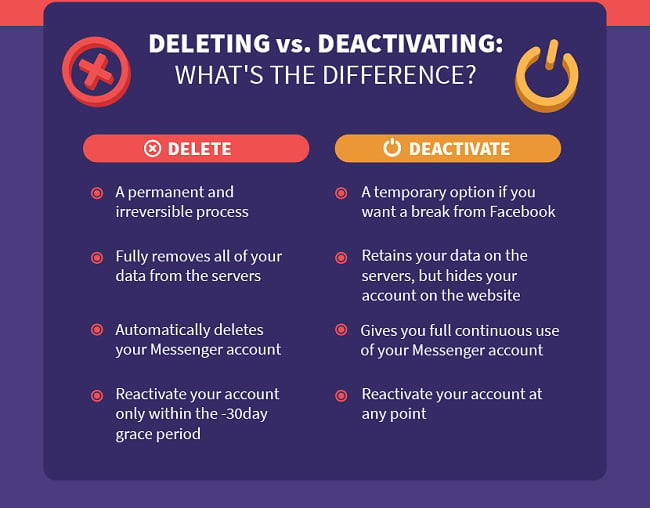
If you decide to delete your Facebook account, you are choosing a permanent and irreversible action that removes your ability to use Facebook login for third-party apps like Spotify or Tinder, and automatically deletes your Messenger account along with all your messages without any option for recovery.
Deactivating your Facebook account is a temporary measure that hides your profile and content from other users but preserves them for when you choose to reactivate, regardless of how much time has passed. Messenger remains active too, allowing you to communicate with your contacts.
Keep in mind that if you are the owner or sole admin of any Facebook pages, deactivating your main account will also deactivate these pages. You can reactivate your account at any time by logging back in with your credentials.
Simply follow the steps below to temporarily remove yourself from the site.
How to Deactivate Your Facebook Account
- Access “Settings & Privacy.”
- On Desktop: Click your profile picture in the top right corner to open “Settings & Privacy” and then click “Settings.”

![Screenshot of Facebook profile menu]()

![Screenshot of Facebook Settings menu]()
- On Mobile: Tap the hamburger menu icon (in the bottom right corner of the app on iPhone, or top right on Android), open the “Menu,” then tap the cogwheel icon in the top right to access “Settings & privacy.”

![Screenshot of iPhone and Android with hamburger icon.]()
![Screenshot of iPhone and Android cogwheel icon.]()
- On Desktop: Click your profile picture in the top right corner to open “Settings & Privacy” and then click “Settings.”
- Click or tap “Accounts Center” at the top left of your screen.
![Screenshot of Facebook settings and privacy on website.]()
- Select “Personal details” under “Account Settings.”

![Click Personal details under Account settings]()
- Choose “Account ownership and control.”

![Click account ownership and control]()
- Select “Deactivation or deletion.”

![Facebook account ownership and control]()
- Choose the account or profile you want to deactivate.
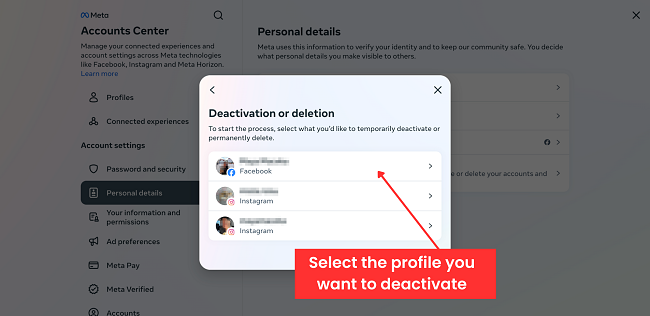
![Facebook select profile you want to deactivate]()
- Click or tap “Deactivate account,” then “Continue.”
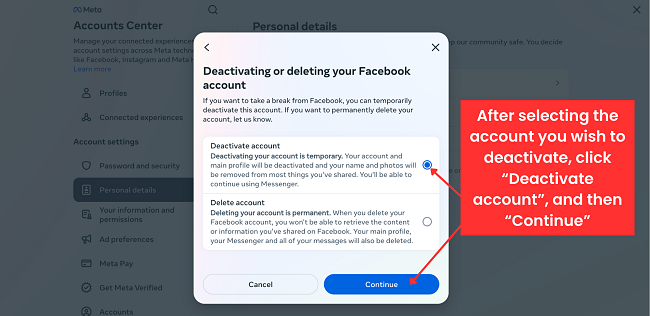
![Facebook deactivation confirmation]()
- Enter your password.
![Facebook enter your password and click continue]()
- You can choose a reason for deactivating your Facebook and click “Continue.” This step is optional.

![Facebook select reason for deactivating]()
- Review your alternatives. These include finding more friends on Facebook or learning more about using Facebook. Click “Continue.”
![Facebook review your alternatives before deactivating]()
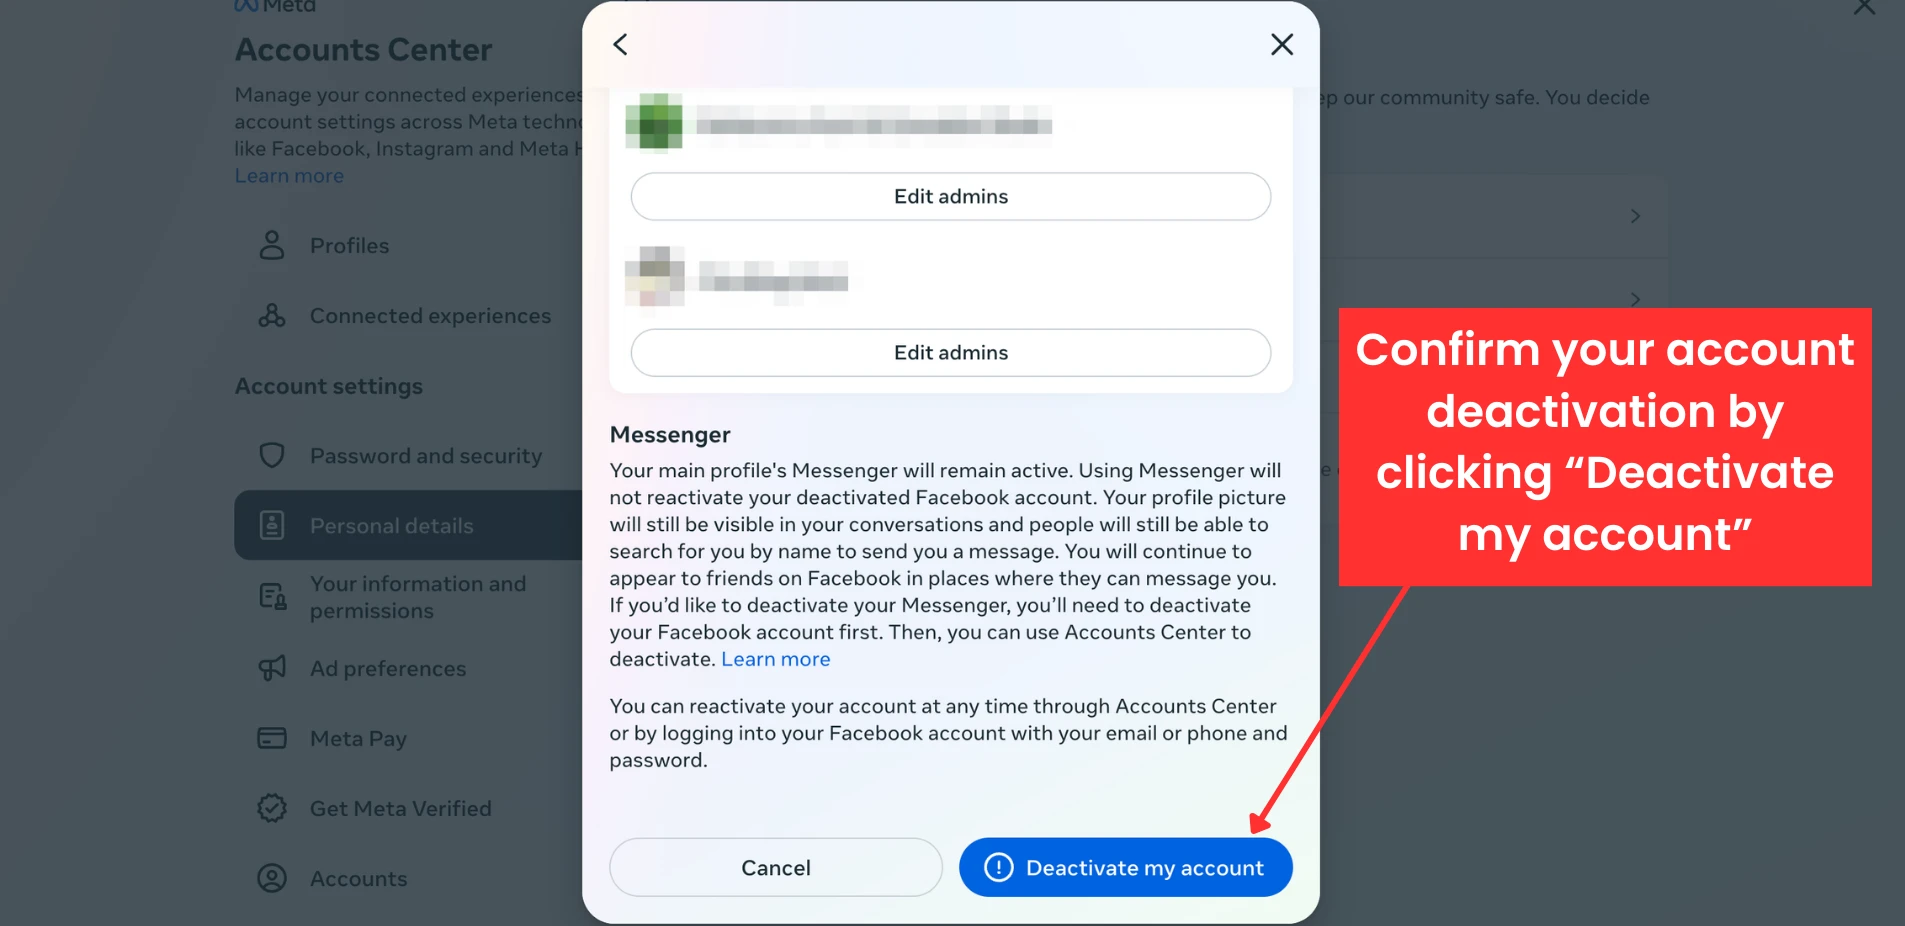
- Confirm temporary account deactivation by clicking “Deactivate my account.”
![Facebook confirm your account for deactivating]()
How to Protect Yourself from Data Collection Using Off-Meta (Previously Off-Facebook) Activity
With the rebranding of Facebook to Meta in 2021, several features also underwent name changes. The tracking of off-platform activity is now “off-Meta” instead of “off-Facebook.”
Meta collects data from third-party apps and websites you interact with while using apps like Facebook and Instagram. This includes details about the websites you visit, the apps and games you use, the purchases and transactions you make, and how you interact with ads. Understanding and managing these settings can help you maintain better control over your data privacy.
How to Access Off-Meta Activity Settings on Mobile and Desktop
- Access “Settings & Privacy.”
- On Desktop: Click your profile picture in the top right corner to open “Settings & Privacy” and then click “Settings.”
![Screenshot of Facebook profile menu]()

![Screenshot of Facebook Settings menu]()
- On Mobile: Tap the hamburger menu icon (in the bottom right corner of the app on iPhone, or top right on Android), open the “Menu,” then tap the cogwheel icon in the top right to access “Settings & privacy.”

![Screenshot of iPhone and Android with hamburger icon.]()

![Screenshot of iPhone and Android cogwheel icon.]()
- On Desktop: Click your profile picture in the top right corner to open “Settings & Privacy” and then click “Settings.”
- Click or tap “Accounts Center” at the top left of your screen.

![Screenshot of Facebook settings and privacy on website.]()
- Click on “Your information and permissions.”
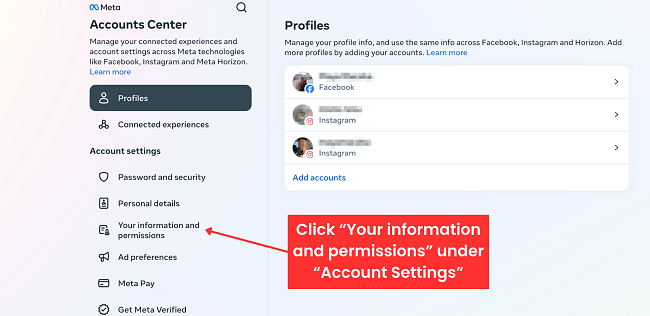
![Screenshot of Facebook account settings information and permissions.]()
- Click on “Your activity off Meta technologies” to see details.
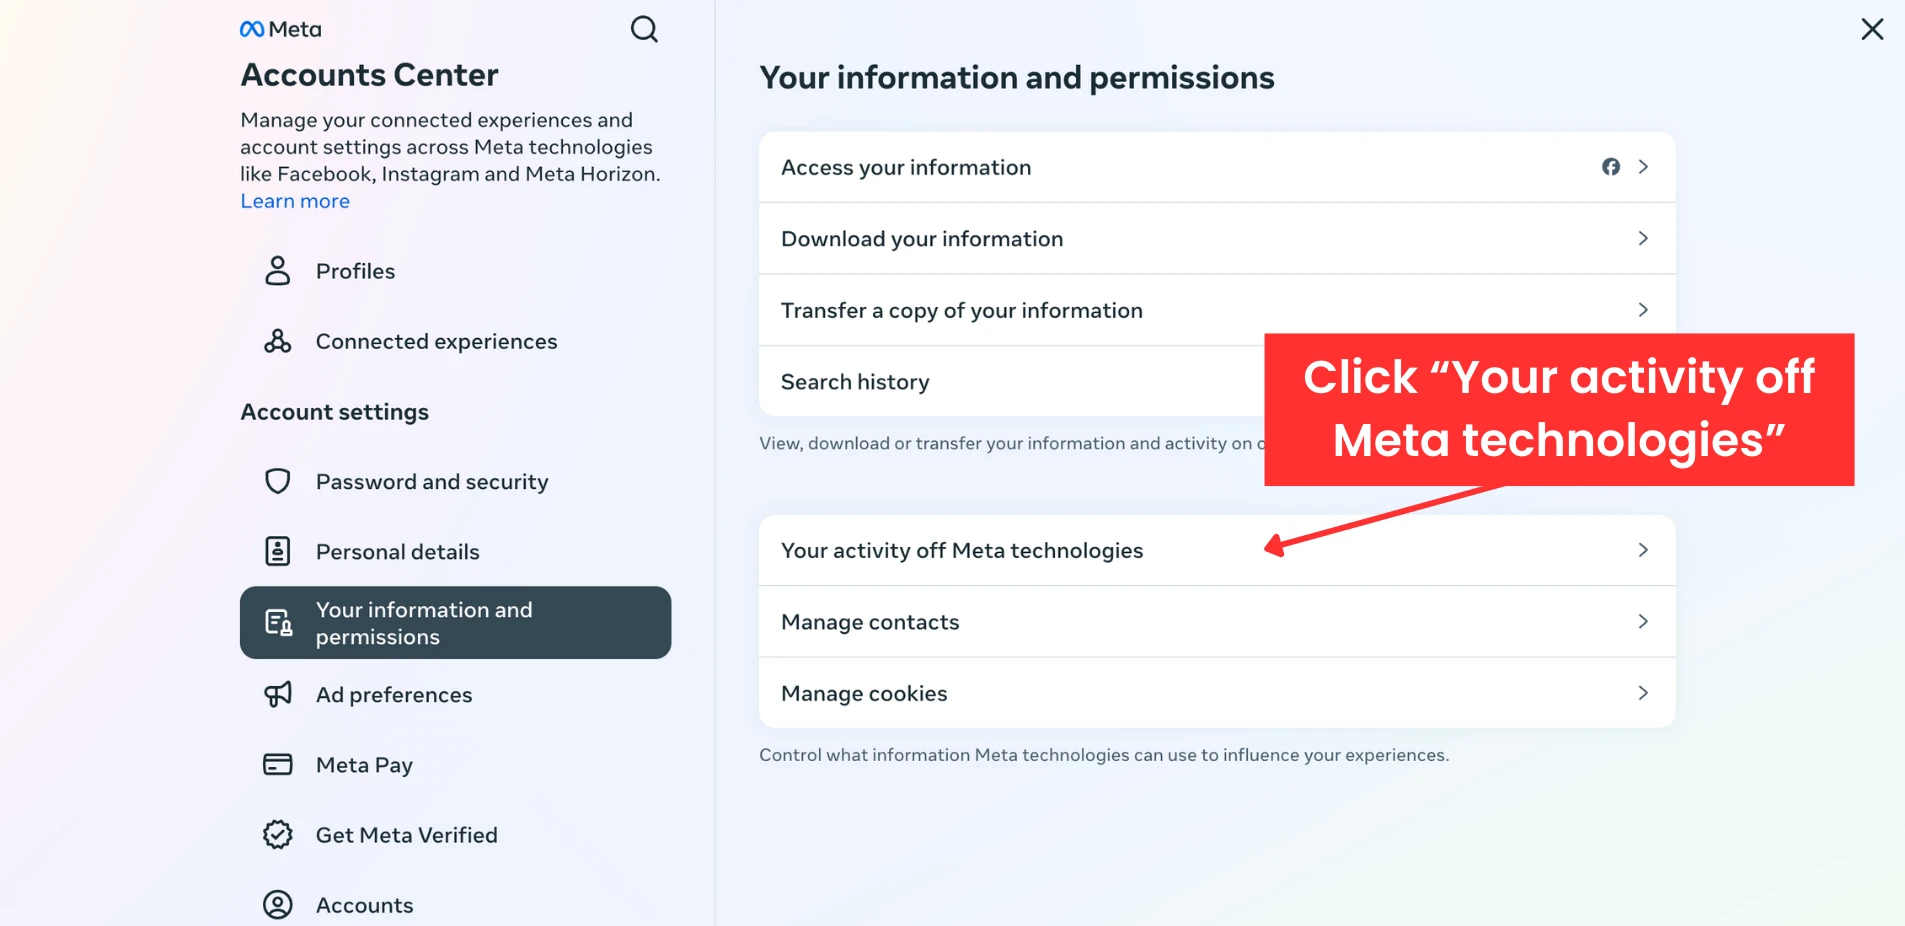
![Screenshot of Facebook activity off meta technologies]()
- Click “Recent Activity” to see a summary of the recent data Meta has received from apps and websites.
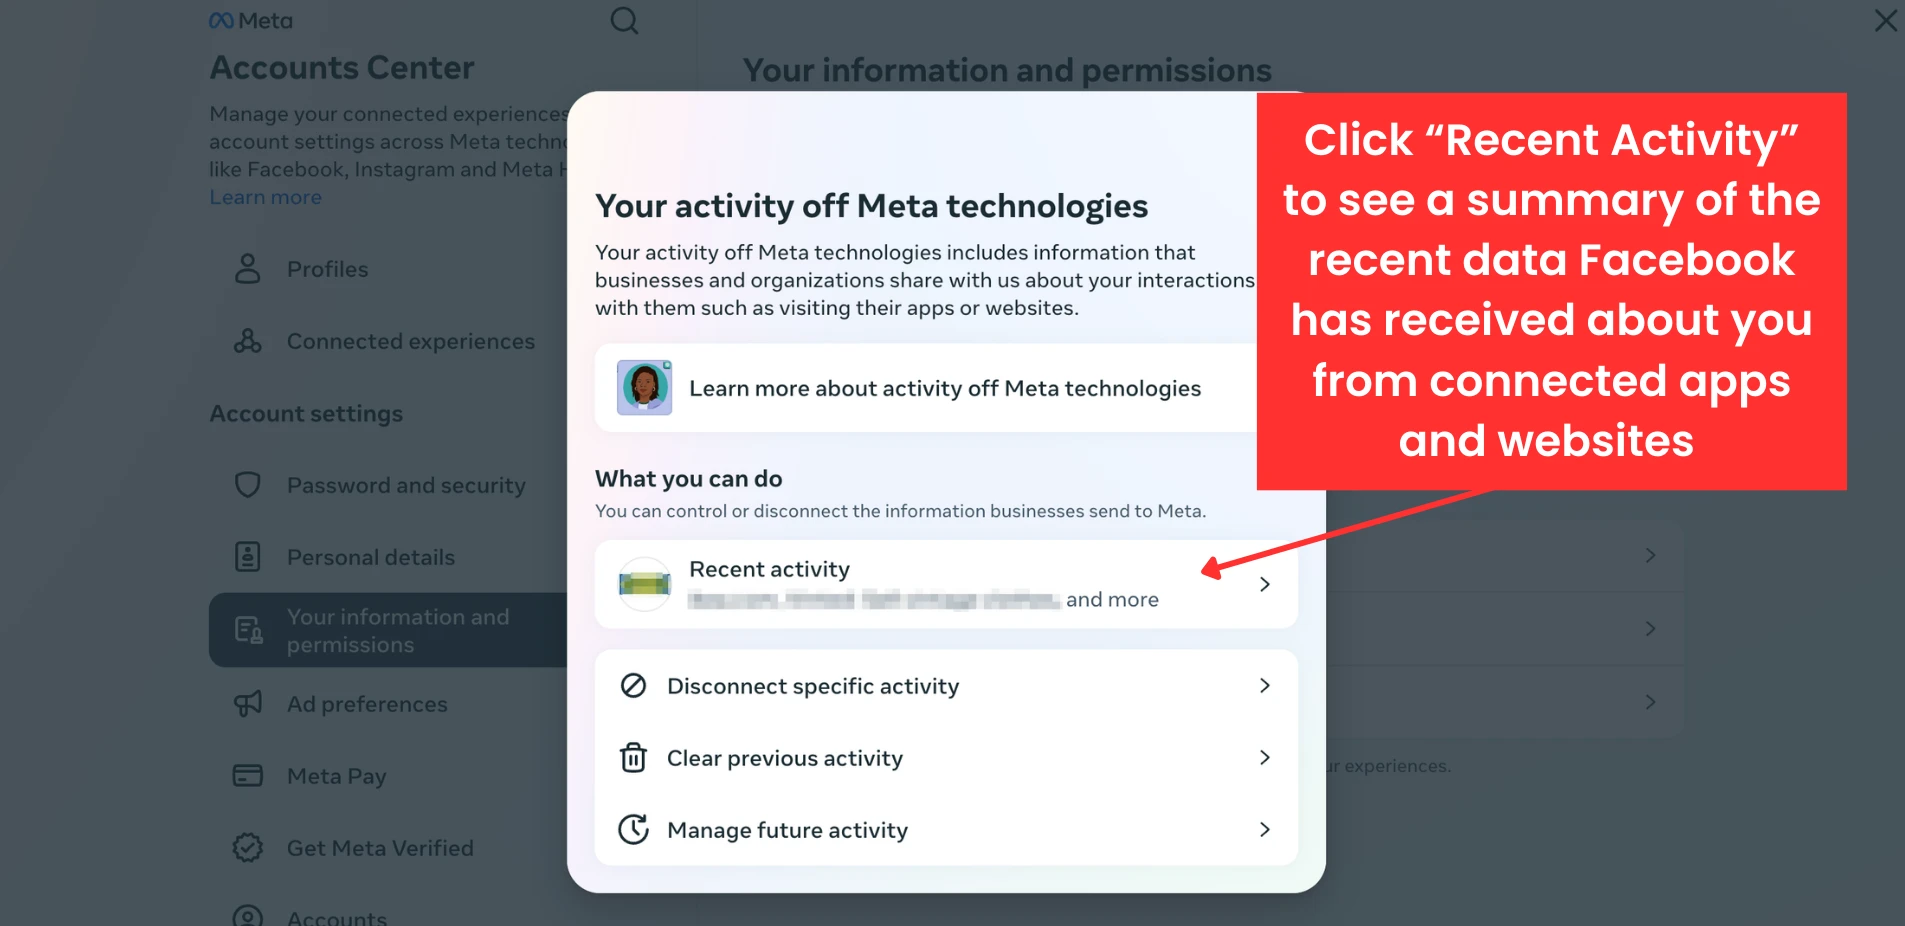
![Screenshot of Facebook screen activity]()
- Use the “Disconnect specific activity” option to select which apps and websites should no longer be able to share your activities with Meta.
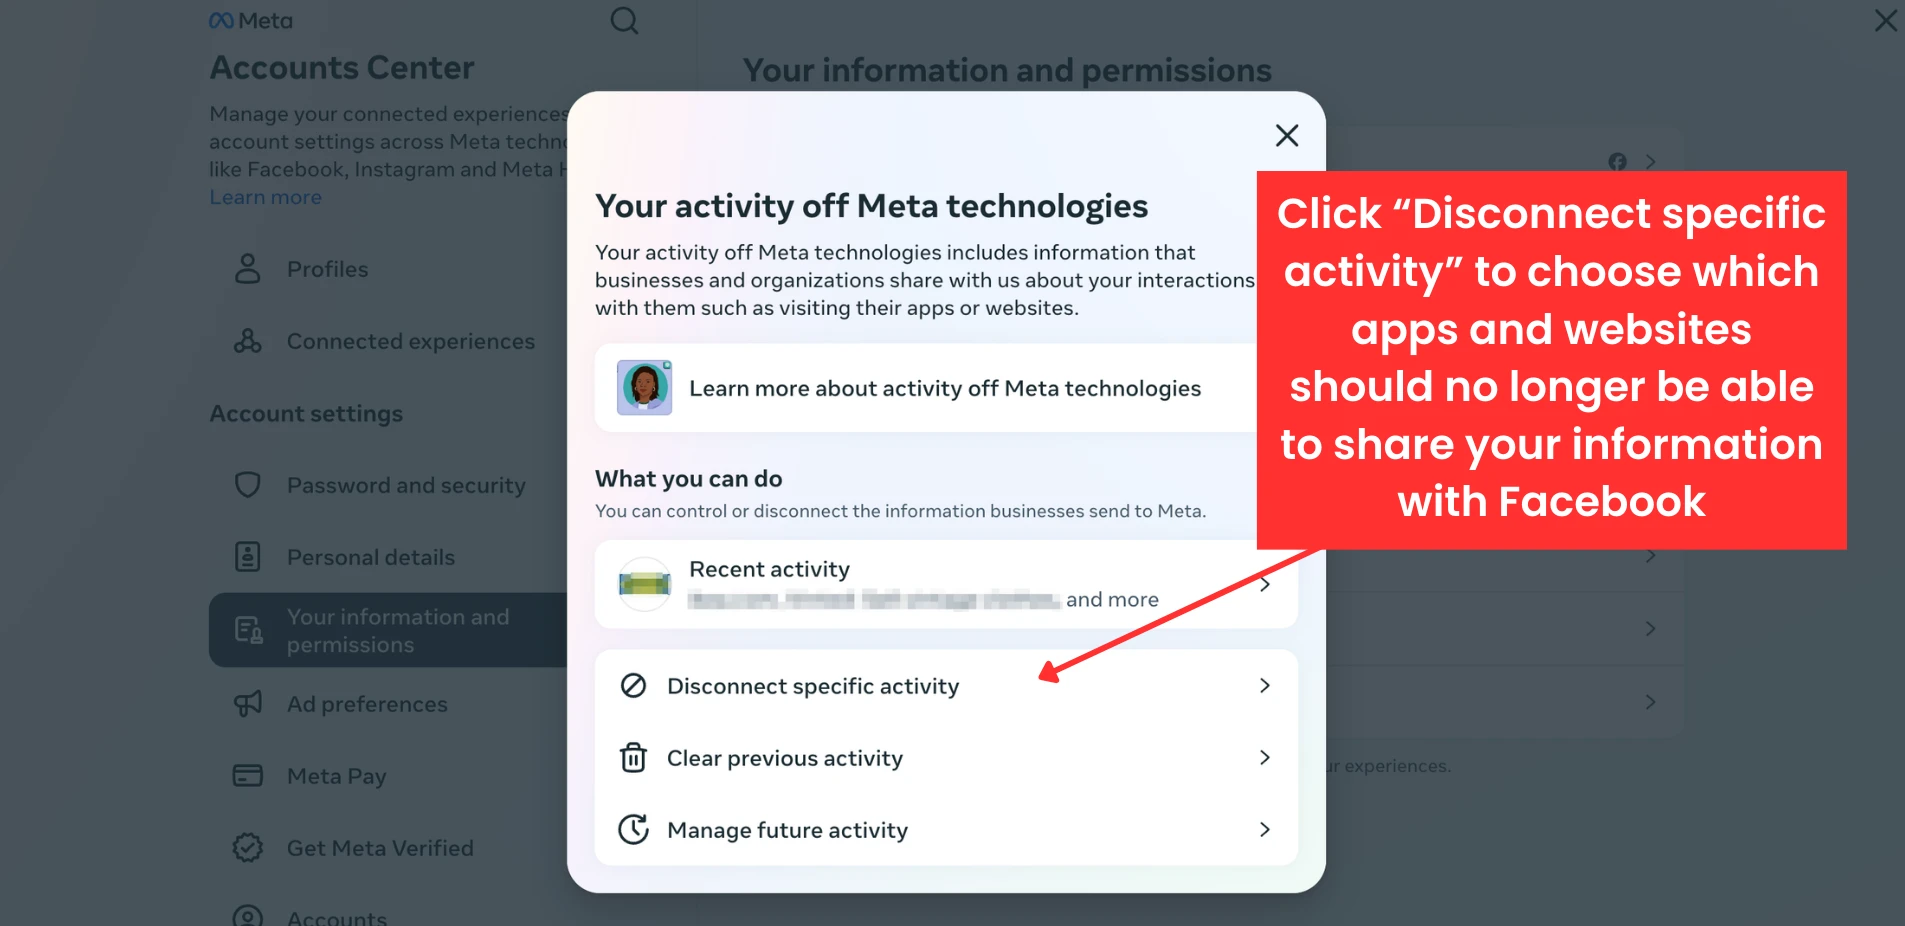
![Screenshot of Facebook to disconnect specific activity]()
- Choose “Clear previous activity” to remove your entire activity history from all connected apps and websites.
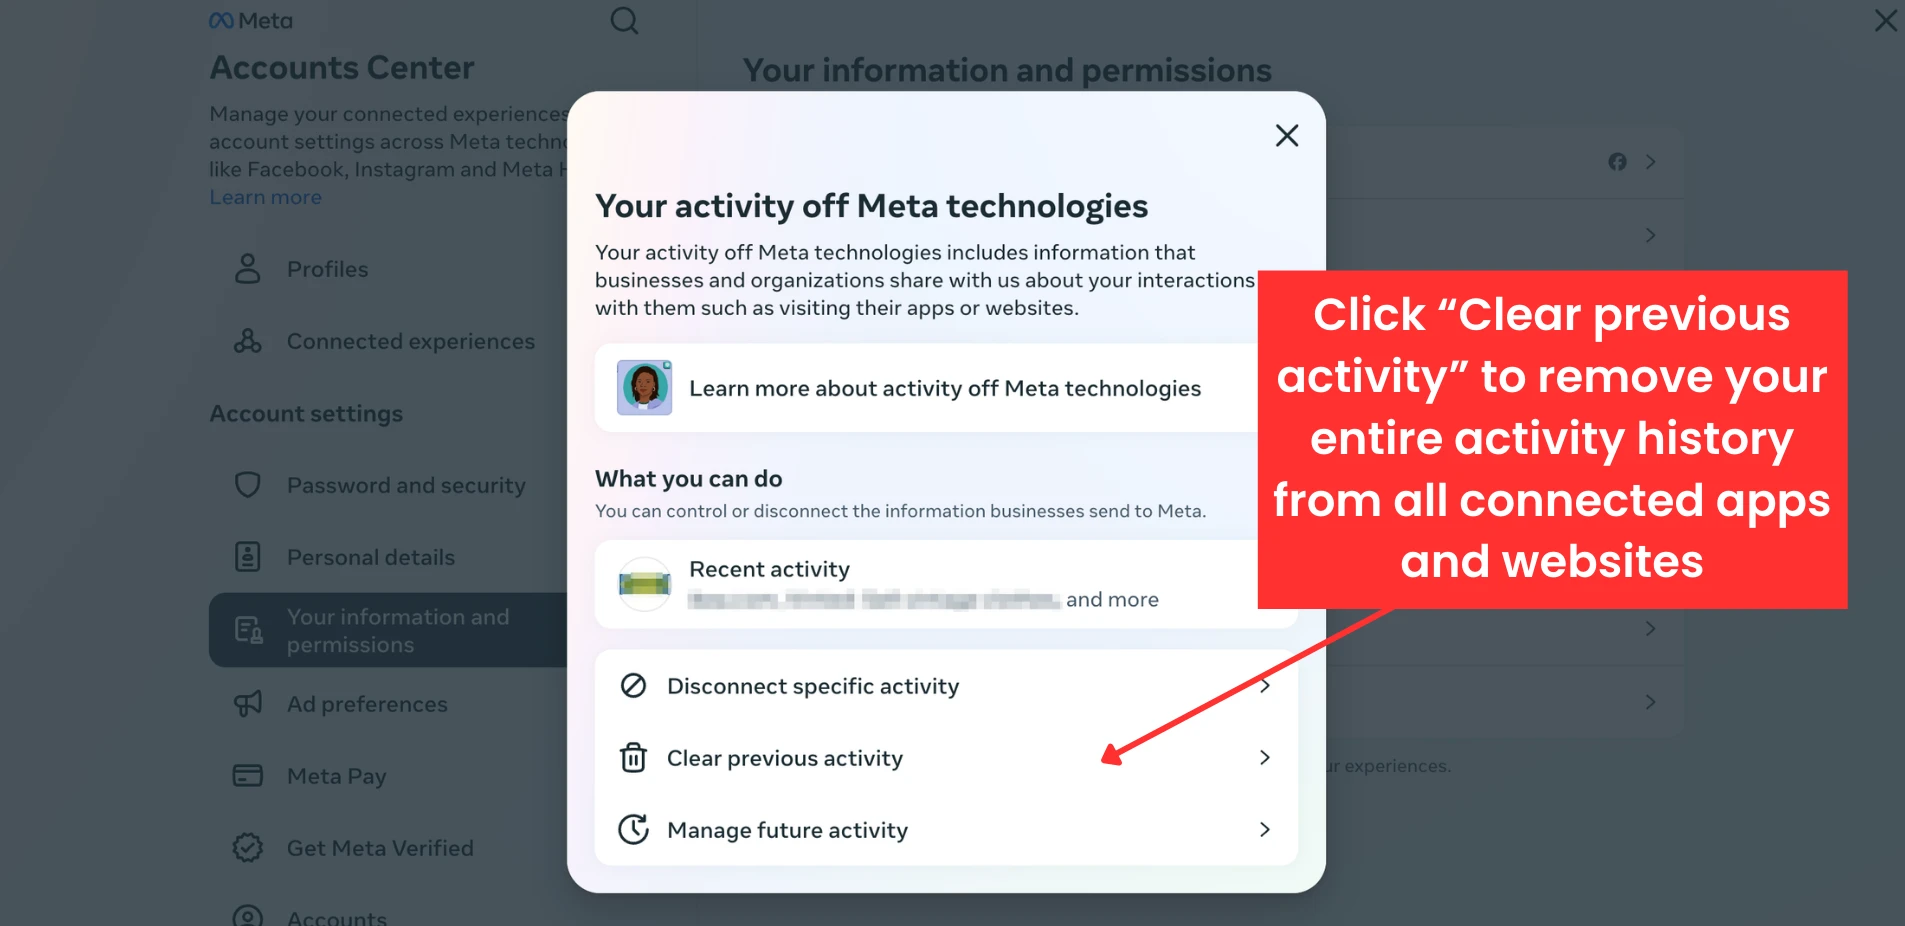
![Screenshot of Facebook to clear previous activity]()
- By selecting “Manage future activity,” you can decide if you want Meta to connect future activities from third-party businesses to your account. Opting to “Disconnect future activity” will also clear your past activities.
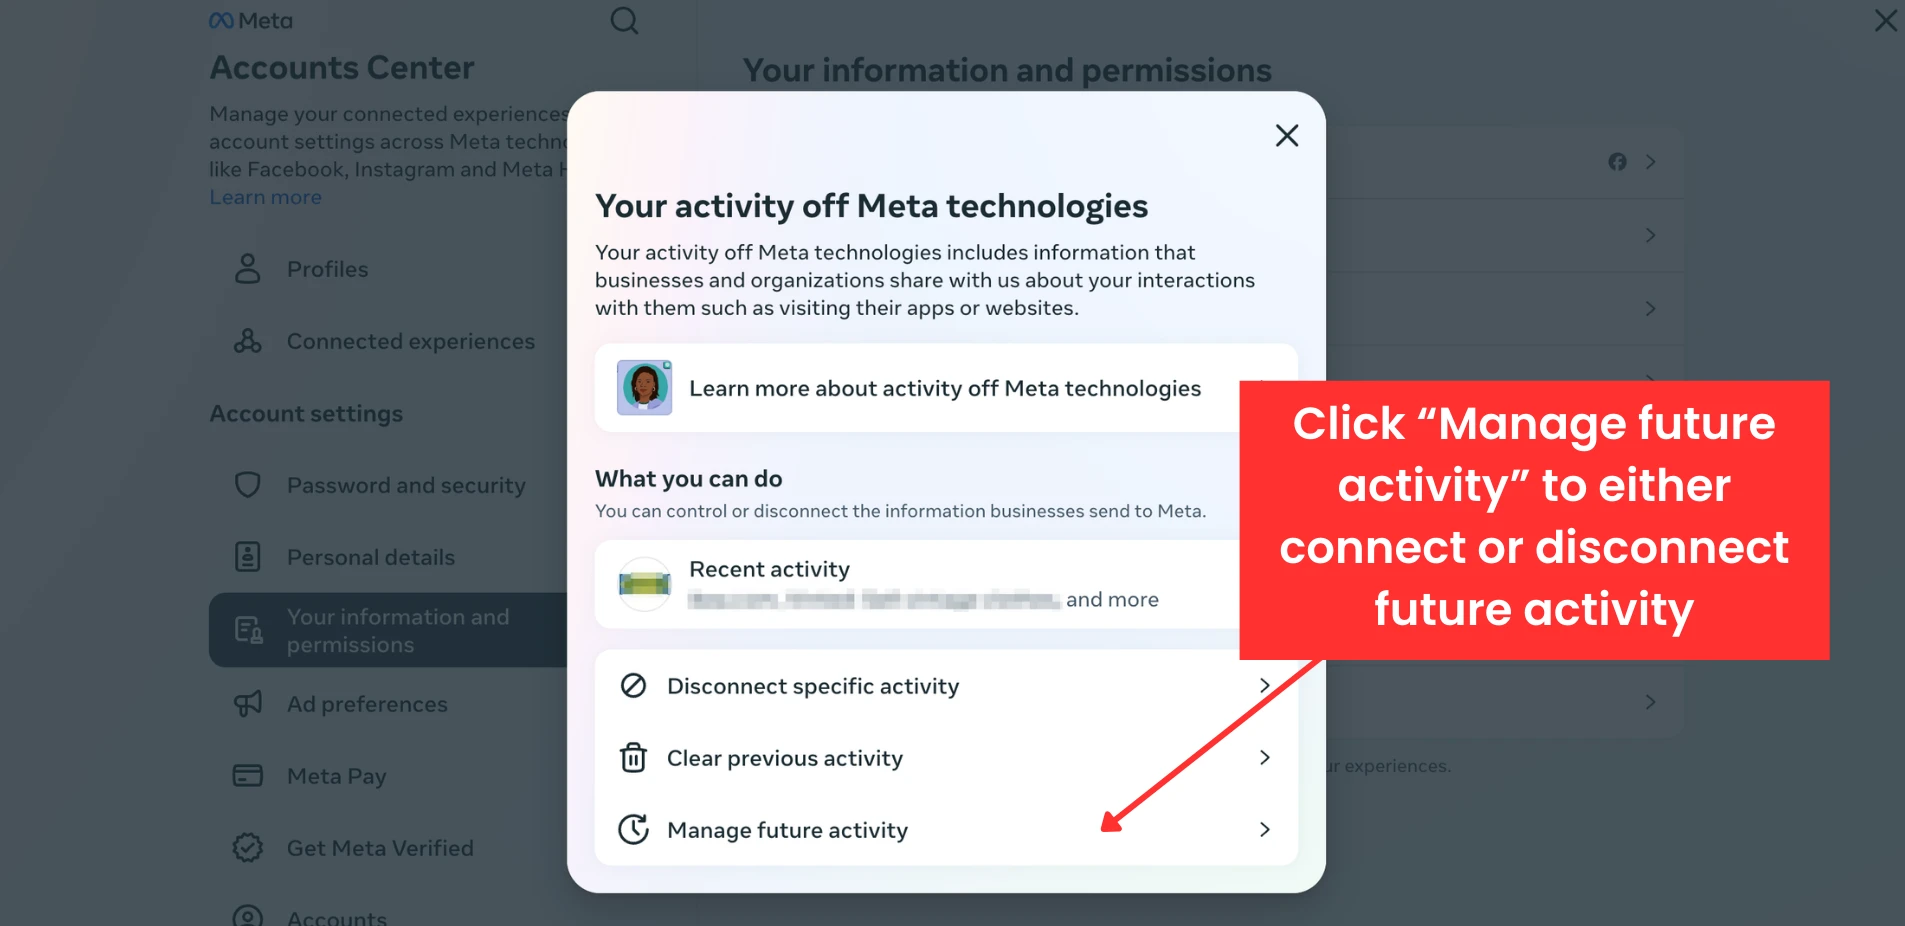
![Screenshot of activity off meta technologies on Facebook]()
How to Change Your Security Settings on Facebook
Maintaining control over who can see and interact with your content on Facebook is crucial for protecting your privacy and managing your online presence.
How to Change Your Audience and Visibility Settings on Facebook
- Access “Settings & Privacy.”
- On Desktop: Click your profile picture in the top right corner to open “Settings & Privacy” and then click “Settings.”

![Screenshot of Facebook profile menu]()

![Screenshot of Facebook Settings menu]()
- On Mobile: Tap the hamburger menu icon (in the bottom right corner of the app on iPhone, or top right on Android), open the “Menu,” then tap the cogwheel icon in the top right to access “Settings & privacy.”

![Screenshot of iPhone and Android with hamburger icon.]()

![Screenshot of iPhone and Android cogwheel icon.]()
- On Desktop: Click your profile picture in the top right corner to open “Settings & Privacy” and then click “Settings.”
- Scroll down to “Audience and Visibility” to view various sub-settings.
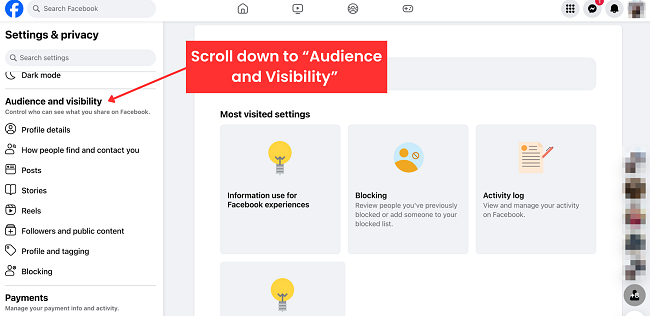
![Screenshot of audience and visibility on Facebook]()
- Click on “Profile Details” to adjust who can view various sections of your “About” information.
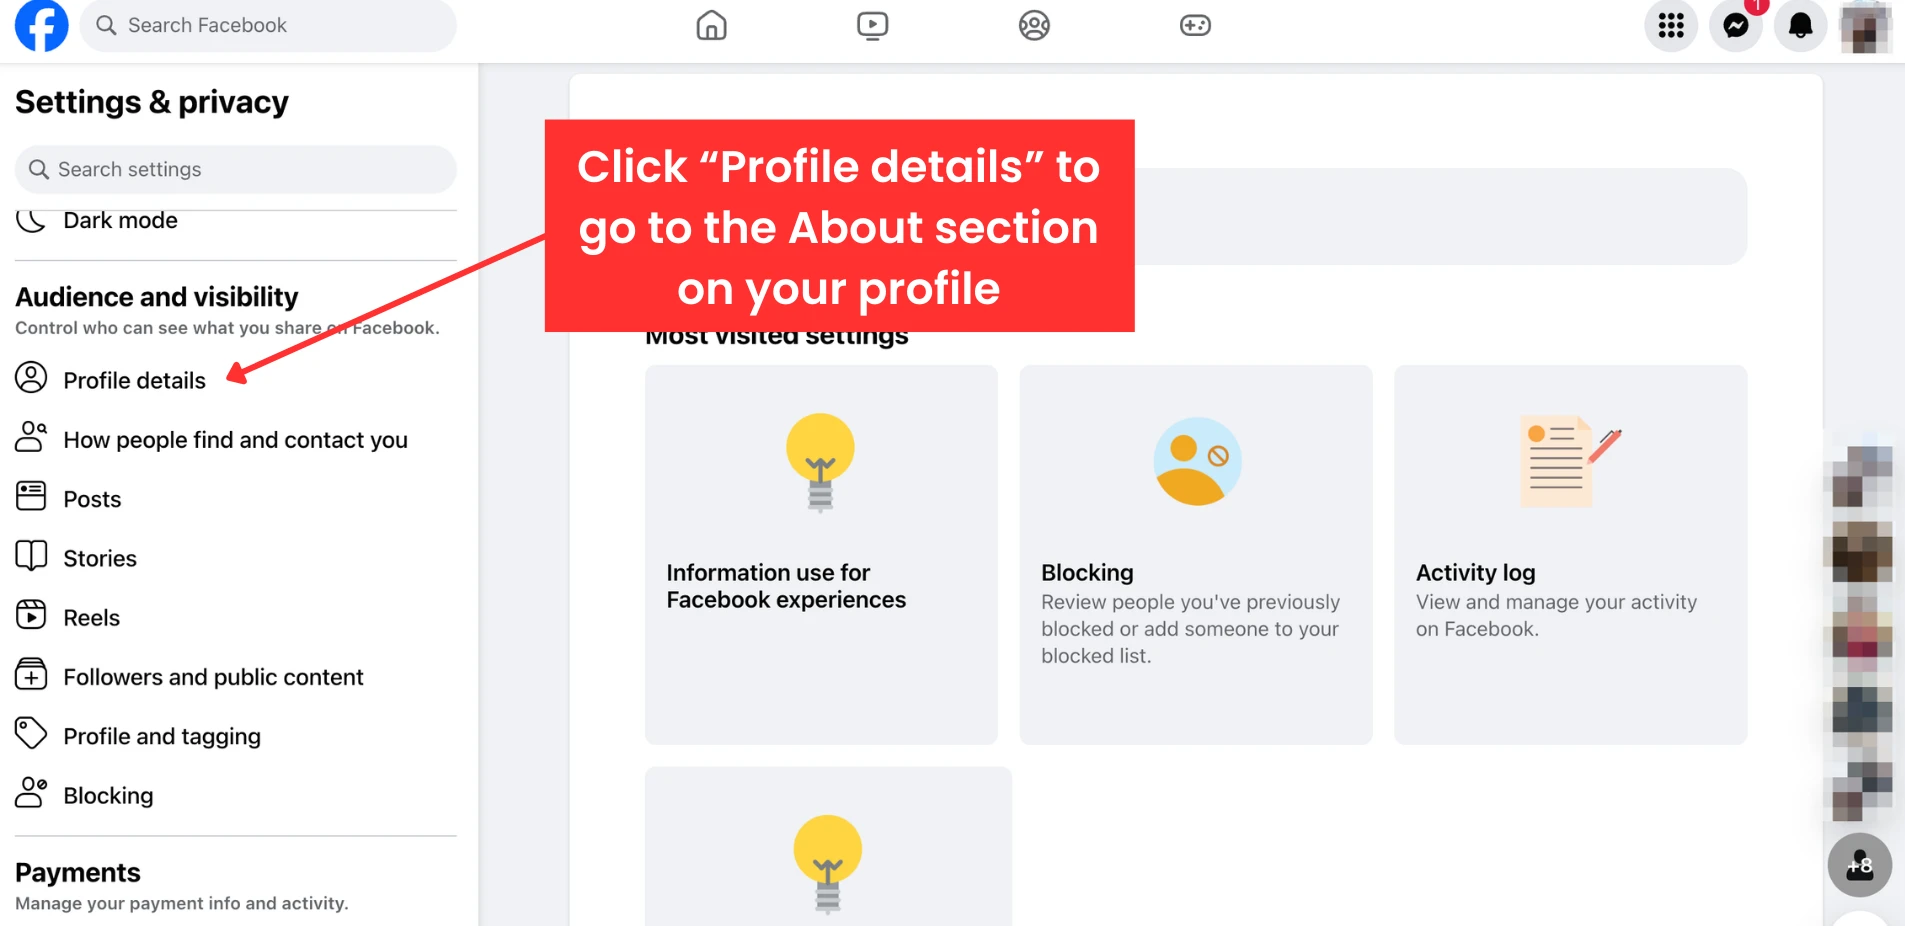
![Screenshot of profile details on Facebook]()
- On desktop, modify the audience for each item by clicking the icon next to it.
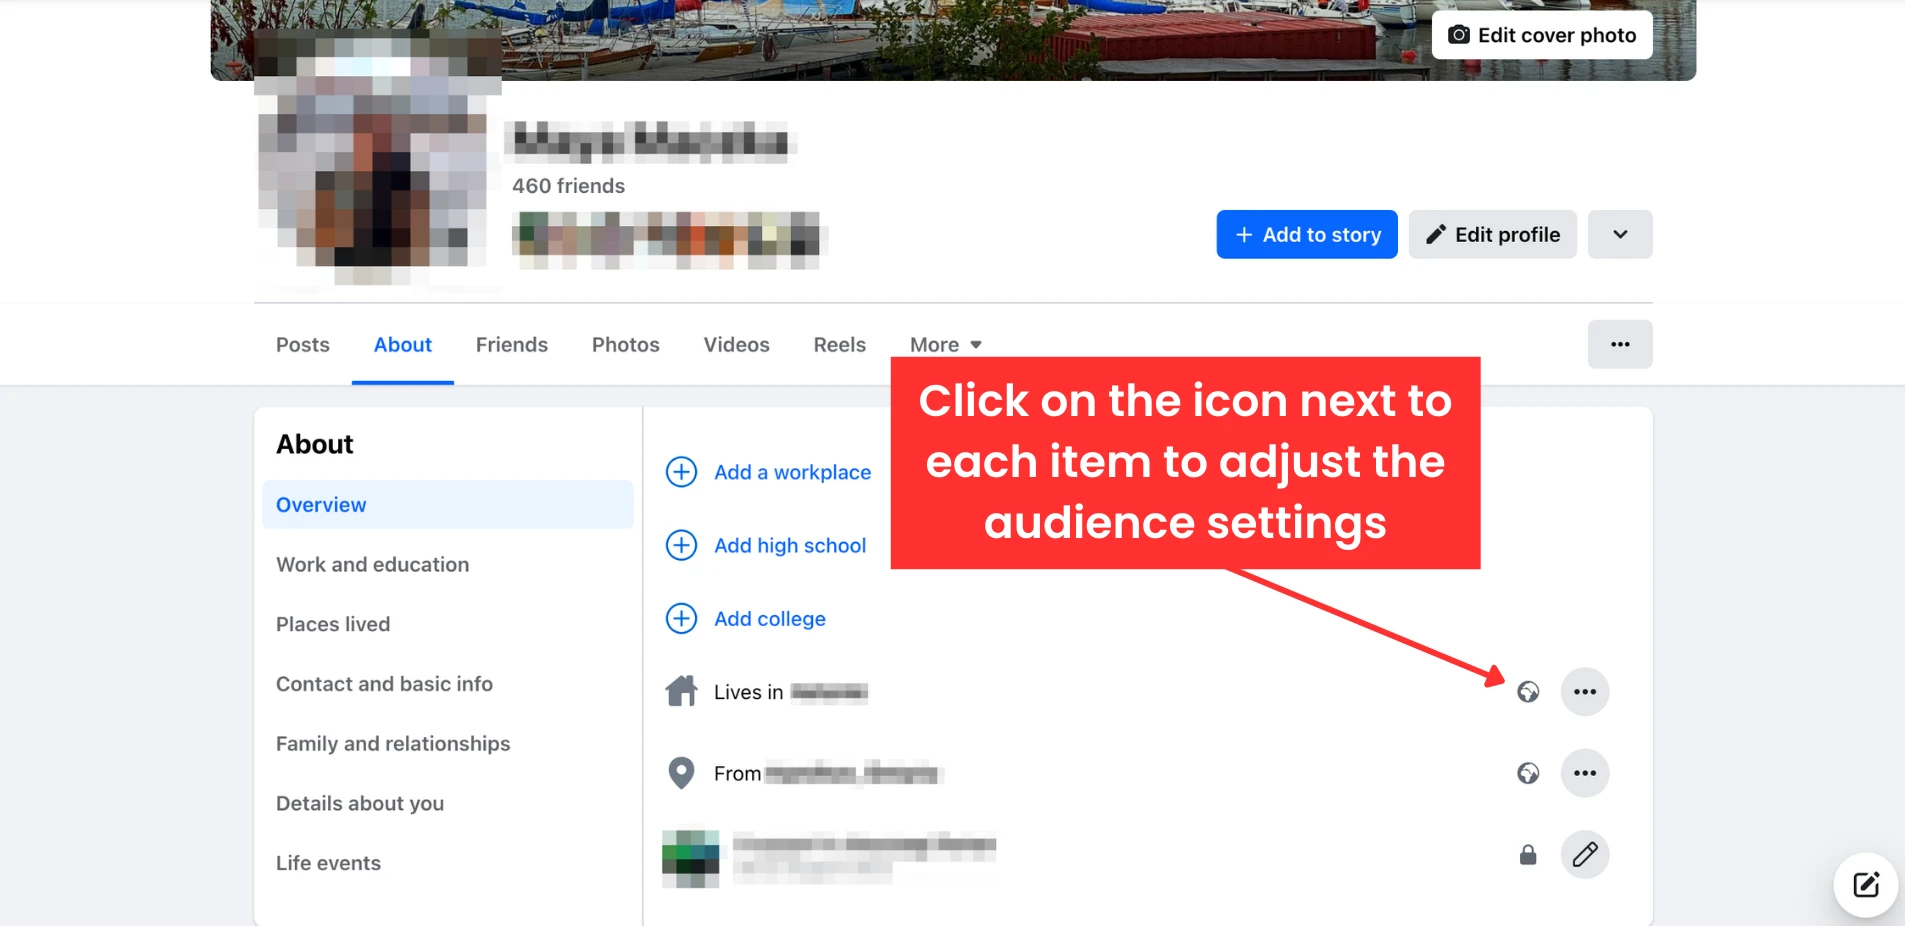
![Screenshot of adjust audience settings icon on Facebook]()
- On mobile devices, tap the pencil icon next to each category to edit the information and its audience settings. In some instances, you may need to tap “Edit” to make these adjustments.
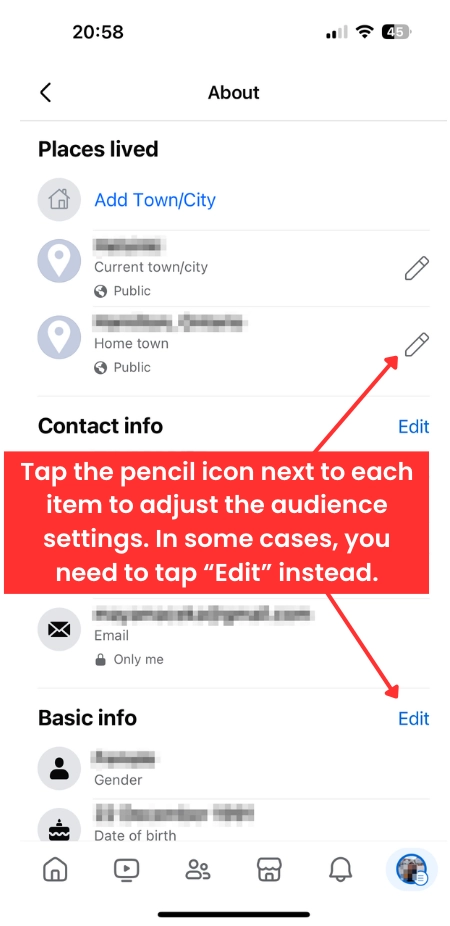
![Screenshot of pencil icon to edit on Facebook]()
- On desktop, modify the audience for each item by clicking the icon next to it.
- Back under “Audience and visibility,” select “How people find and contact you” to control friend requests, the visibility of your friends list, suggestions based on your contact information, and external search engines’ access to your profile.
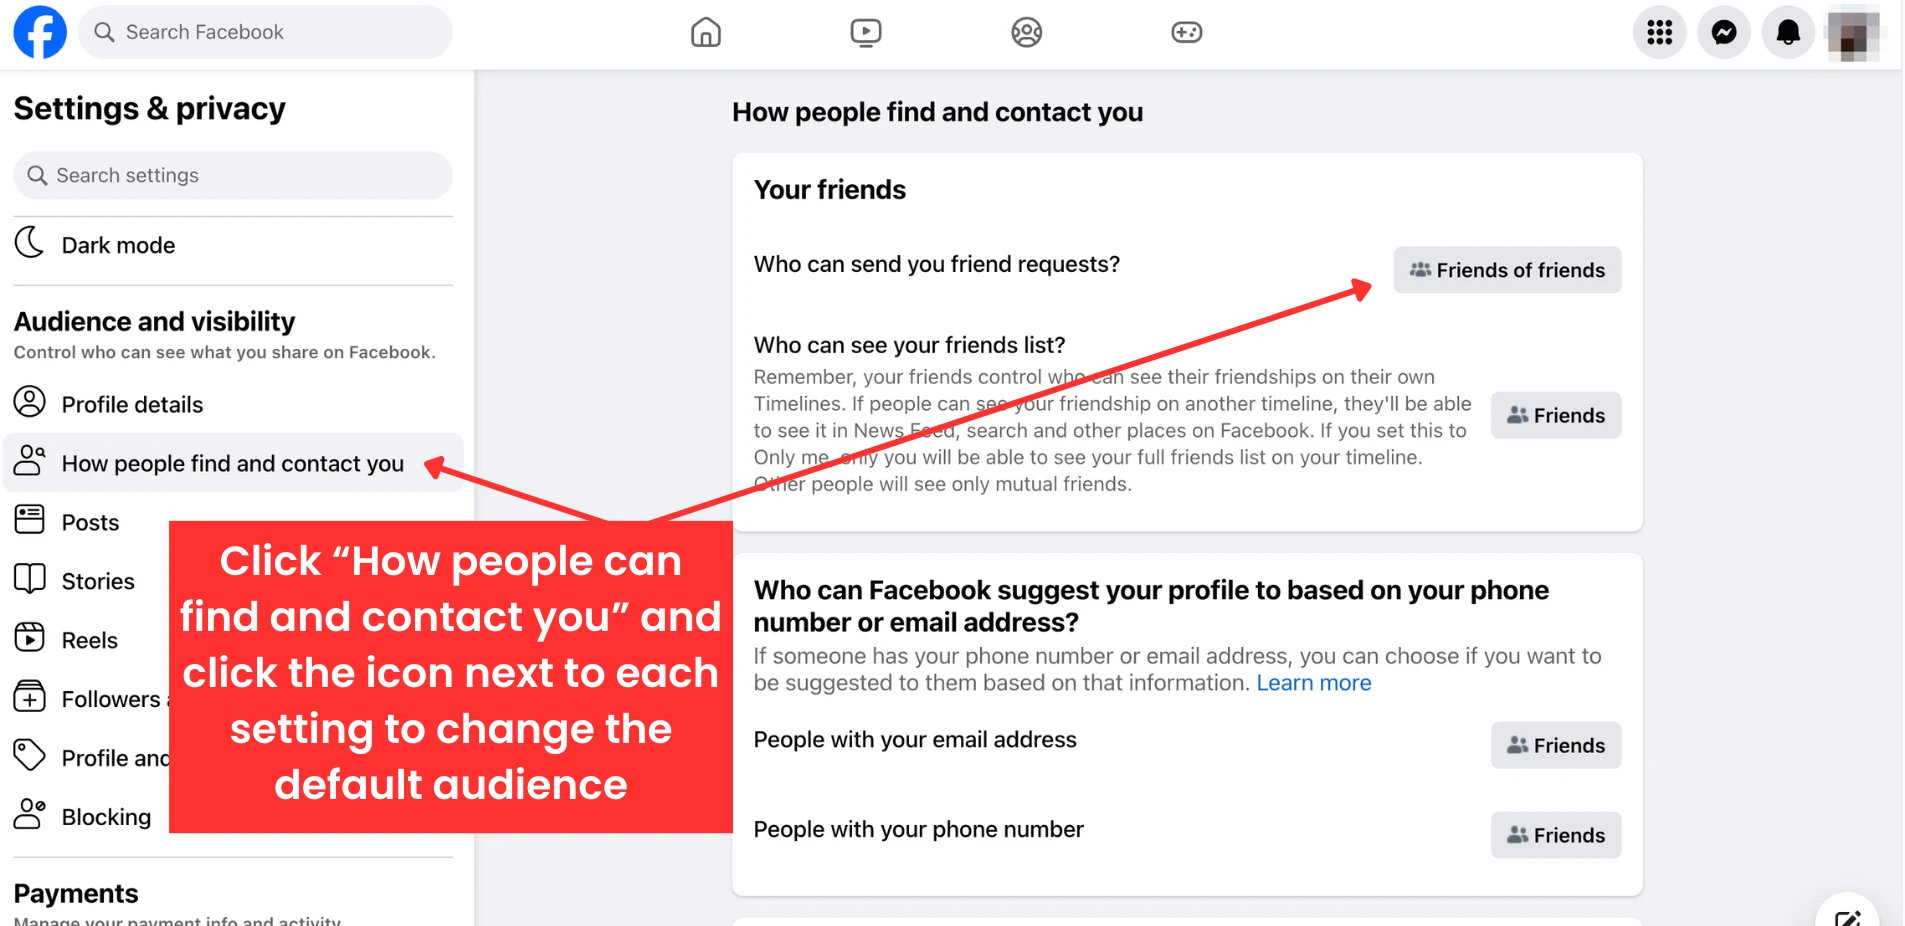
![Screenshot of settings and privacy on Facebook]()
- Select “Posts” to set audience preferences for your future posts and to restrict the visibility of your past posts.
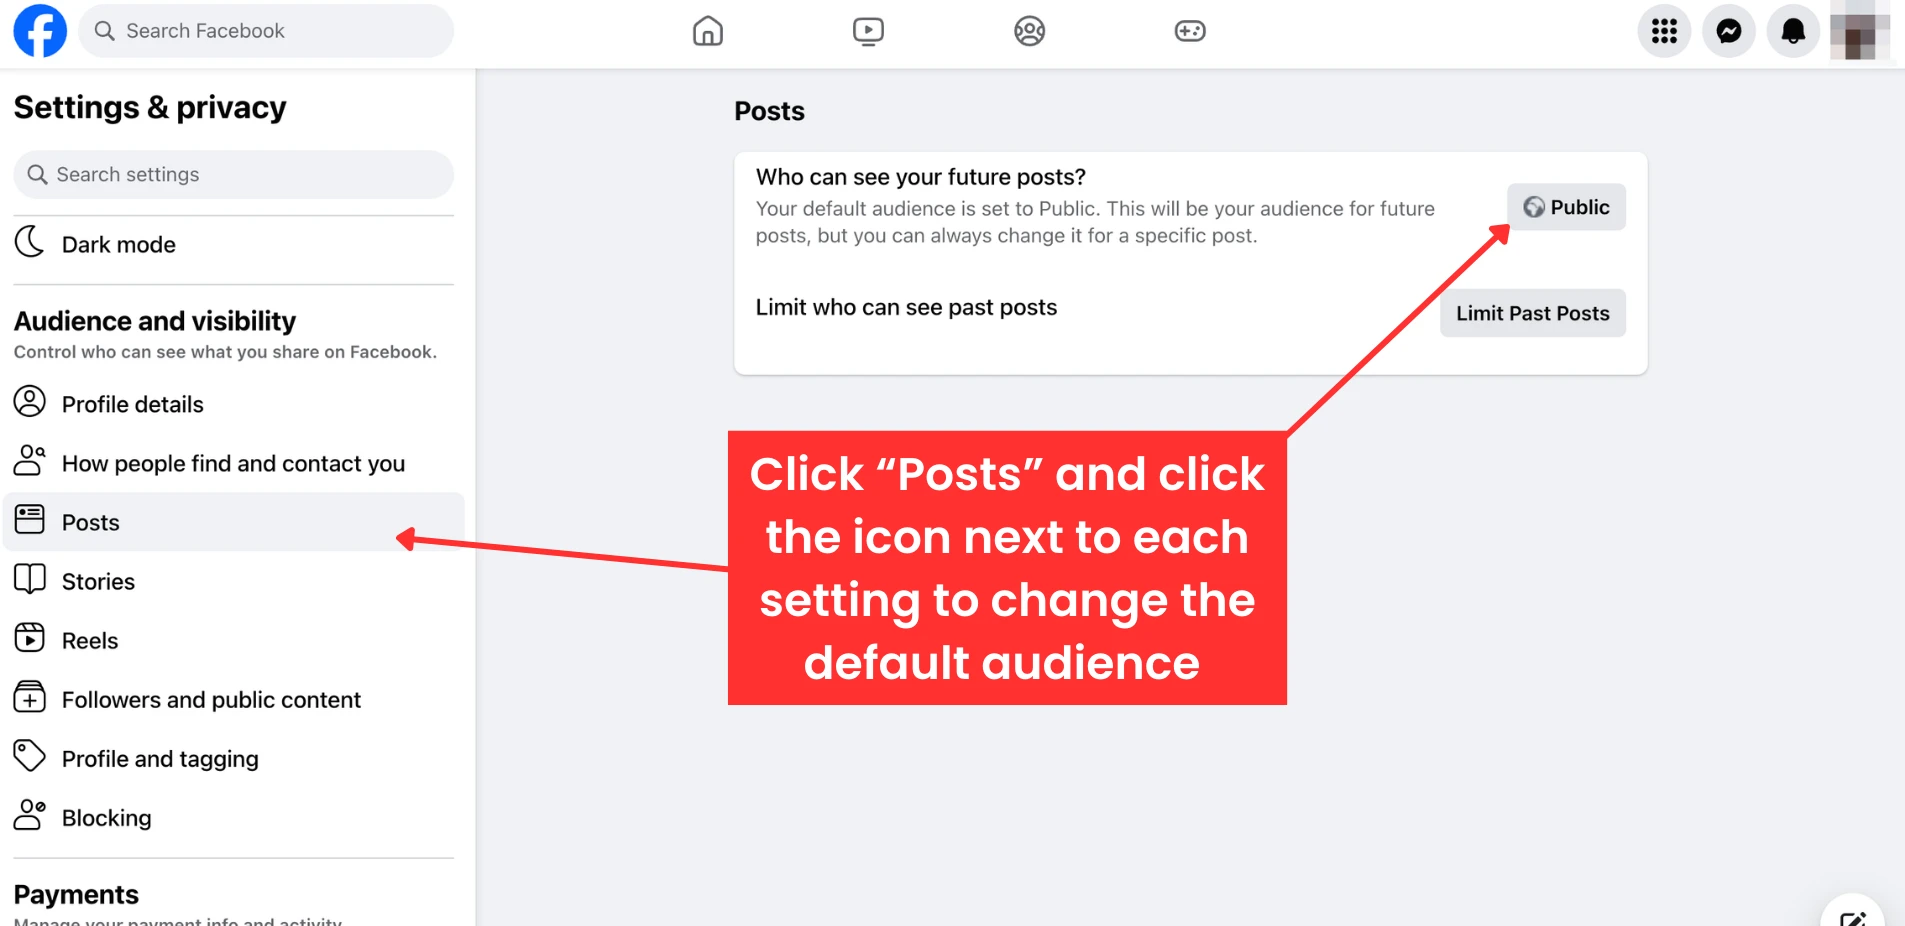
![Screenshot of post icon to change audience on Facebook]()
- Click “Stories” to adjust who can see your stories and manage your story archive.
- On desktop, click the icon next to “Who can see your stories?” to customize the default audience. Additionally, you can choose to allow others to share your public stories, let people share your stories when you mention them, and set your stories to be automatically archived.
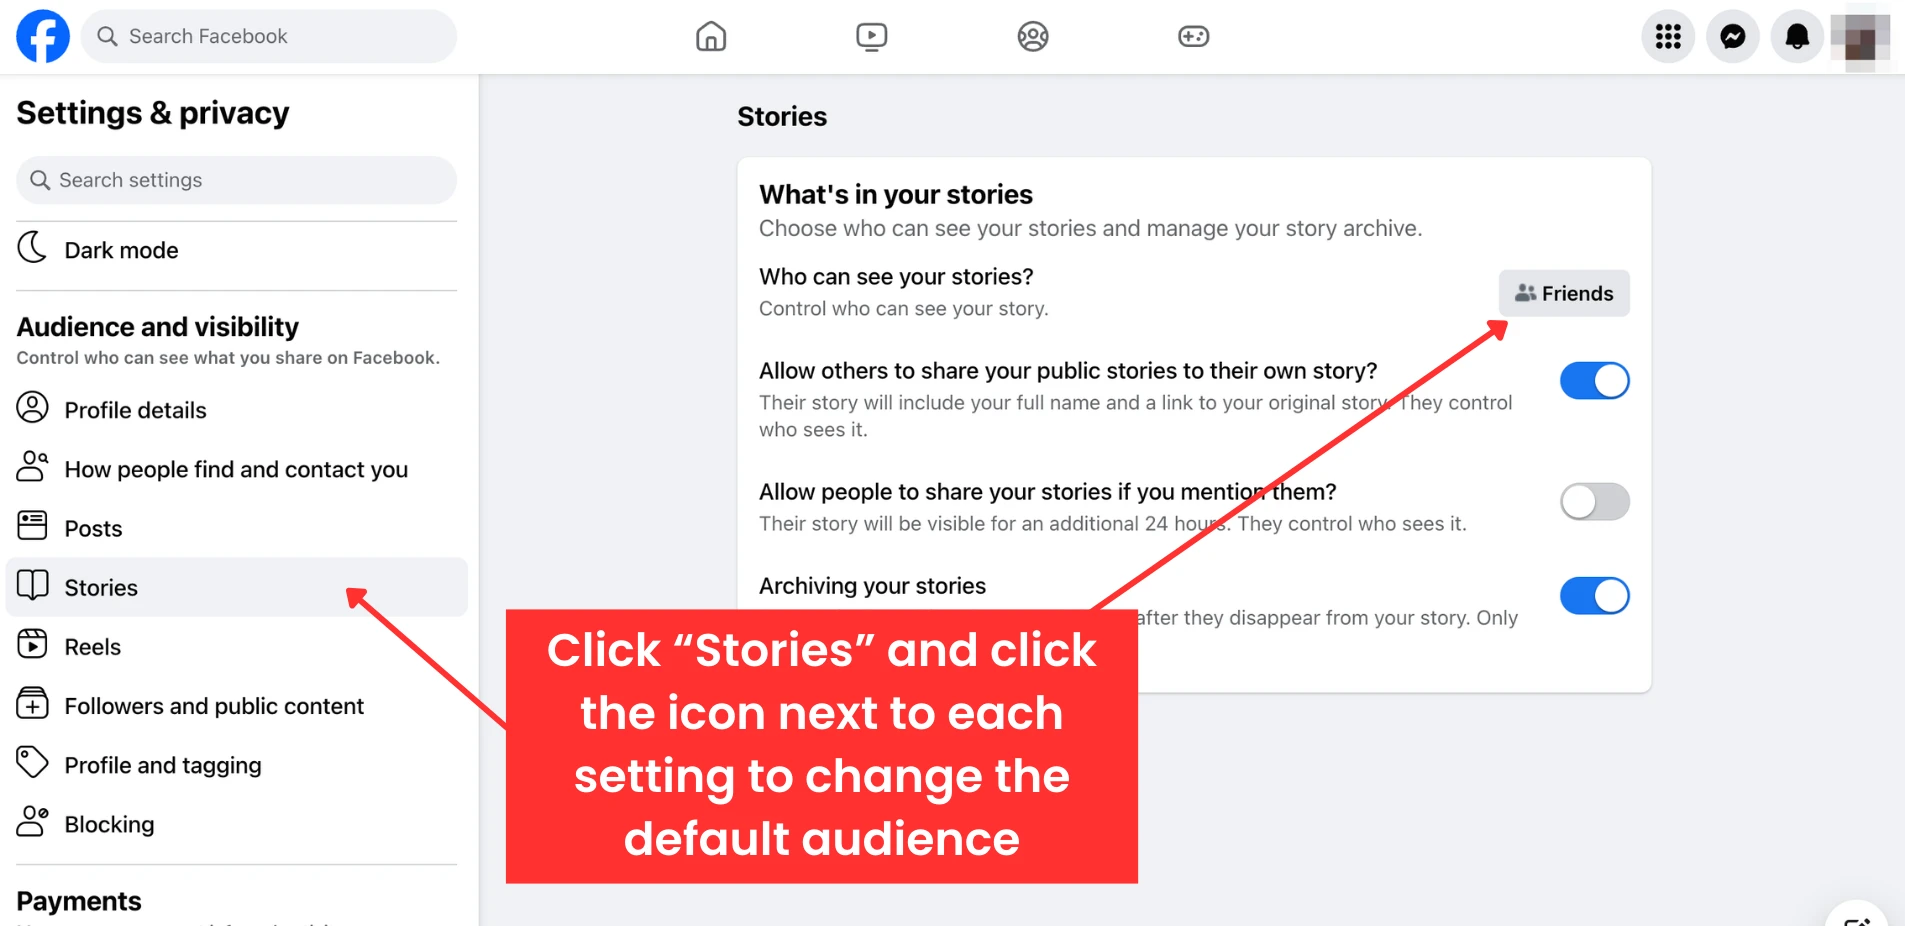
![Screenshot of settings and privacy stories on Facebook]()
- On mobile devices, you have access to an expanded set of settings. Tap “Story privacy” to determine who can view your stories. Use “Sharing Options” to control whether others can share your stories to their own timelines. Select “Story archive” to decide if your stories should be automatically saved. Lastly, visit “Stories you’ve muted” to view or modify any profiles whose stories you have muted.
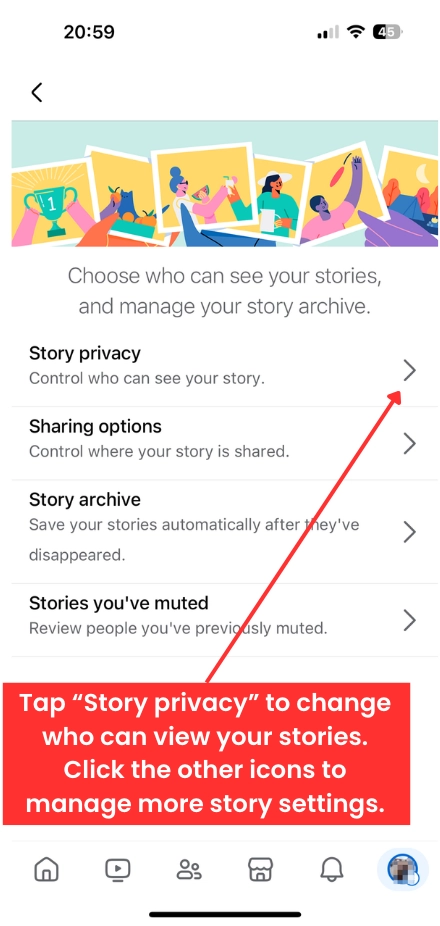
![Screenshot of Story Privacy on Facebook]()
- On desktop, click the icon next to “Who can see your stories?” to customize the default audience. Additionally, you can choose to allow others to share your public stories, let people share your stories when you mention them, and set your stories to be automatically archived.
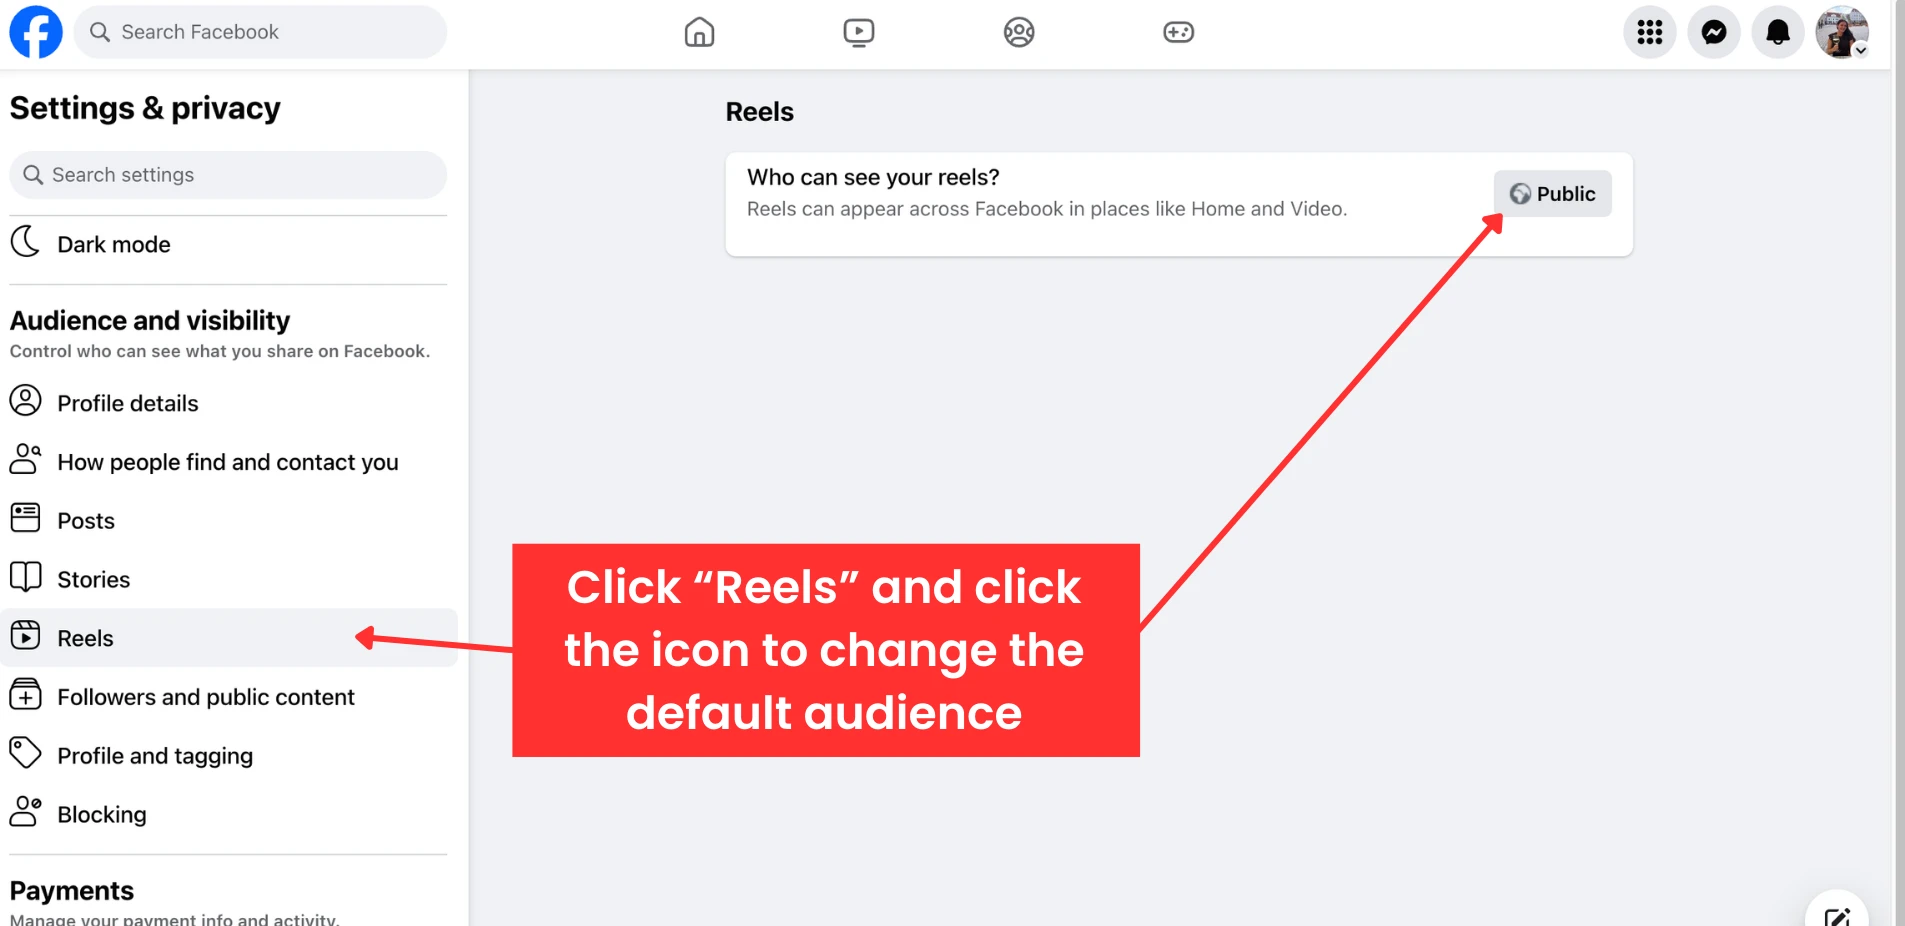
- Select “Reels” to adjust visibility settings for your reels.
- On desktop, click the icon next to “Who can see your reels?” to edit the default audience for your reels.
![Screenshot of reels default audience on Facebook]()
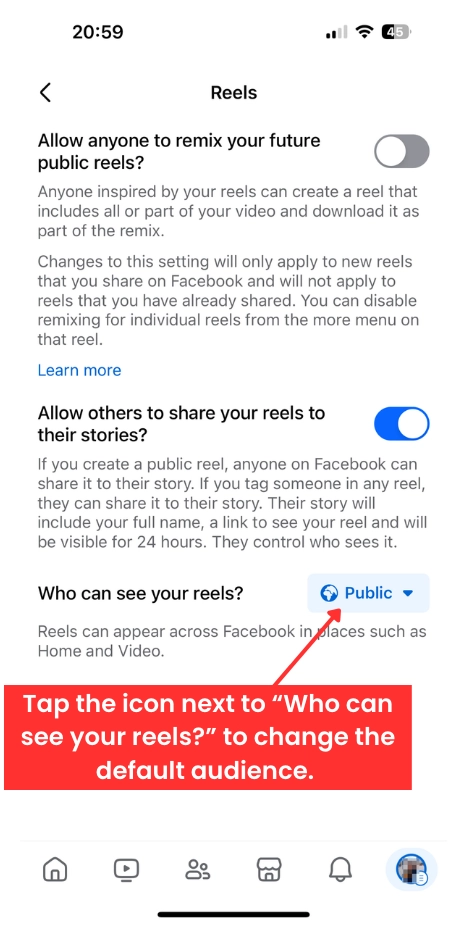
- On mobile devices, you’ll find the “Who can see your reels?” option at the bottom of the menu. Tap the icon to modify the default audience for your reels. Additionally, you can enable others to remix your public reels (allowing them to incorporate all or part of your video into their own creations) and allow others to share your reels to their stories. Use the toggle to activate or deactivate these features.
![Screenshot of reels settings on Facebook]()
- On desktop, click the icon next to “Who can see your reels?” to edit the default audience for your reels.
- Click “Followers and public content” to control who can follow you, who can see your followers and followings, comment settings on public posts, notifications from non-friends, and previews of your public group posts.
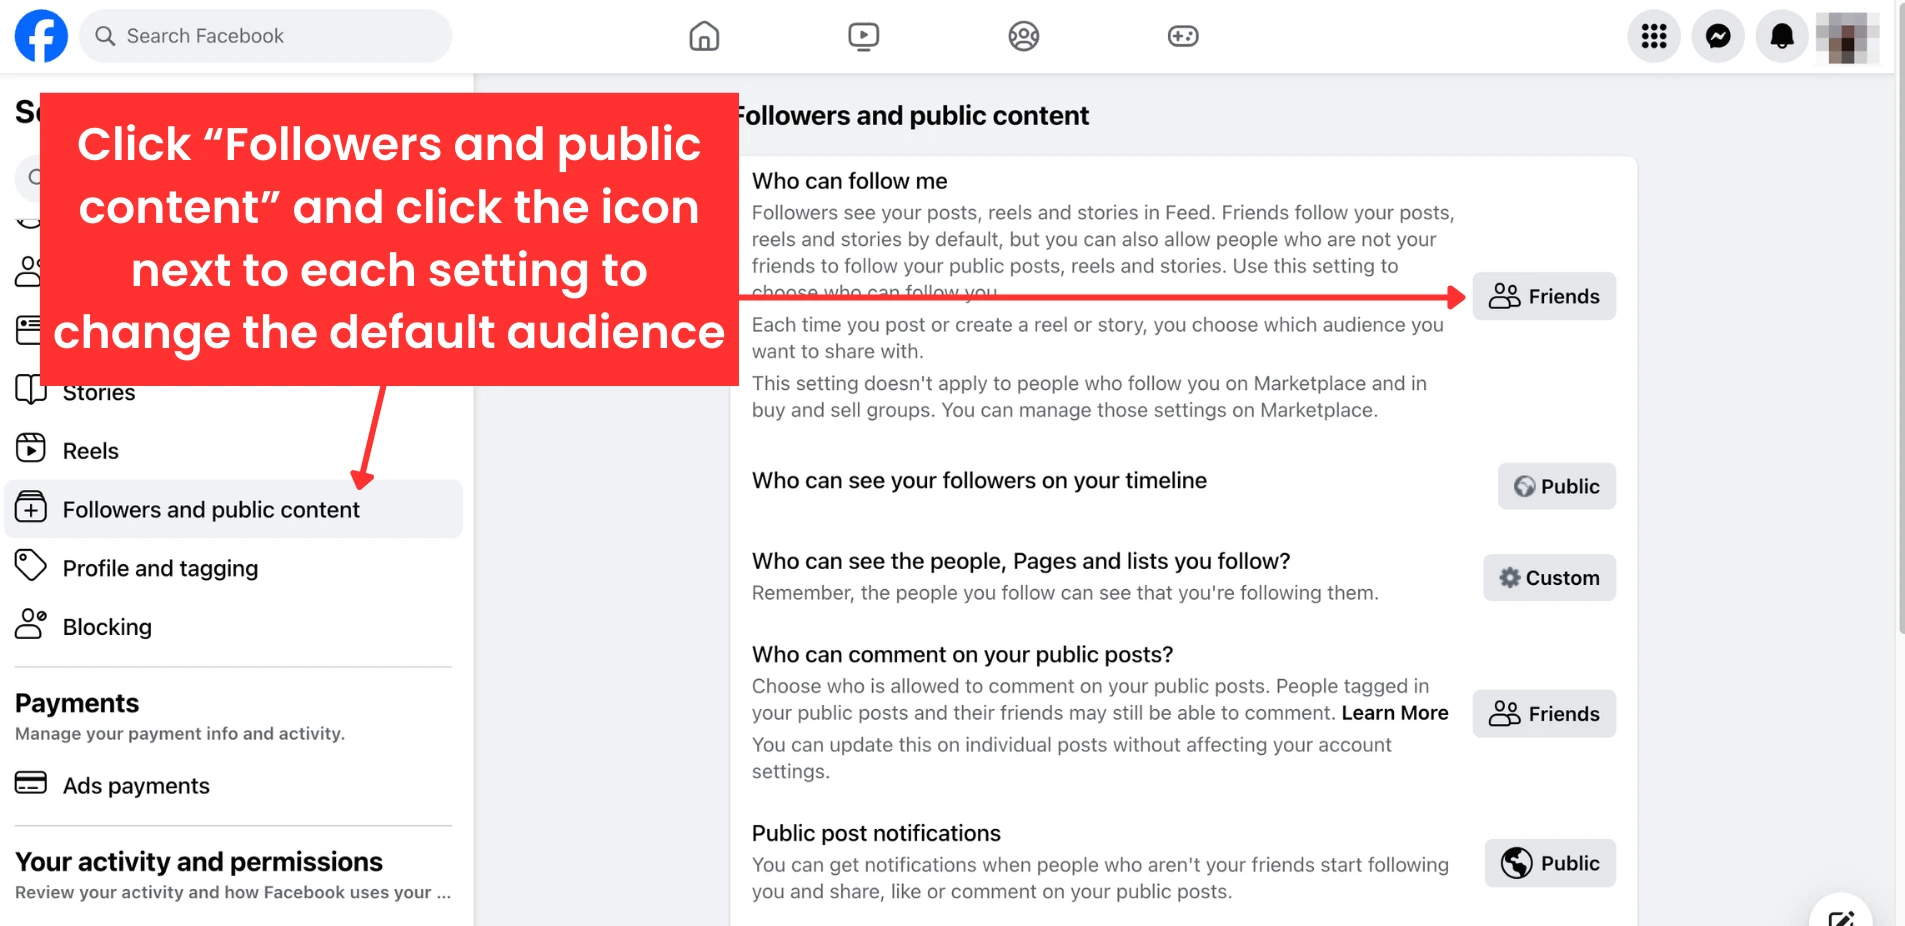
![Screenshot followers and public content on Facebook]()
- Choose “Profile and tagging” to manage who can post or see content on your profile, share your posts to their story, see others’ posts on your profile, view posts you are tagged in, and whether or not you’d like to review tags added by others before their post appears.

![Screenshot of profile and tagging on Facebook]()
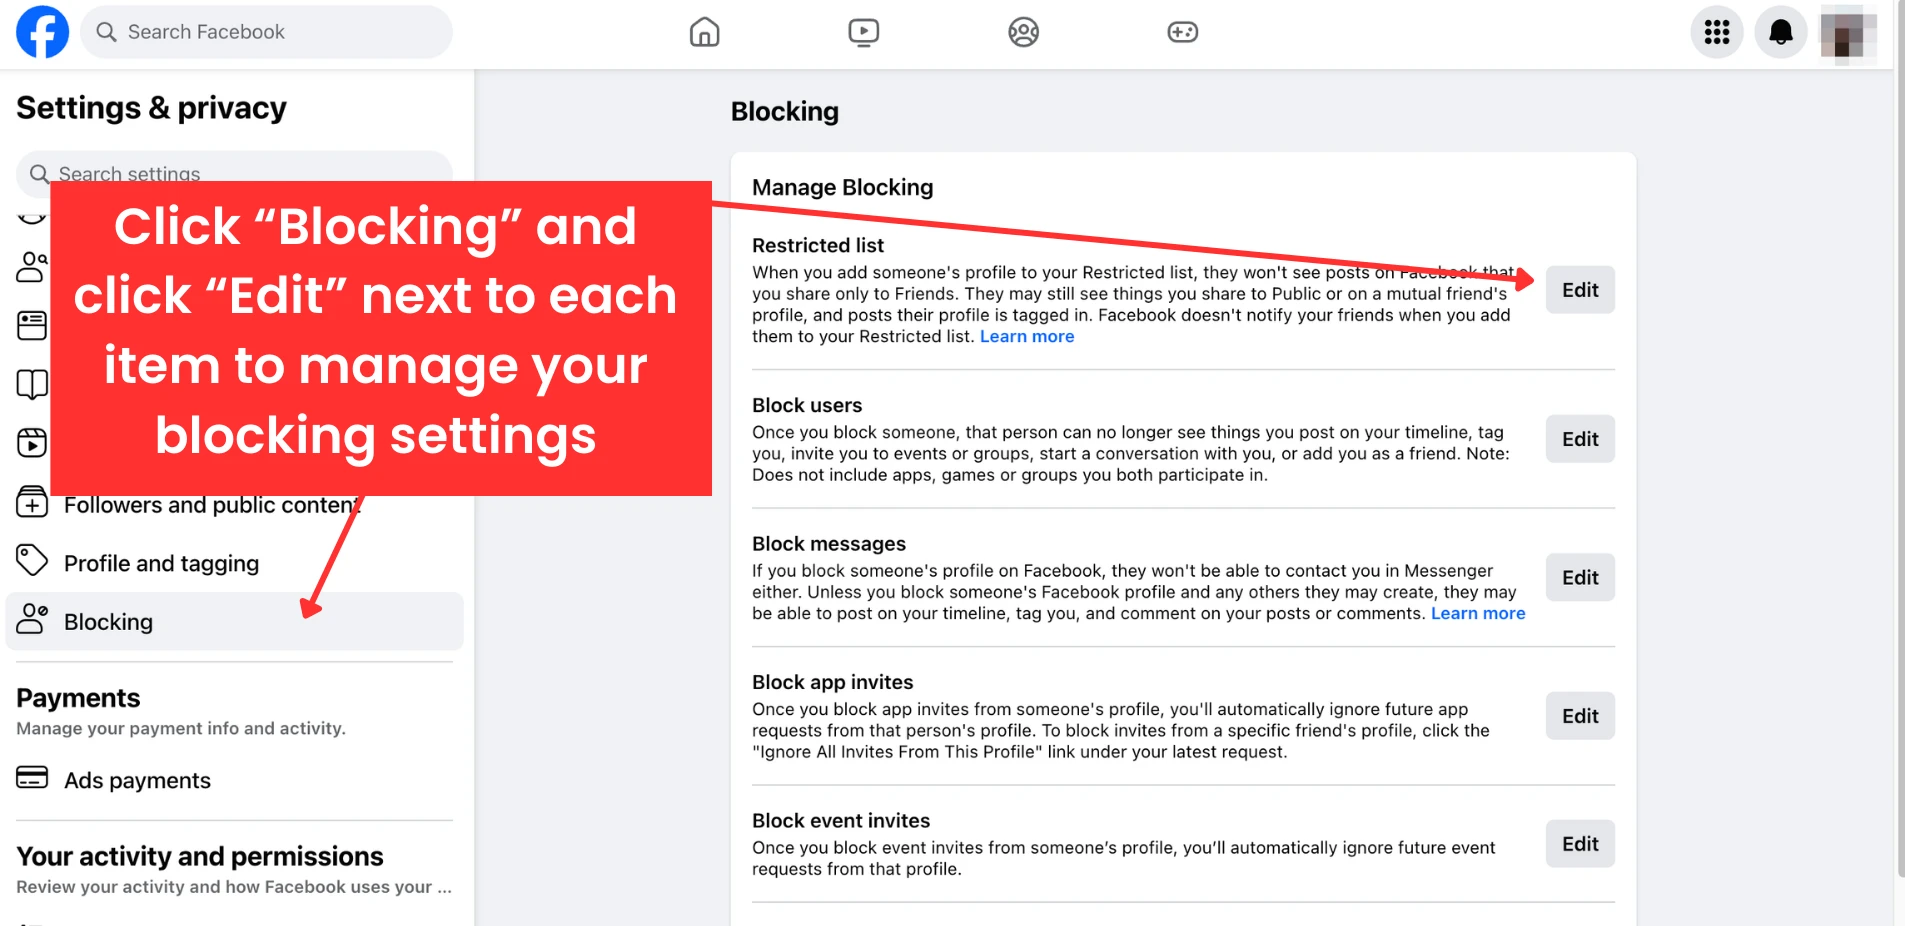
- Select “Blocking” to manage your blocked list.
- On desktop, you can manage your restricted list and block users, messages, app invites, event invites, and pages. Click on the “Edit” icon next to each category to add to your blocked and restricted lists or to review them.
![Screenshot of blocking and edit on Facebook]()
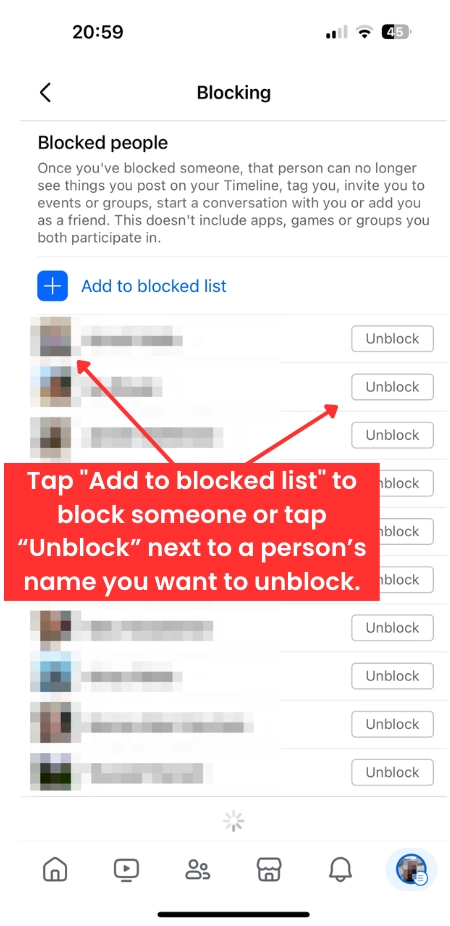
- On mobile devices, you only have the option to manage your list of blocked people. Tap “Add to blocked list” to block someone. To unblock someone, simply tap “Unblock” next to their name.
![Screenshot of blocking settings on Facebook]()
- On desktop, you can manage your restricted list and block users, messages, app invites, event invites, and pages. Click on the “Edit” icon next to each category to add to your blocked and restricted lists or to review them.
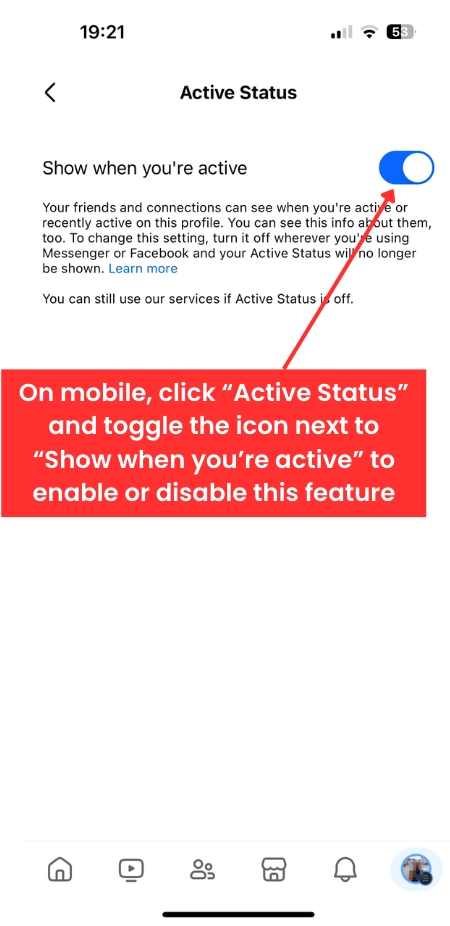
- On mobile devices, you can also select “Active Status” from the “Audience and visibility” menu to control whether your friends can see when you’re active or recently active on Messenger or Facebook. Simply use the toggle to enable or disable this feature.
![Screenshot of active status on Facebook]()
How to Remove Third-Party Apps Connected to Your Facebook Account
To ensure your personal data remains secure and isn’t mishandled by platforms connected to your Facebook account, you’ll need to regularly audit and remove third-party apps that you no longer trust or use. Follow these steps to clean up the apps linked to your Facebook profile:
- Open “Settings & Privacy.”
- On Desktop: Click your profile picture in the top right corner, then select “Settings & Privacy” and click “Settings.”

![Screenshot of Facebook profile menu]()
![Screenshot of Facebook Settings menu]()
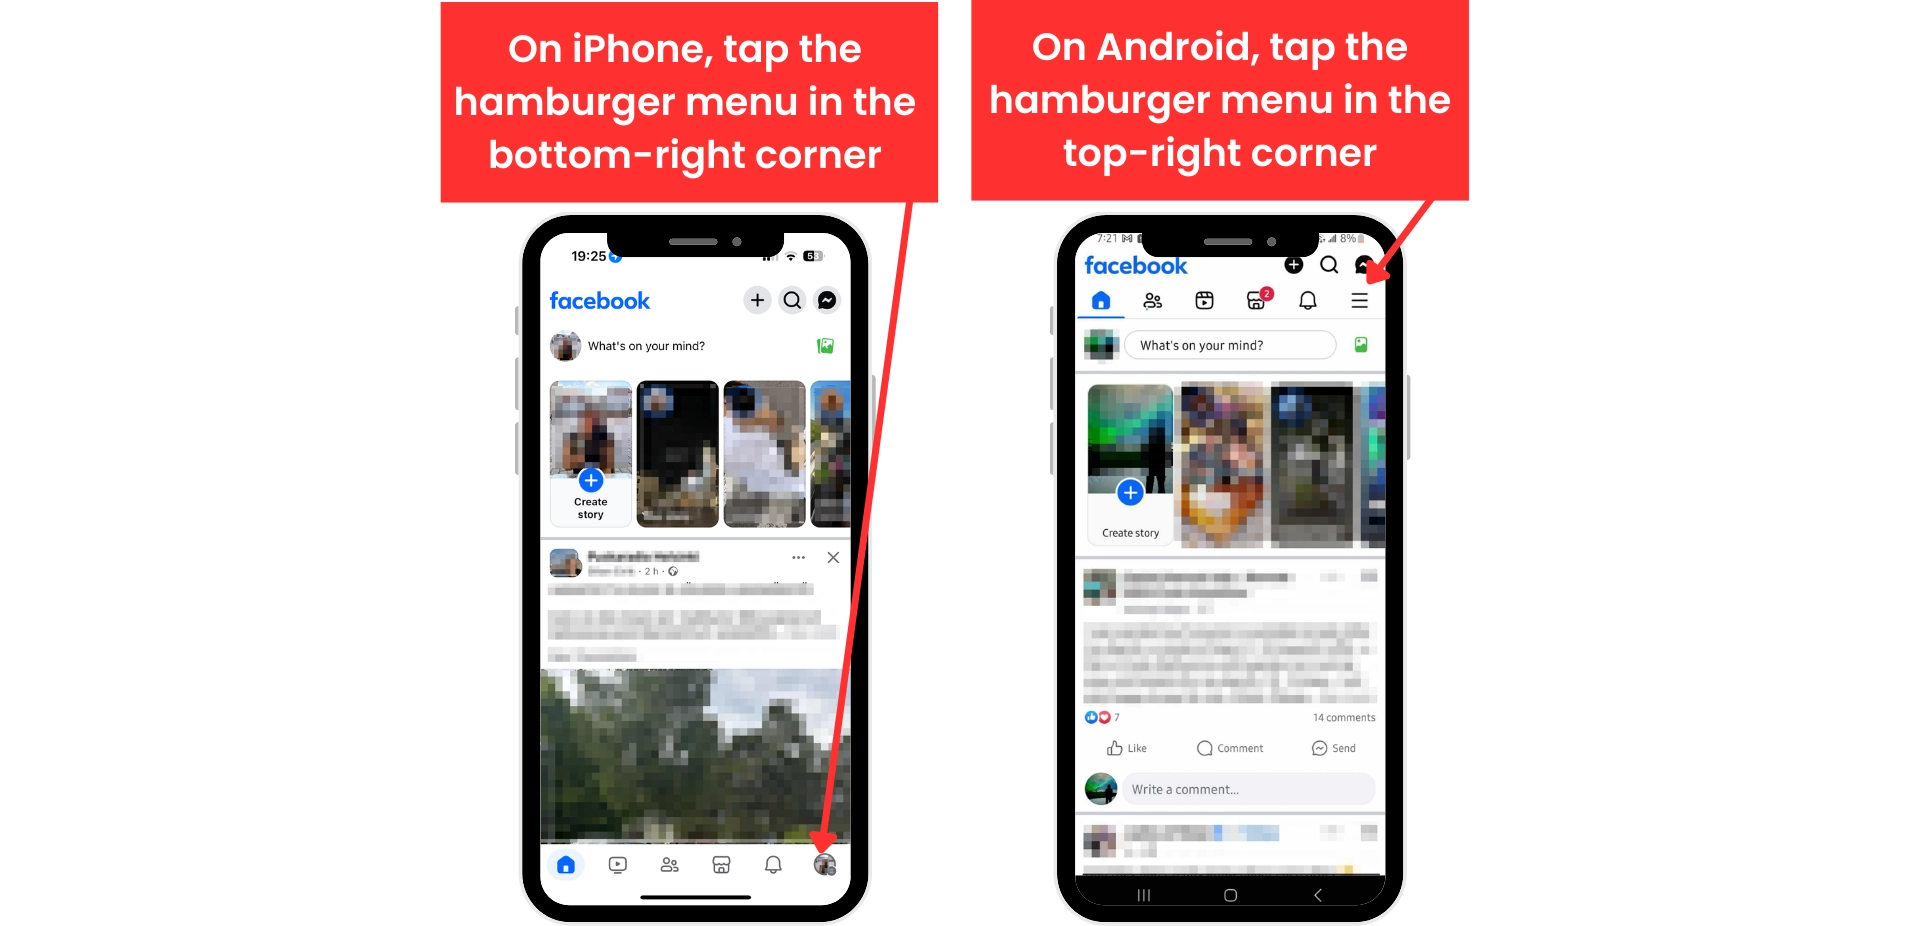
- On Mobile: Tap the hamburger menu icon (in the bottom right corner of the app on iPhone, or top right on Android), open the “Menu,” then tap the cogwheel icon in the top right to access “Settings & privacy.”

![Screenshot of iPhone and Android with hamburger icon.]()

![Screenshot of iPhone and Android cogwheel icon.]()
- On Desktop: Click your profile picture in the top right corner, then select “Settings & Privacy” and click “Settings.”
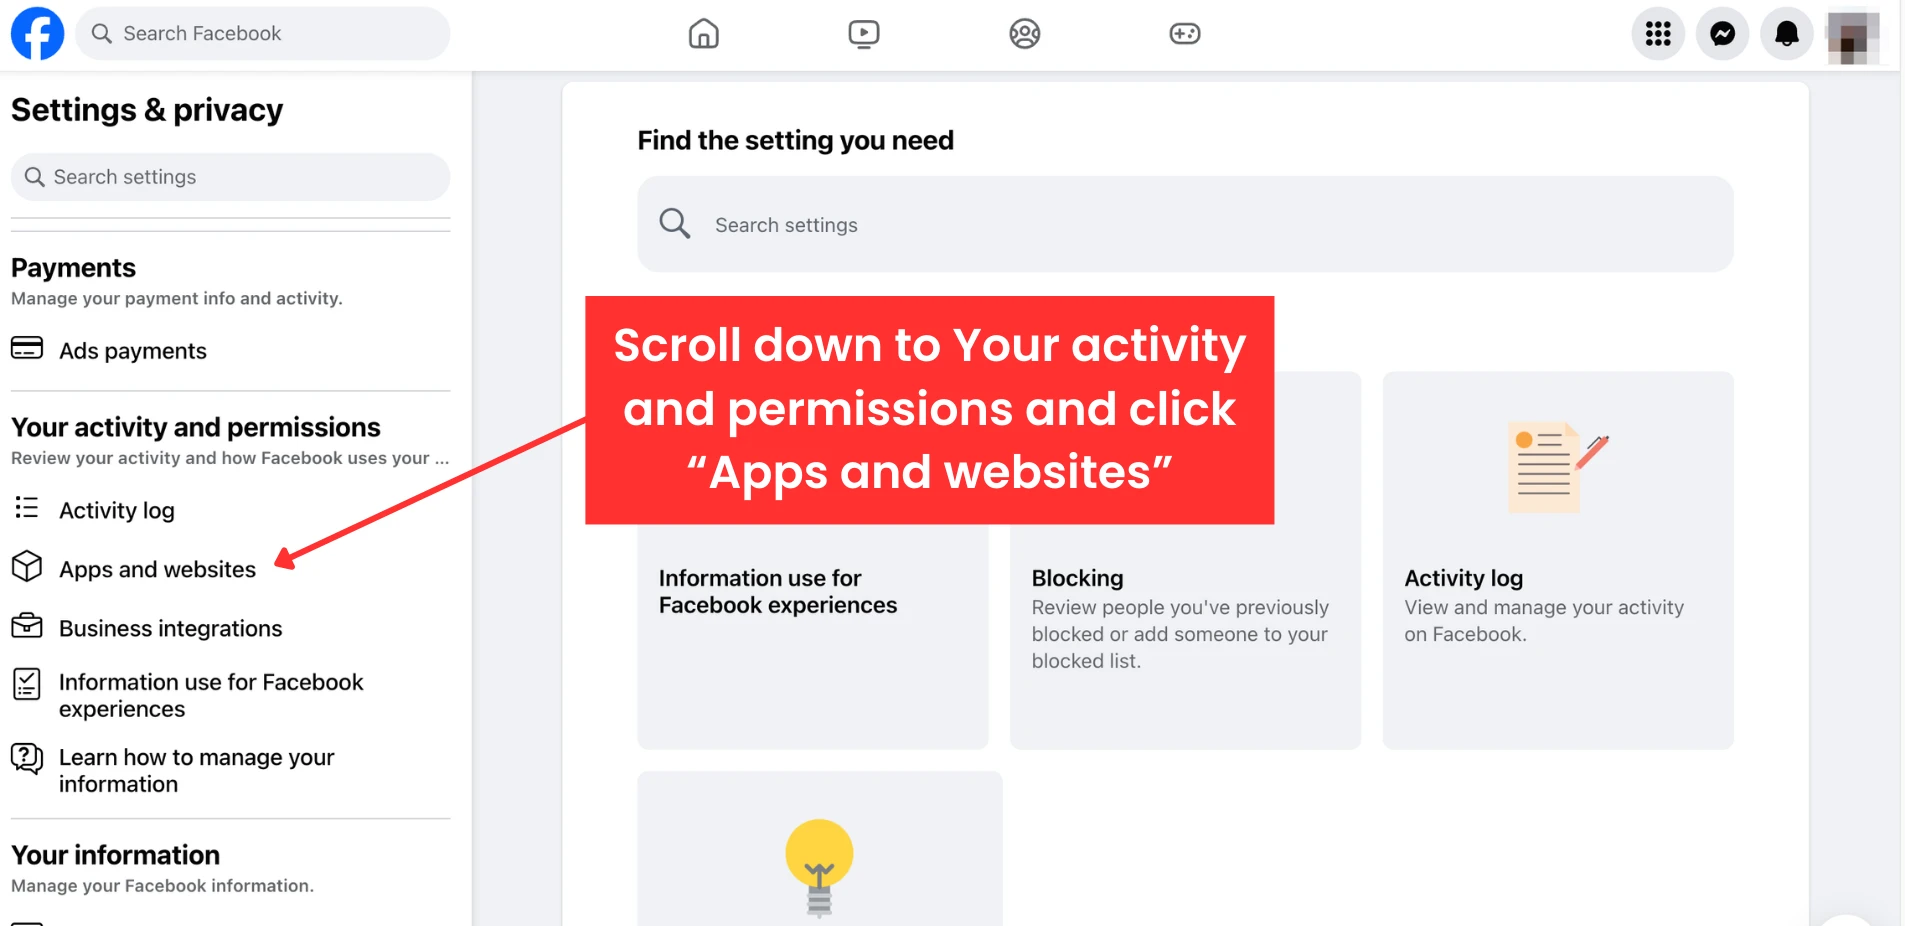
- Scroll down to “Your Activity” (which may be listed as “Your activity and permissions” in certain regions) and select “Apps and Websites.”
![Screenshot of activity and permissions on Facebook]()
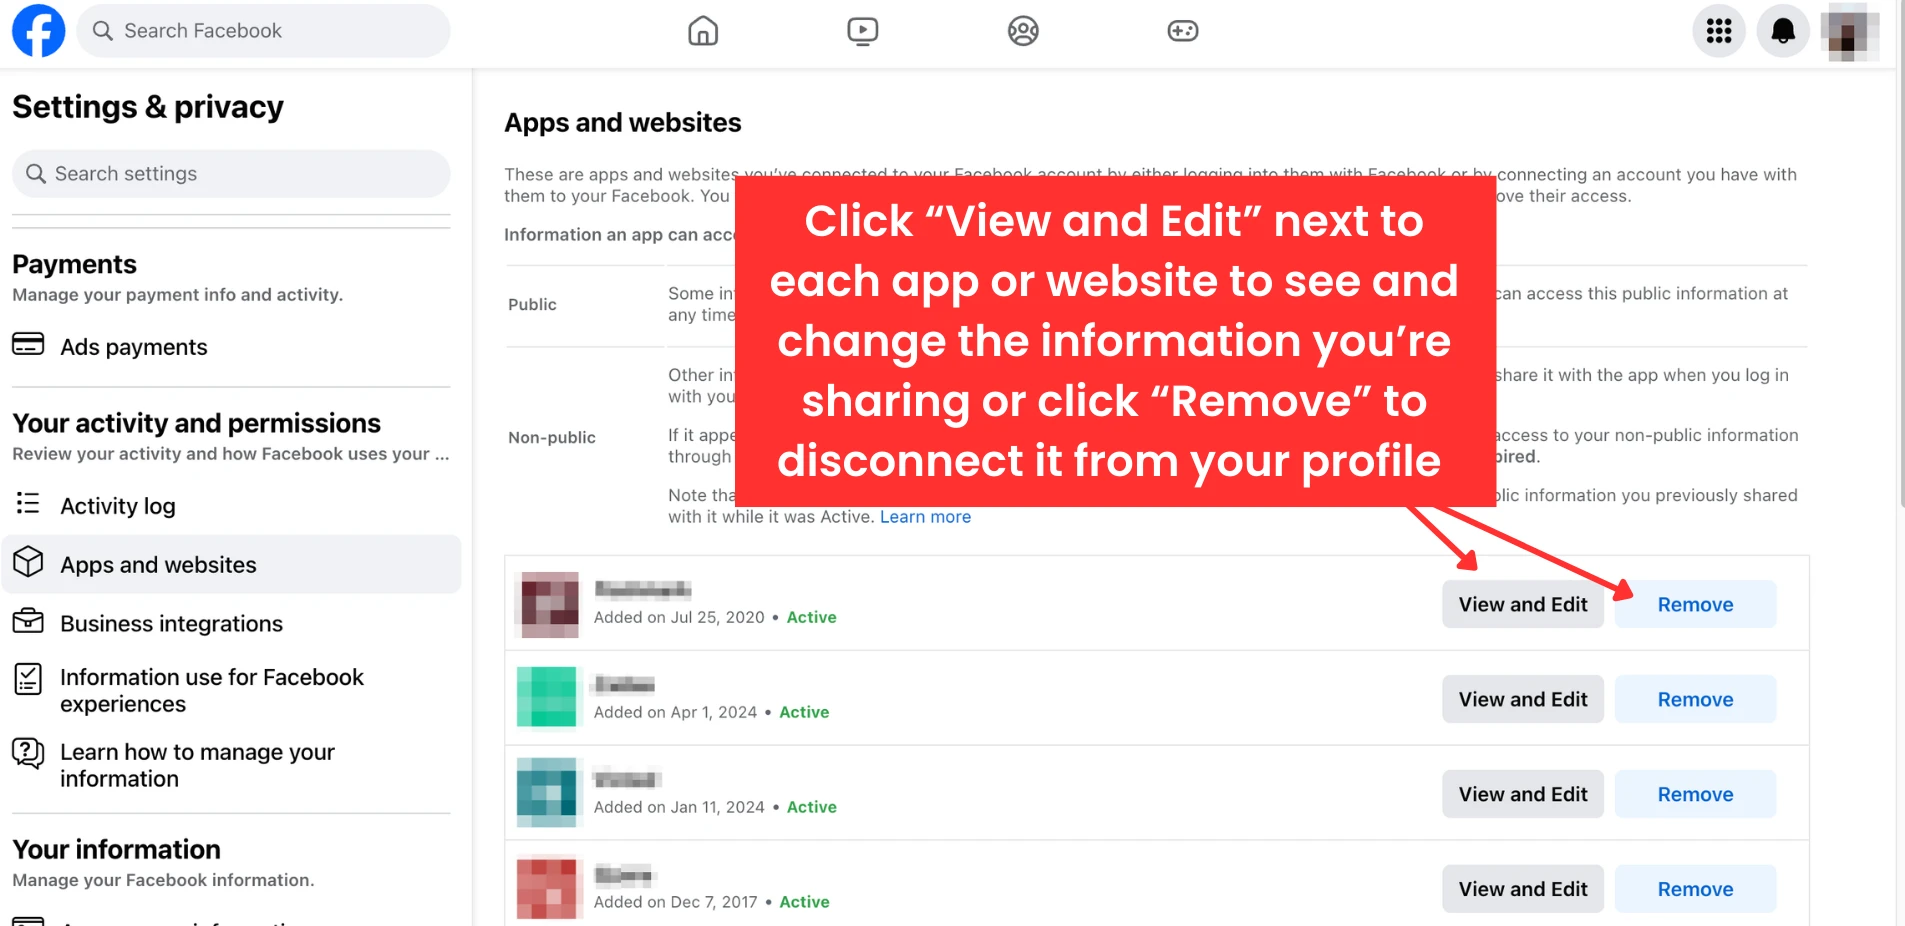
- From here, you can manage the permissions for each app or website.
- On desktop, click “View and Edit” next to each app or website you wish to change permissions for. Click “Remove” next to any app or website you wish to disconnect from your profile. Confirm your choice when prompted.
![Screenshot of view and edit on Facebook]()
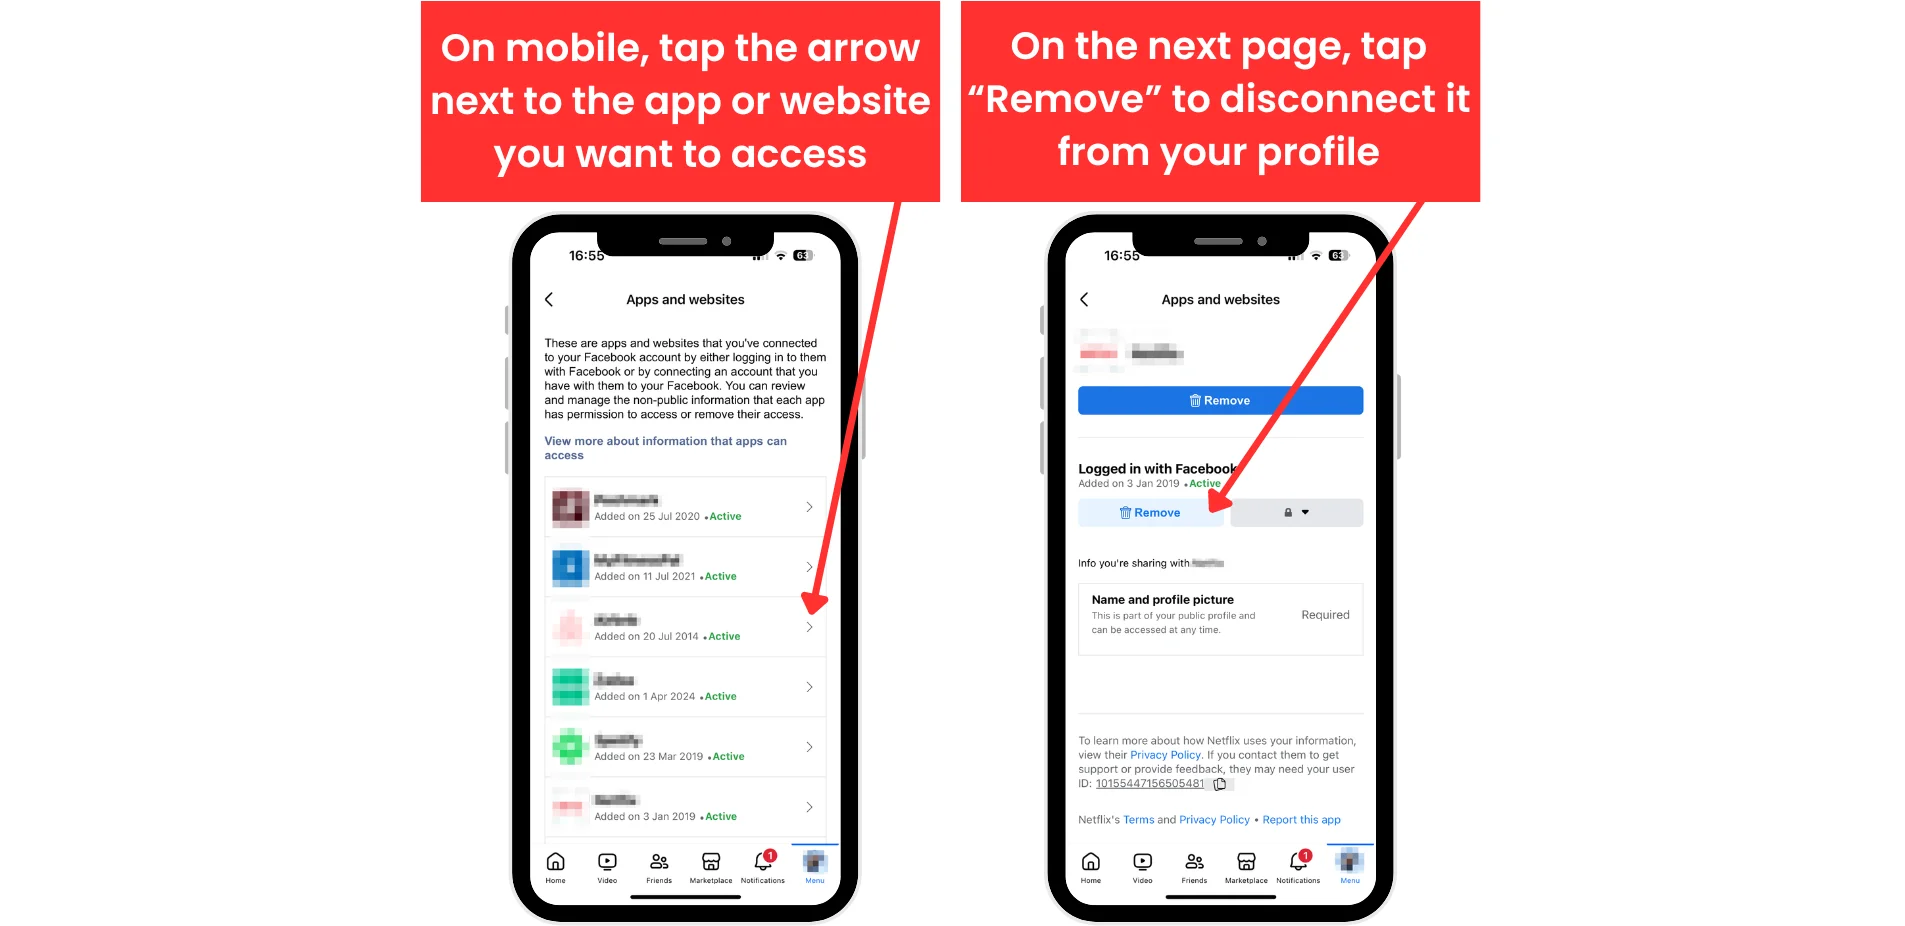
- On mobile devices, tap the arrow next to each app or website you wish to change permissions for. Once opened, click “Remove” to disconnect the app or website from your profile.
![how to remove 3rd party apps on mobile]()
- On desktop, click “View and Edit” next to each app or website you wish to change permissions for. Click “Remove” next to any app or website you wish to disconnect from your profile. Confirm your choice when prompted.
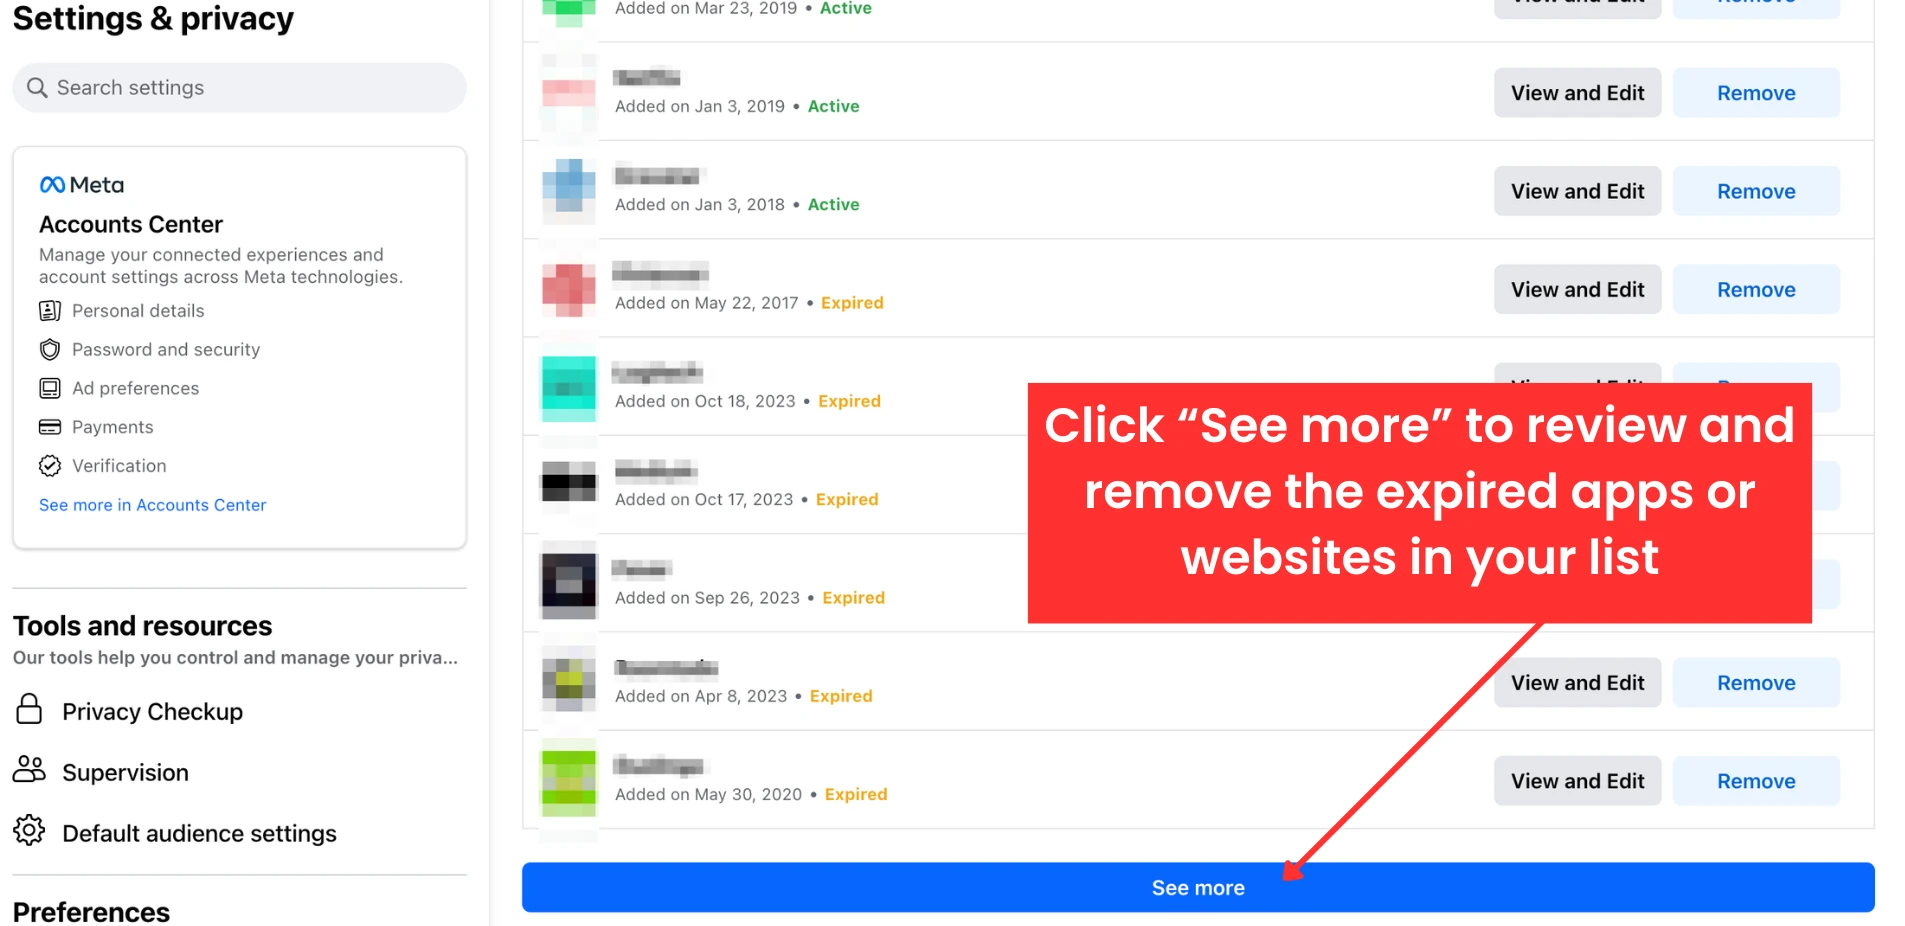
- Click “See more” to review and remove any expired apps or websites in your list. Even though these cannot access new data, they may still hold previously shared information.
![Screenshot of see more review expired apps on Facebook]()
- To prevent Facebook from automatically interacting with third-party apps in the future, scroll down to “Apps, Websites, and Games” under “Preferences” and click “Turn Off.”

![Screenshot of apps websites and games on Facebook]()
How to Delete Your Content on Facebook
Facebook’s Activity Log lets you review and manage everything you’ve shared on the platform, from posts and likes to comments and searches. By carefully managing your activity, you can enhance your privacy and control without needing to deactivate or delete your account.
Unfortunately, there is no quick way to clear your entire activity log. You will have to manually review and manage your content.
How to Manage and Delete Your Content through Facebook’s Activity Log
- Access “Settings & Privacy.”
- On Desktop: Click your profile picture in the top right corner to open “Settings & Privacy” and then click “Settings.”

![Screenshot of Facebook profile menu]()

![Screenshot of Facebook Settings menu]()
- On Mobile: Tap the hamburger menu icon (in the bottom right corner of the app on iPhone, or top right on Android), open the “Menu,” then tap the cogwheel icon in the top right to access “Settings & privacy.”
![Screenshot of iPhone and Android with hamburger icon.]()

![Screenshot of iPhone and Android cogwheel icon.]()
- On Desktop: Click your profile picture in the top right corner to open “Settings & Privacy” and then click “Settings.”
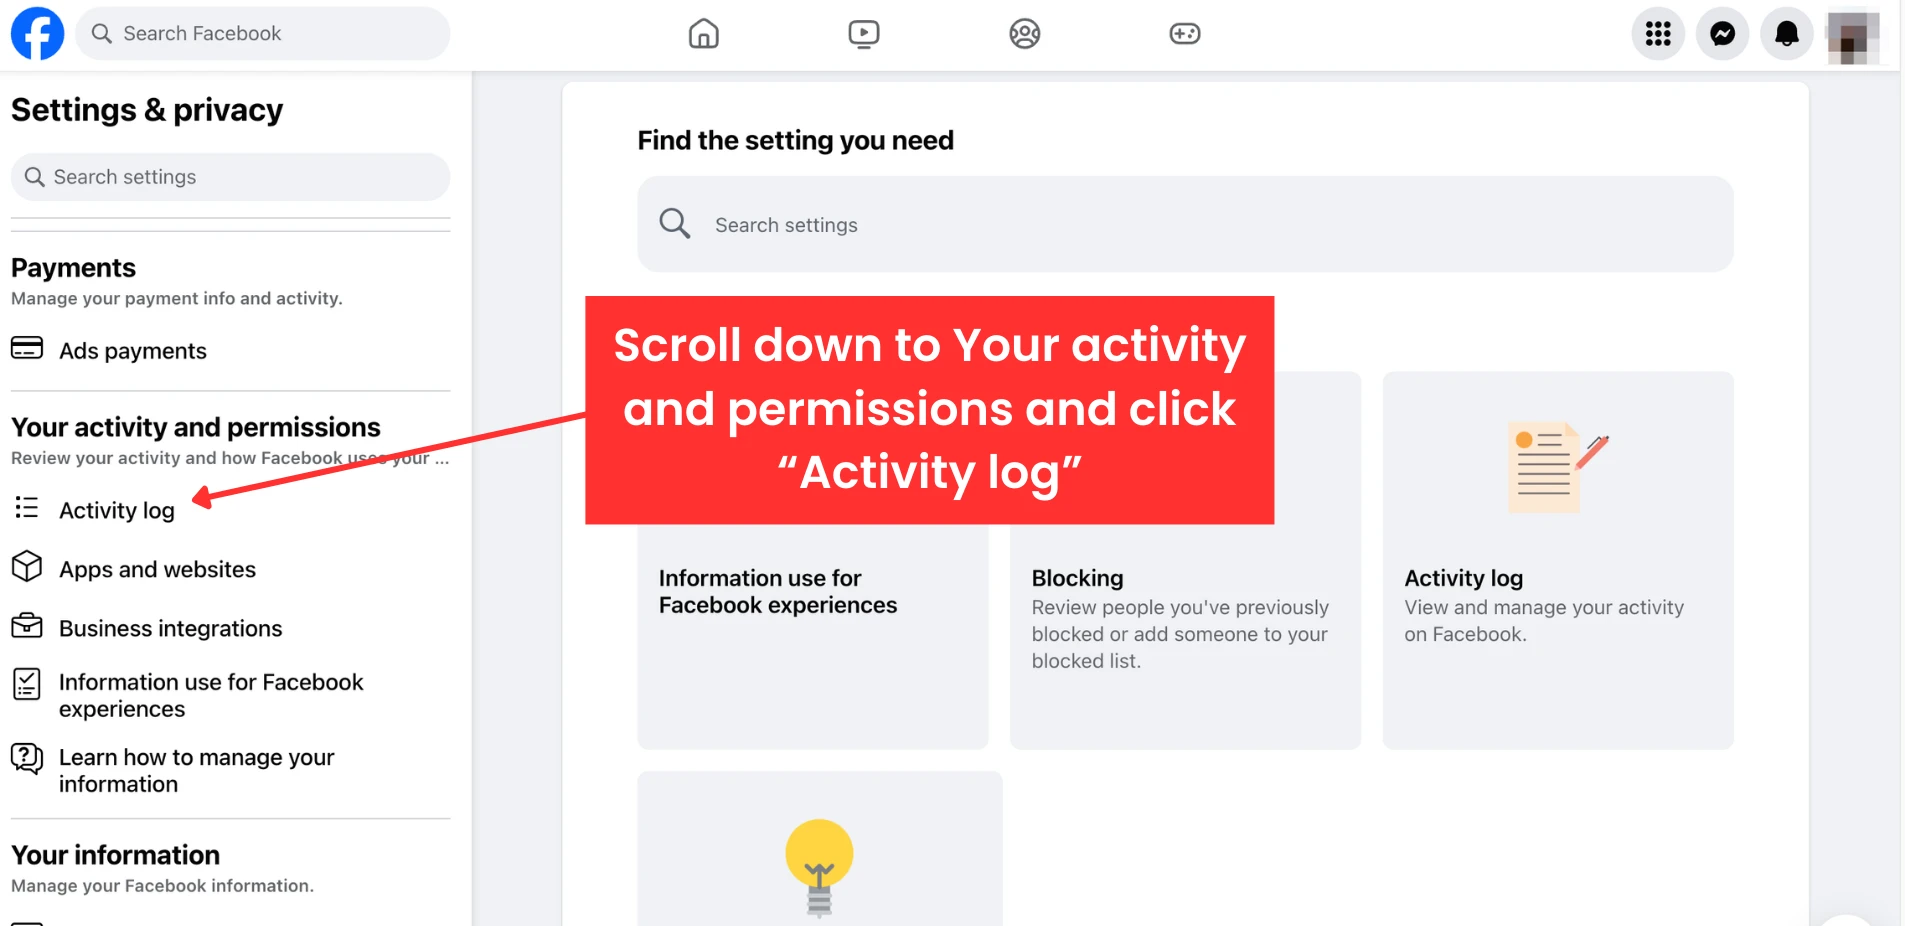
- Scroll down to “Your activity” (which may be listed as “Your activity and permissions” in certain regions) and click “Activity log.” From here, you can review your Facebook activity.
![Screenshot of settings & privacy on Facebook]()
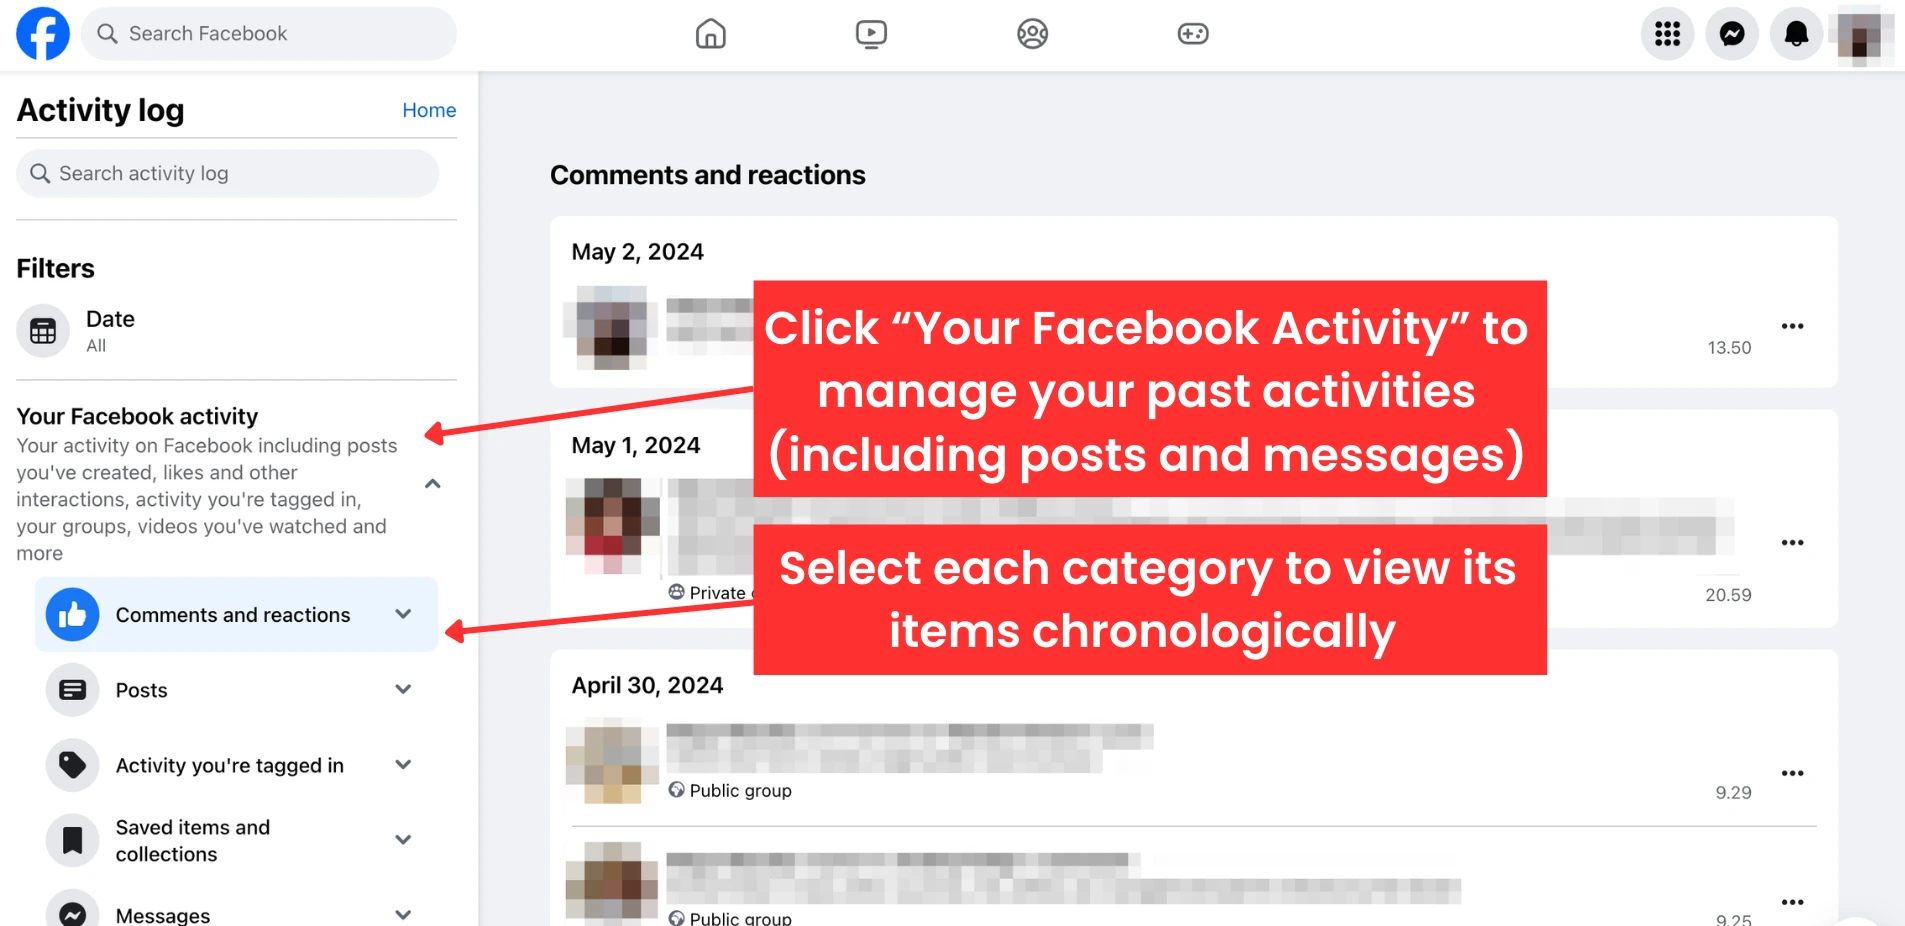
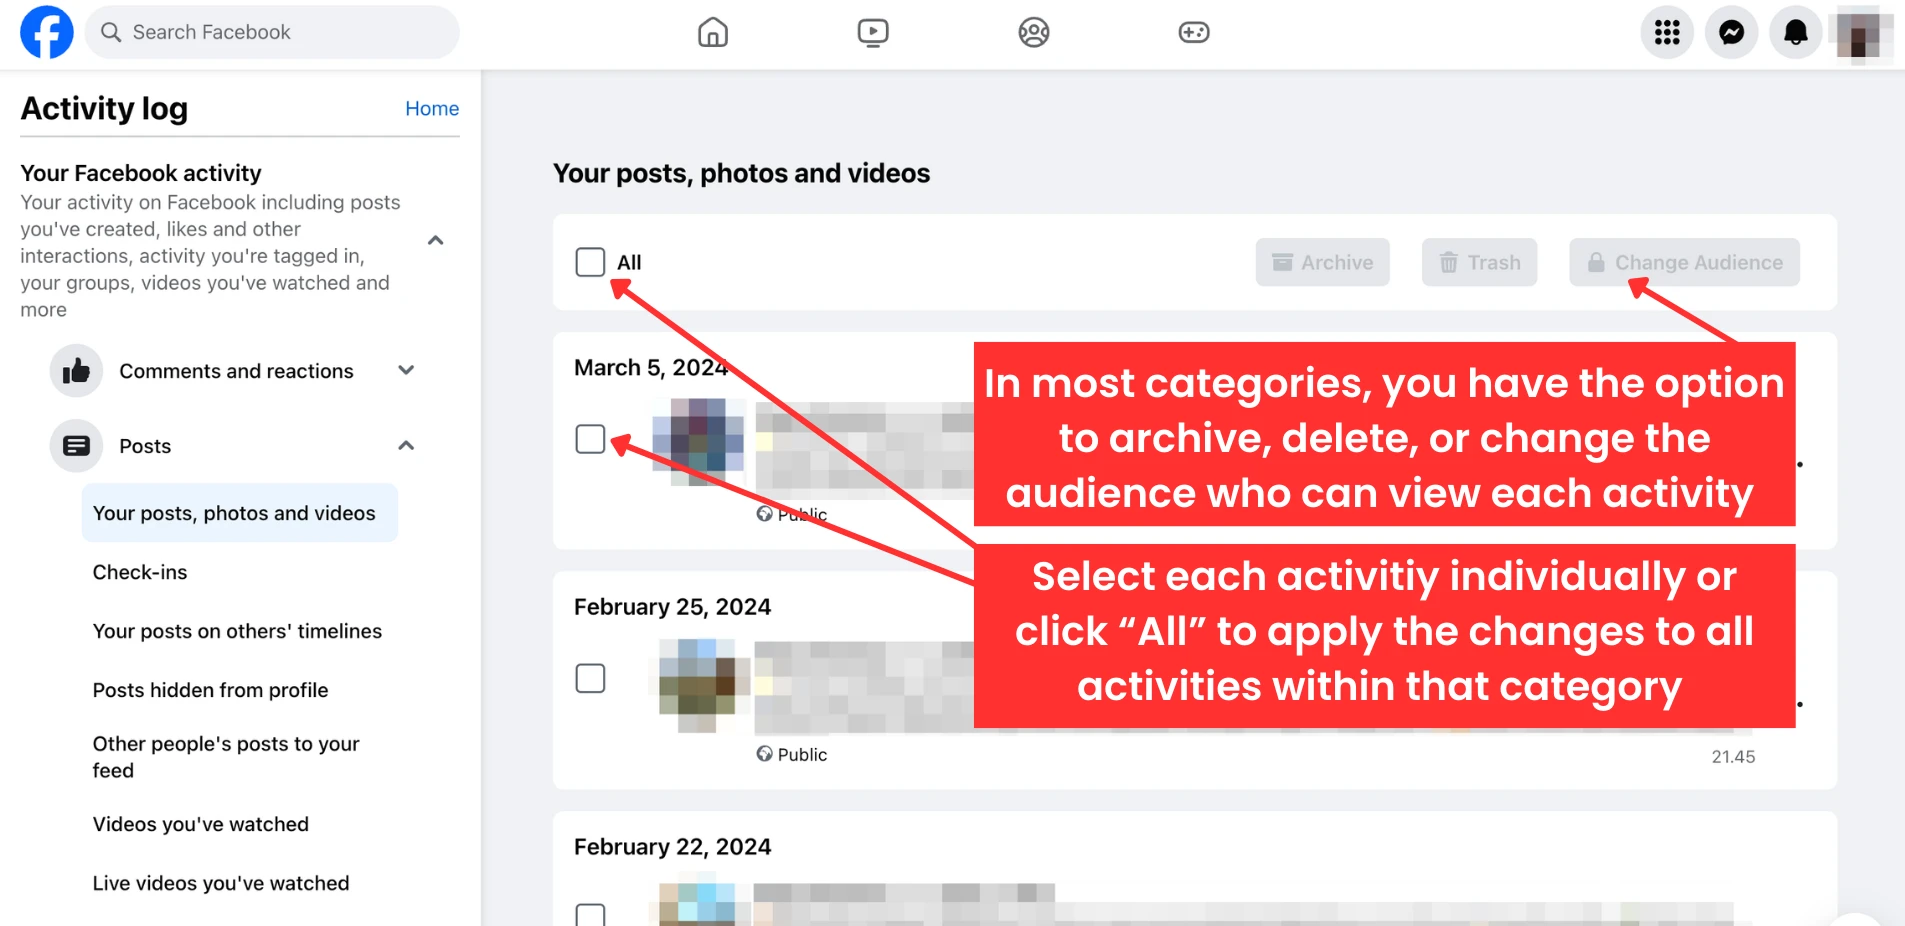
- Click “Your Facebook activity.” This section lets you manage a wide range of activities including posts you’ve created, likes, comments, tags, saved items, messages, group activities, reels, stories, and more. Select any category to view a chronological list of your activities. For most items, you have the option to:
- Archive: Move the content to your archive where only you can see it.
- Trash: Move the content to the recycle bin where it will be automatically deleted after 30 days.
- Change Audience: Adjust who can see the content by using the “Change Audience” option (sometimes accessible behind the three dots icon).
![Screenshot of activity log user comments reactions on Facebook]()
![Screenshot of activity log user profile on Facebook]()
- Click “Personal information” to view and delete the information found on your profile and from past submissions (which may include your contact information).
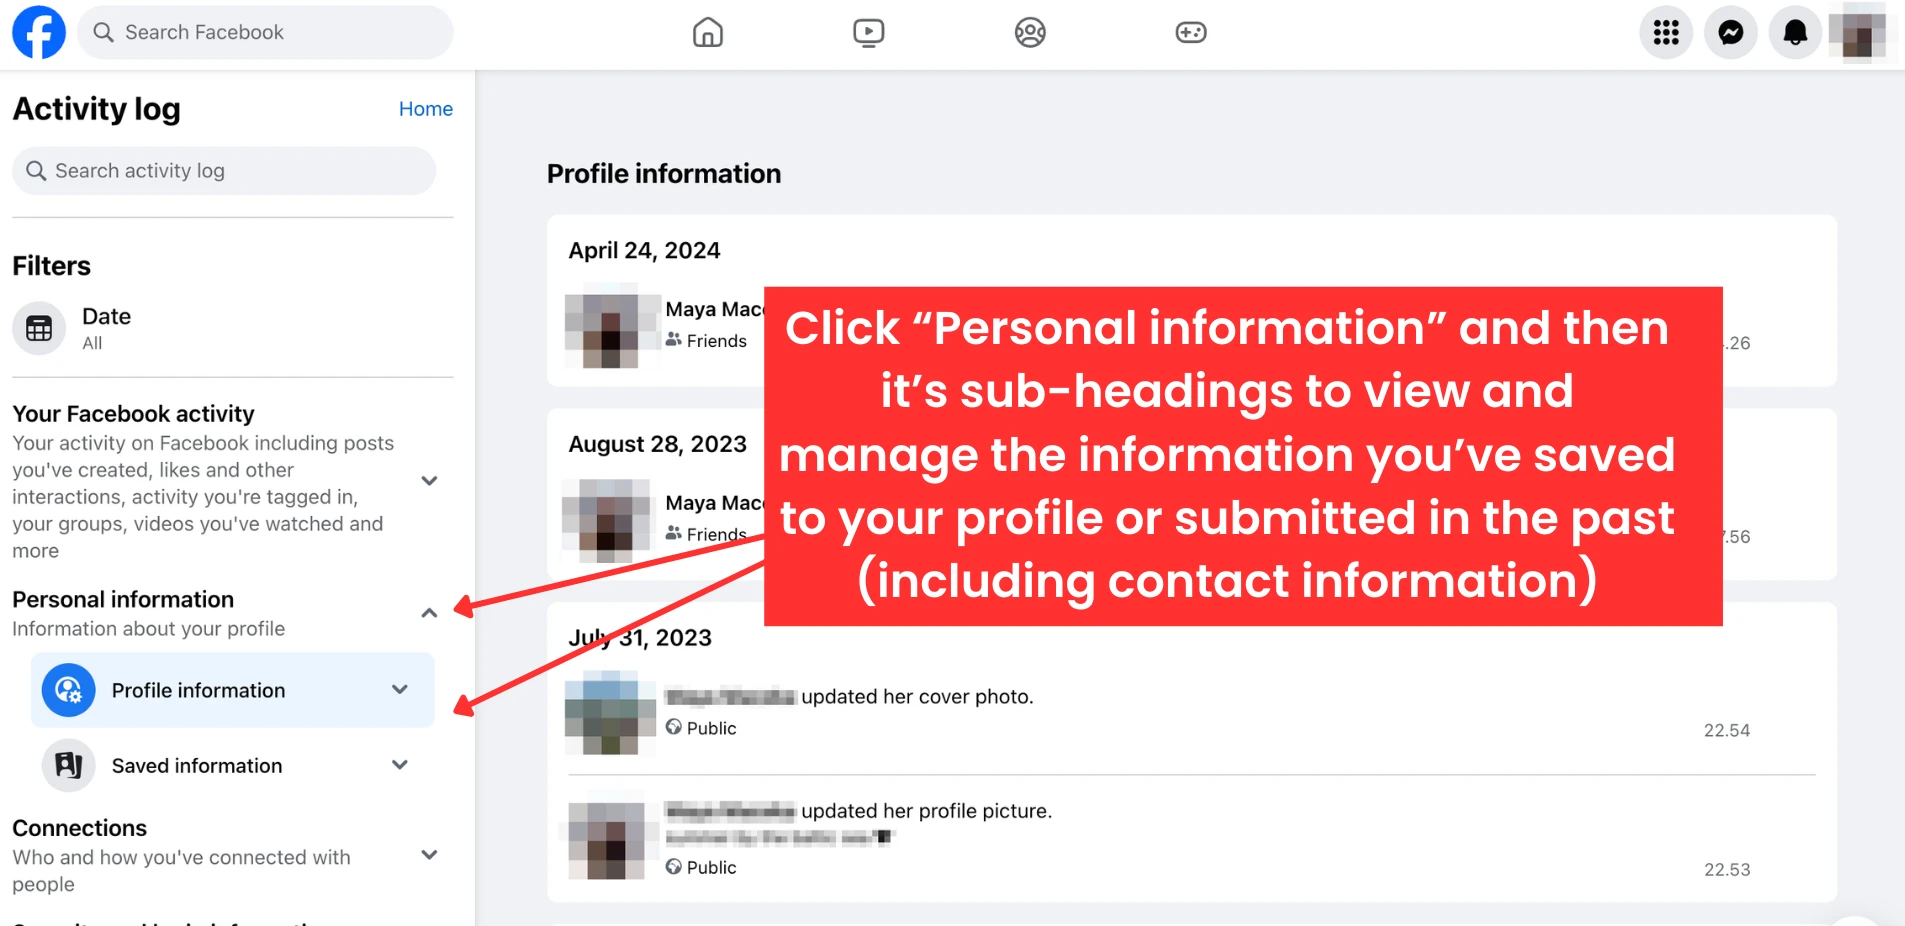
![Screenshot of activity log user personal information on Facebook]()
- Click “Connections” to manage how you’re connected with people on Facebook. This includes managing your friends, followers, and any supervision settings related to accounts you supervise or those supervising you.
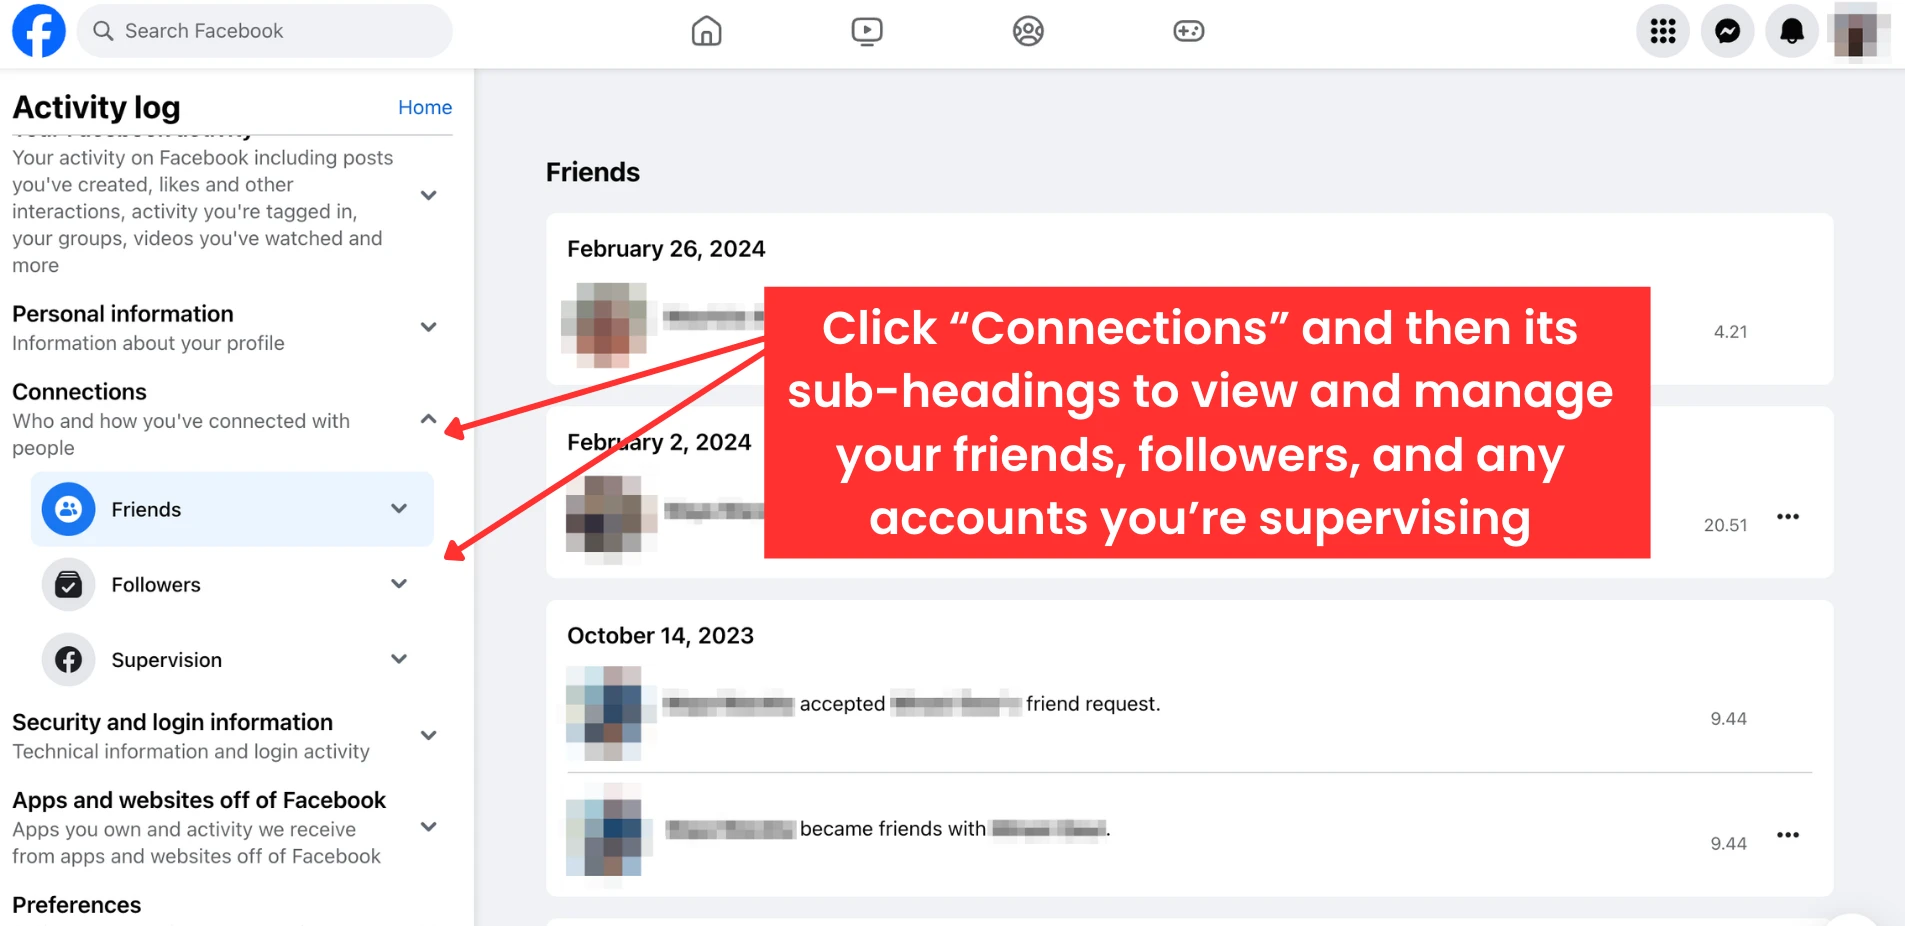
![Screenshot of activity log user connection on Facebook]()
- Select “Security and login information” to review details about your logins, logouts, recognized devices, and active sessions. This helps ensure that your account is only being accessed from devices you recognize.
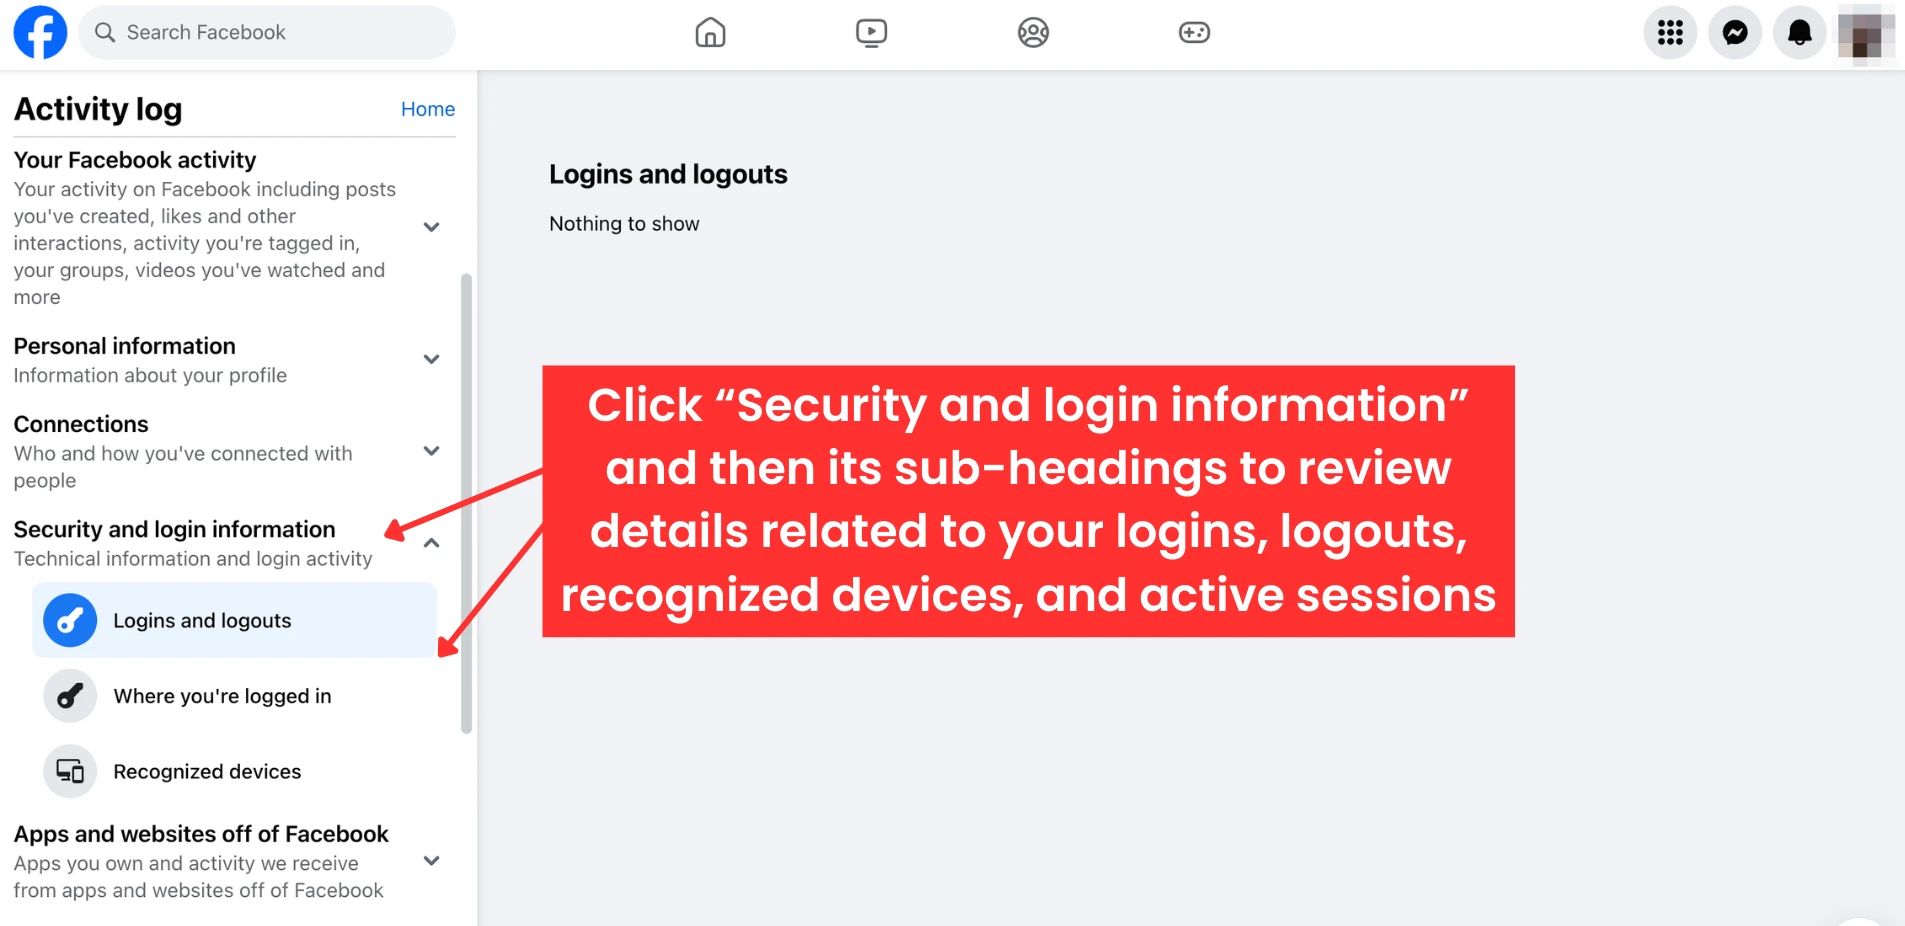
![Screenshot of activity log user logins and logouts on Facebook]()
- Click “Apps and websites off of Facebook.” This section allows you to manage the data received from external apps and websites. Here, you can manage posts from these sources, review the apps connected to your Facebook, and oversee your purchases.

![Screenshot of activity log user posts from apps and websites on Facebook]()
- Choose “Preferences” to review settings for crisis response and how you’ve interacted with videos presented in your feed (having chosen to see more or less of certain types of content).
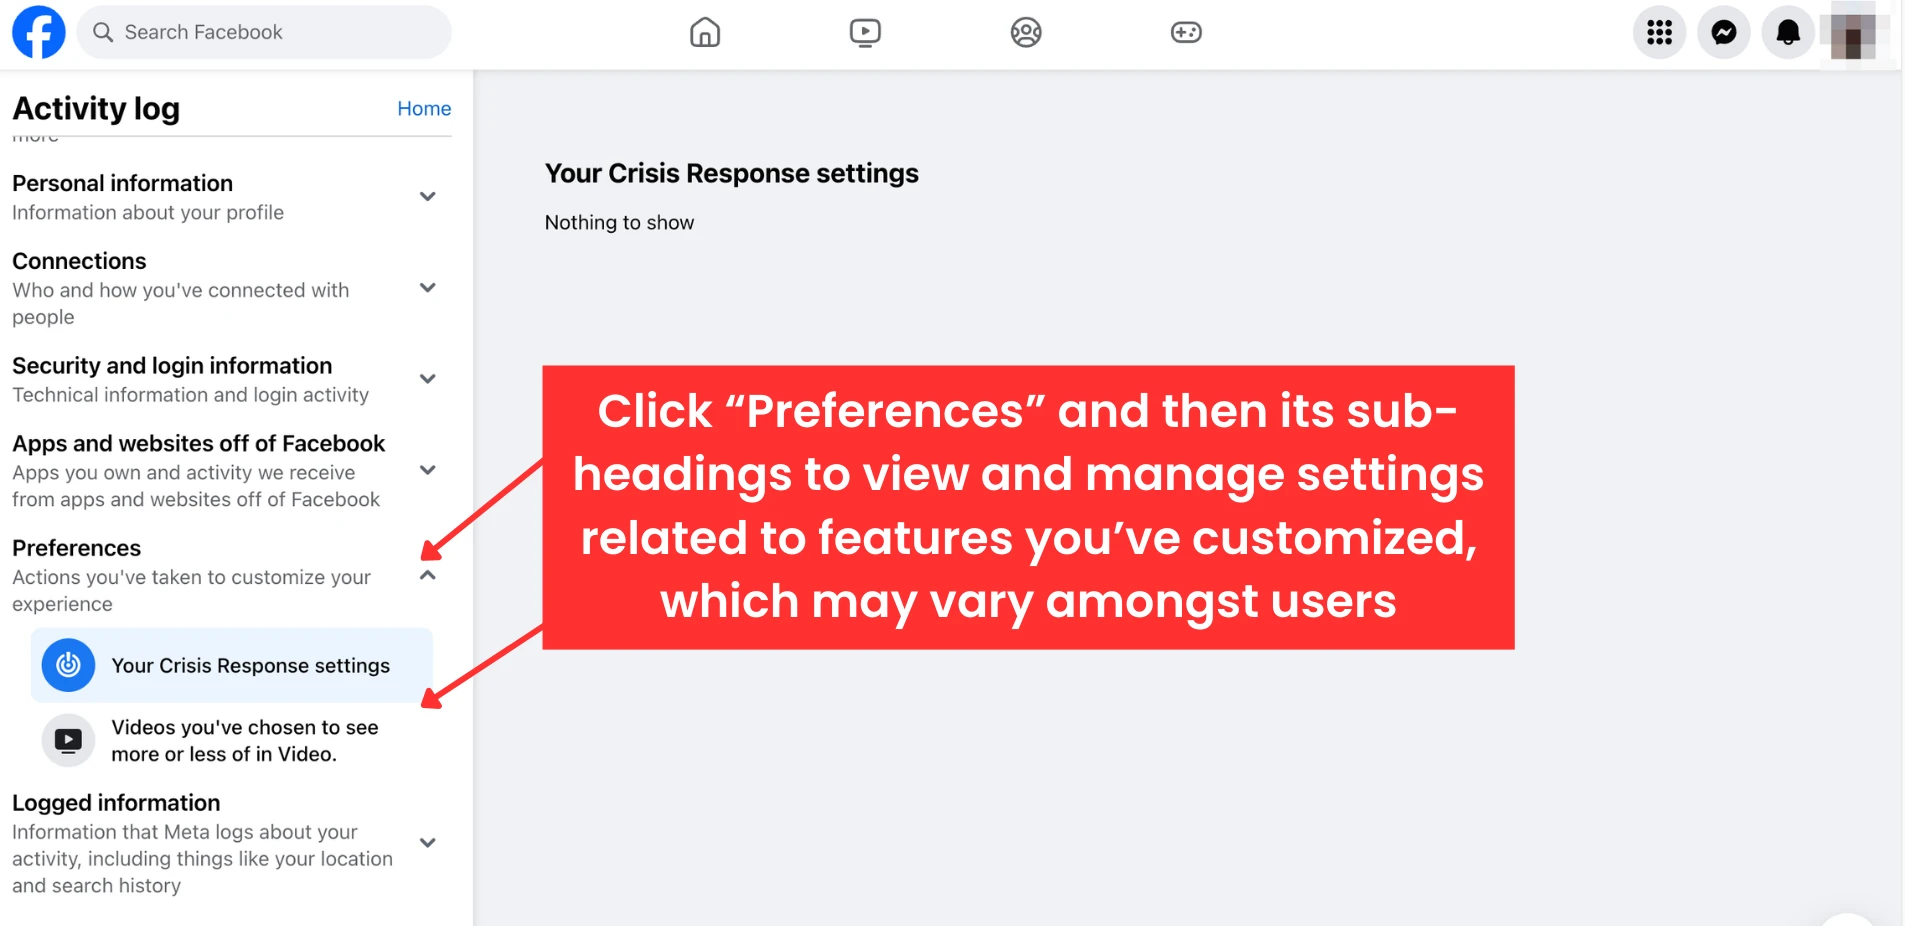
![Screenshot of Facebook activity log user crisis response settings on Facebook]()
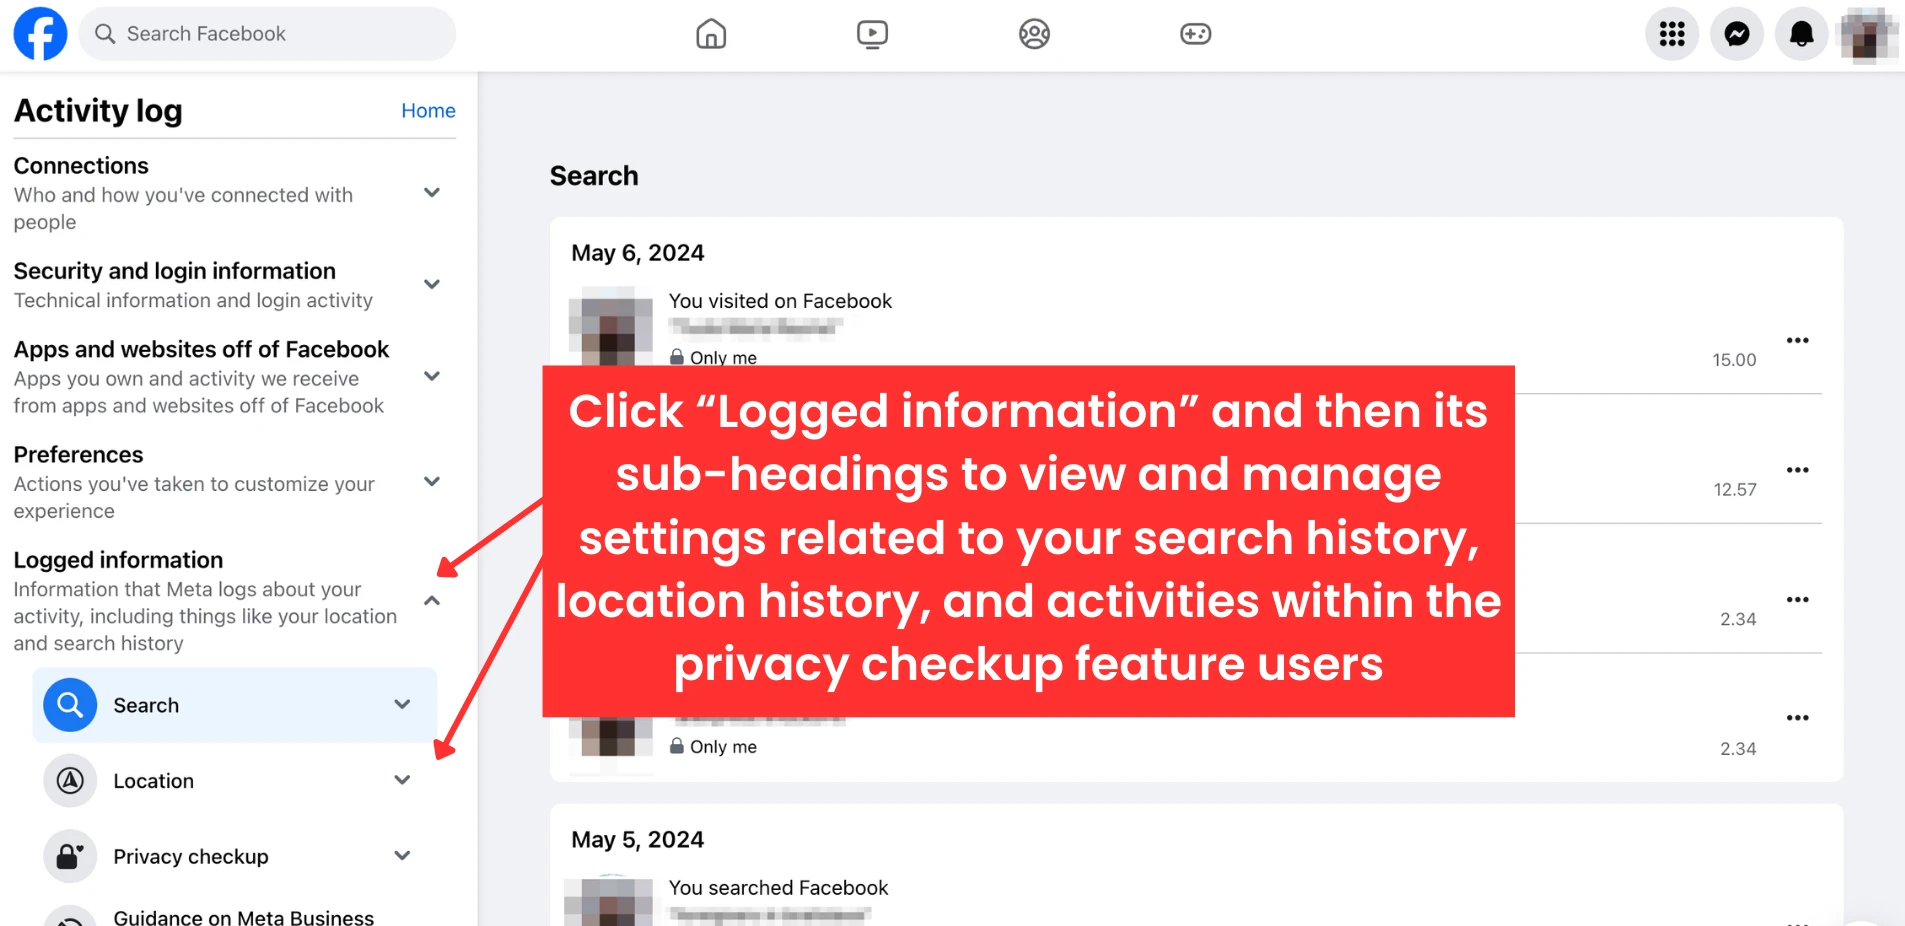
- Finally, click “Logged information” to manage the data that Facebook logs about your activity on the platform. You can see and remove your Facebook search history, location history, and your activities within the privacy checkup feature.
![Screenshot of activity log user search on Facebook]()
Regularly checking and updating your settings in the Activity Log can enhance your privacy and security on Facebook. Take time to familiarize yourself with each category.
How to Clear Your Search History on Facebook through the Search Bar
While the Activity Log provides a comprehensive tool for managing and deleting your content on Facebook, including search history, there’s a quicker, more direct method available right from the search bar.
How to Clear Your Facebook Searches through the Search Bar on Desktop
- Click the search bar at the top of the Facebook homepage.
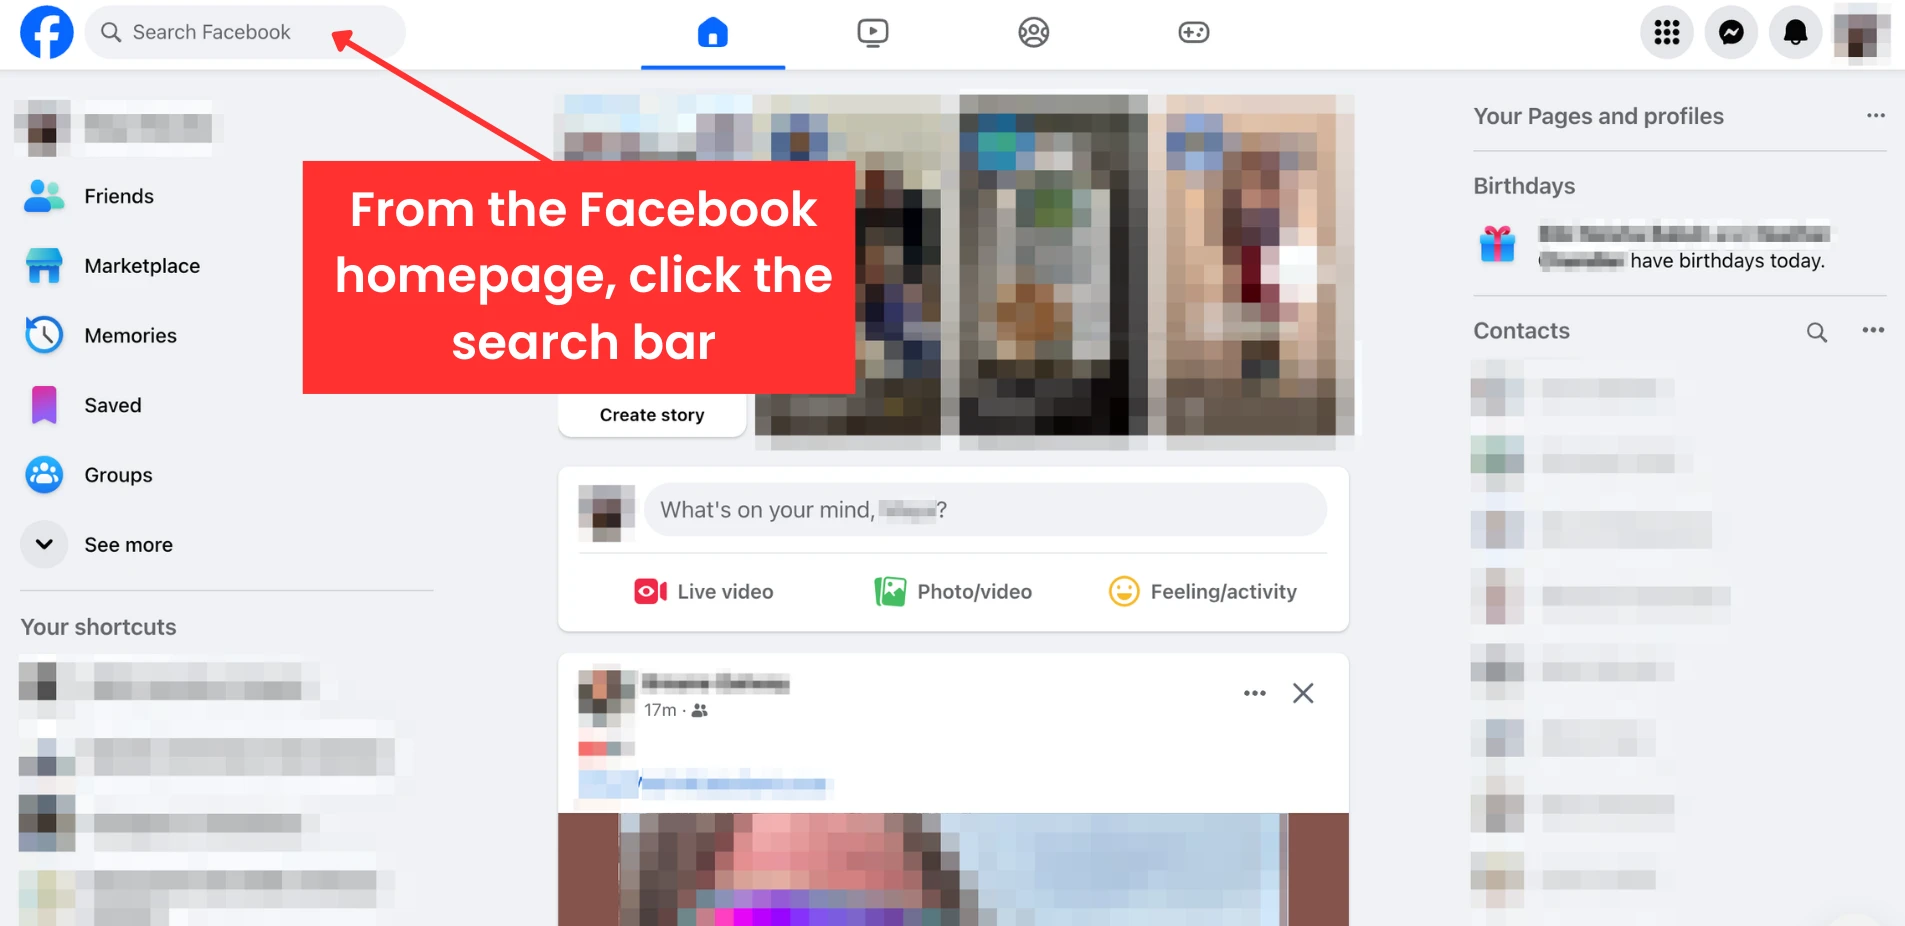
![Screenshot of home page search bar on Facebook]()
- Choose “Edit” at the top-right of the dropdown menu.
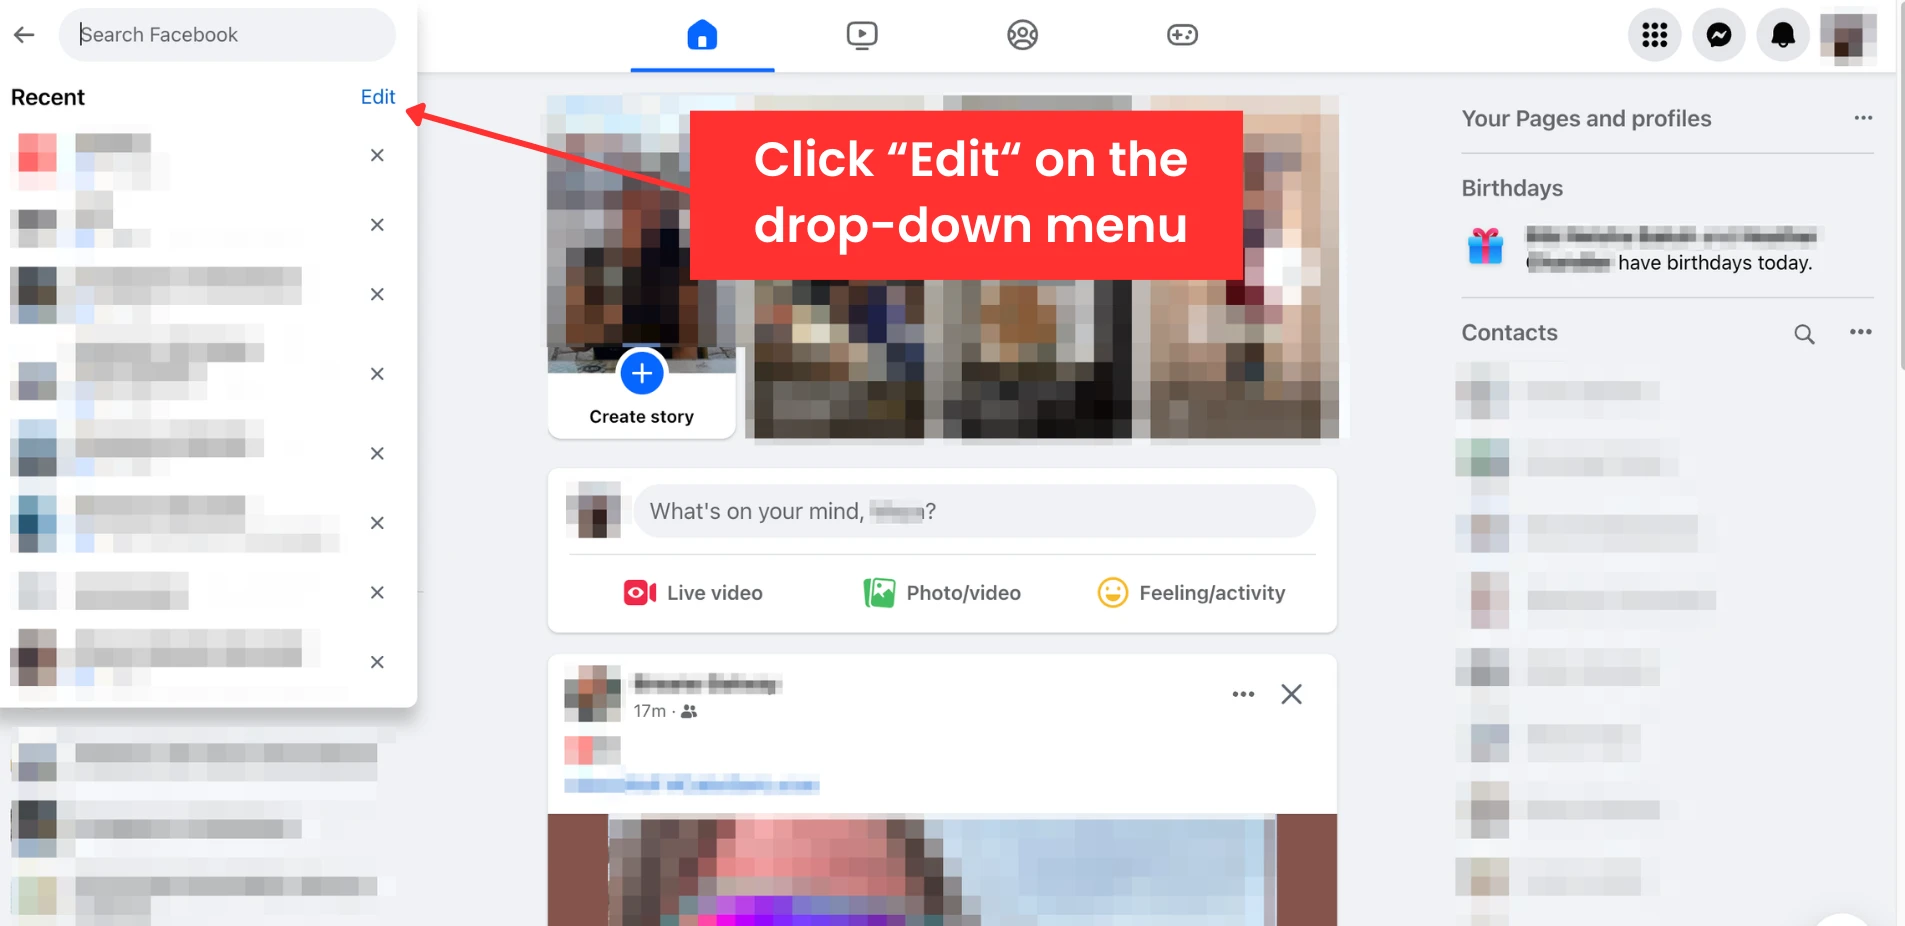
![Screenshot of edit dropdown menu on Facebook]()
- From here, you can click “Clear Searches” to clear your entire search history or manually remove specific searches.
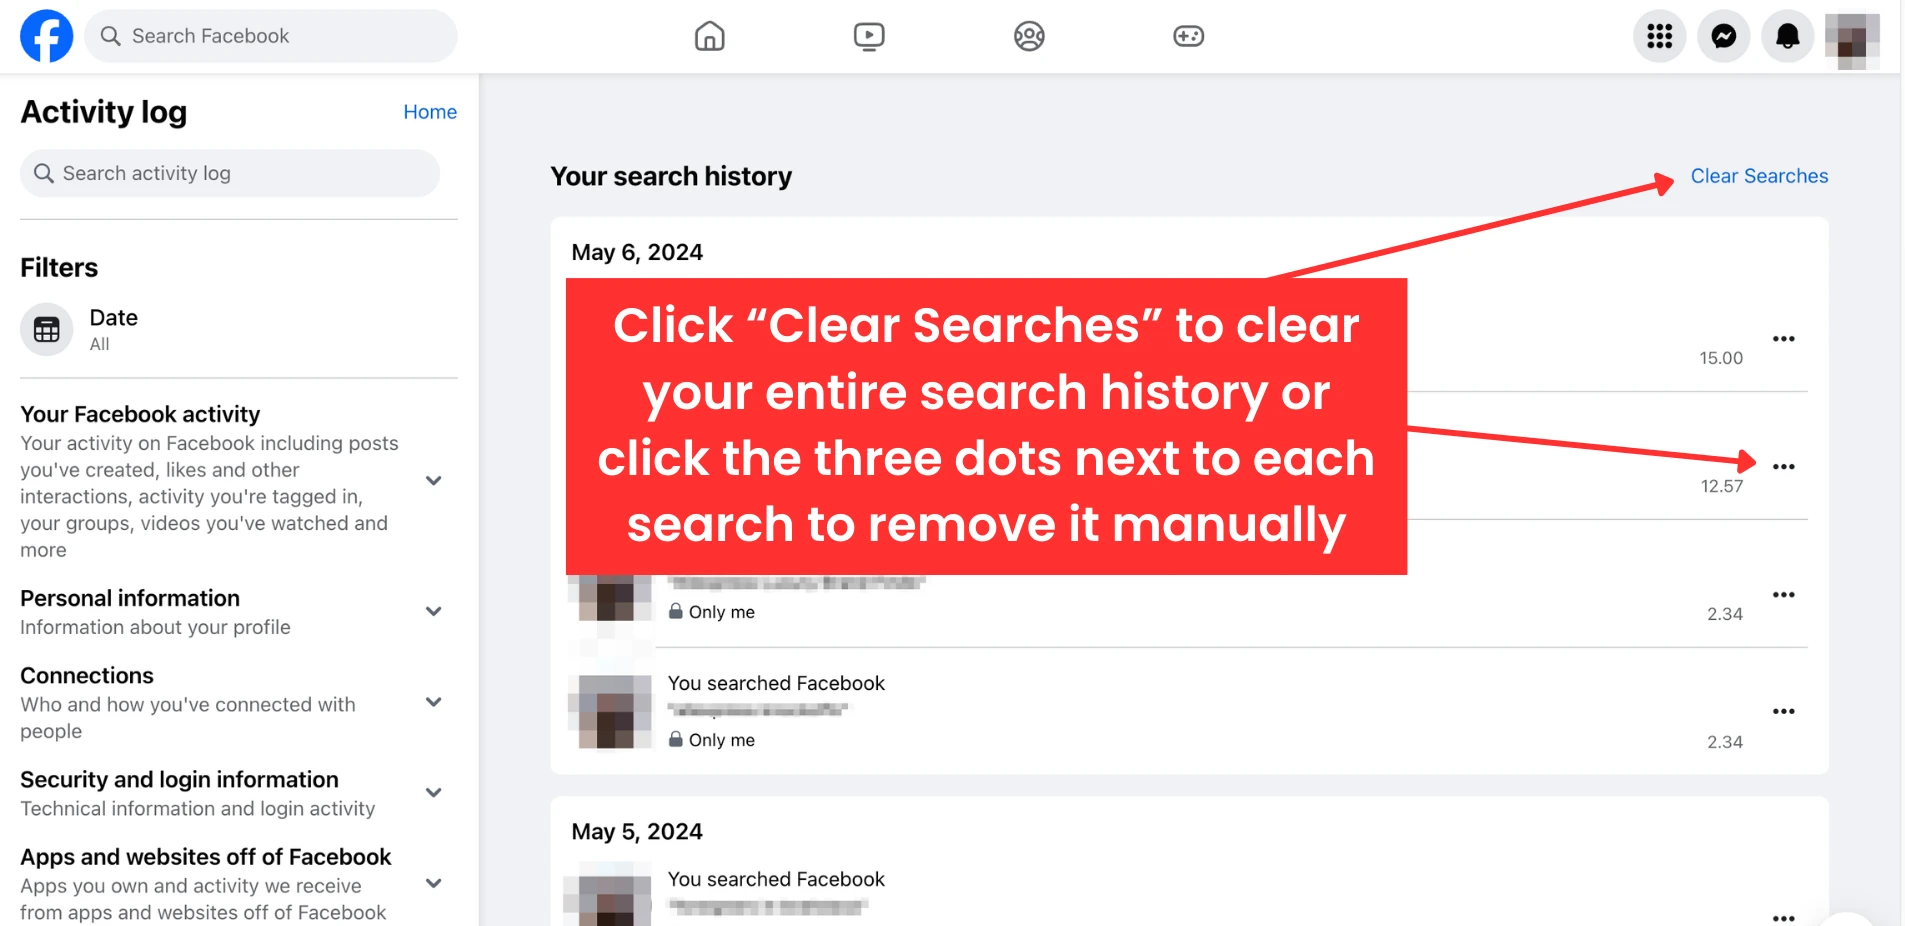
![Screenshot of clear searches on Facebook]()
How to Clear Your Facebook Searches through the Search Bar on Mobile
- Tap the magnifying glass icon in the top-right corner.
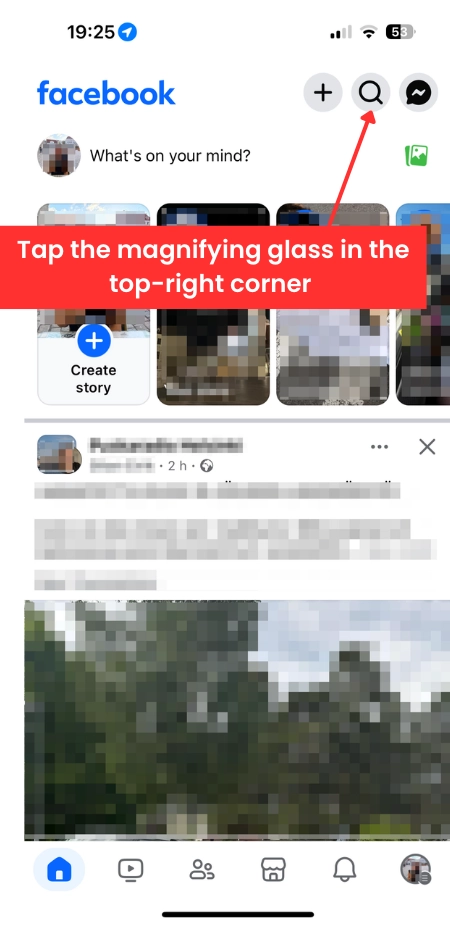
![Screenshot of magnifying glass icon on Facebook]()
- Press “See all” to view your entire search history.
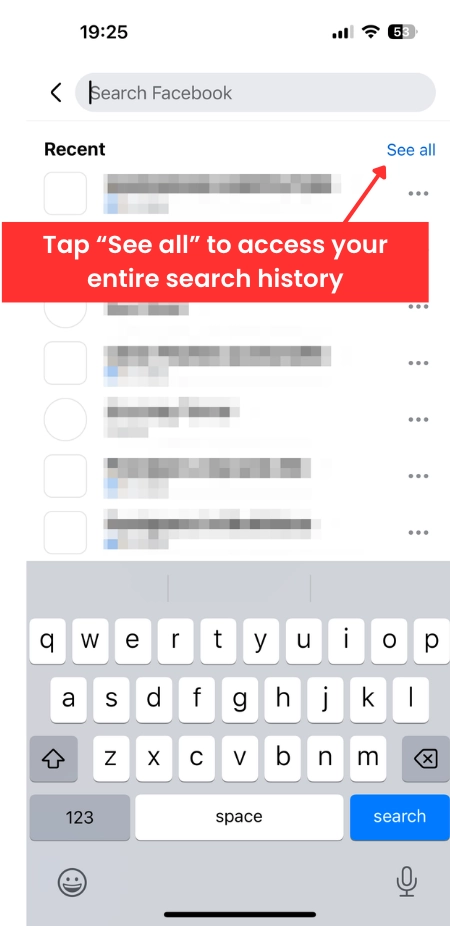
![Screenshot of see all entire search history on Facebook]()
- Tap “Clear All” to remove your entire search history or manually remove specific searches.
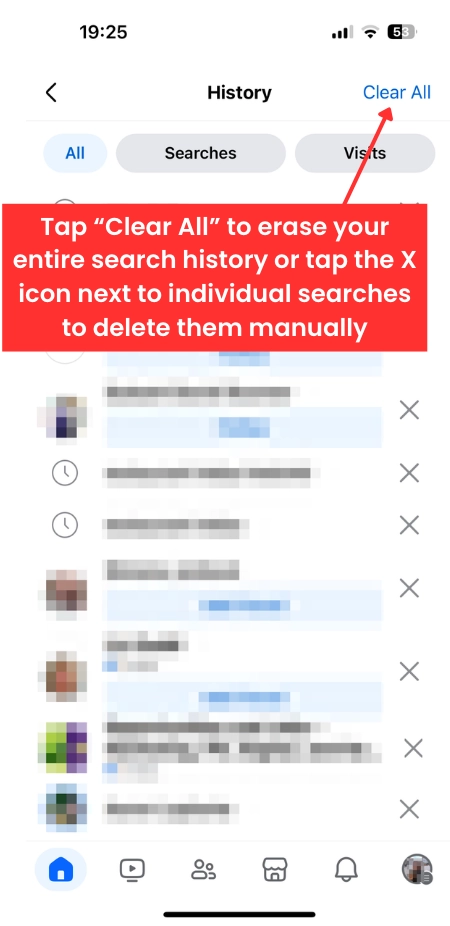
![Screenshot of clear all searches on Facebook]()
Facebook’s Data Security and Privacy
Facebook remains the world’s most popular social media network, but many users still harbor concerns about its data security and privacy. However, protecting your data on Facebook doesn’t necessarily mean deleting your account.
You can take several effective steps to control your data and improve your security. These include removing third-party apps, clearing old posts and comments, and managing the visibility of your activities. Learn how to take control of what you share on Facebook and safeguard your information.
How to Uninstall and Disable the Facebook App
Deleting the Facebook app on your phone prevents accidental logins after you have deleted or deactivated your Facebook account. Should you decide to return to Facebook, you can easily re-download the app.
However, certain Android devices come with the Facebook app pre-installed. On these devices, you can’t fully delete the Facebook app — you can only disable it.
Disabling the app stops it from running and removes its icon from your app drawer, but it does not remove the app from your device entirely. If you receive an update and the app shows up again, you’ll need to disable it once more.
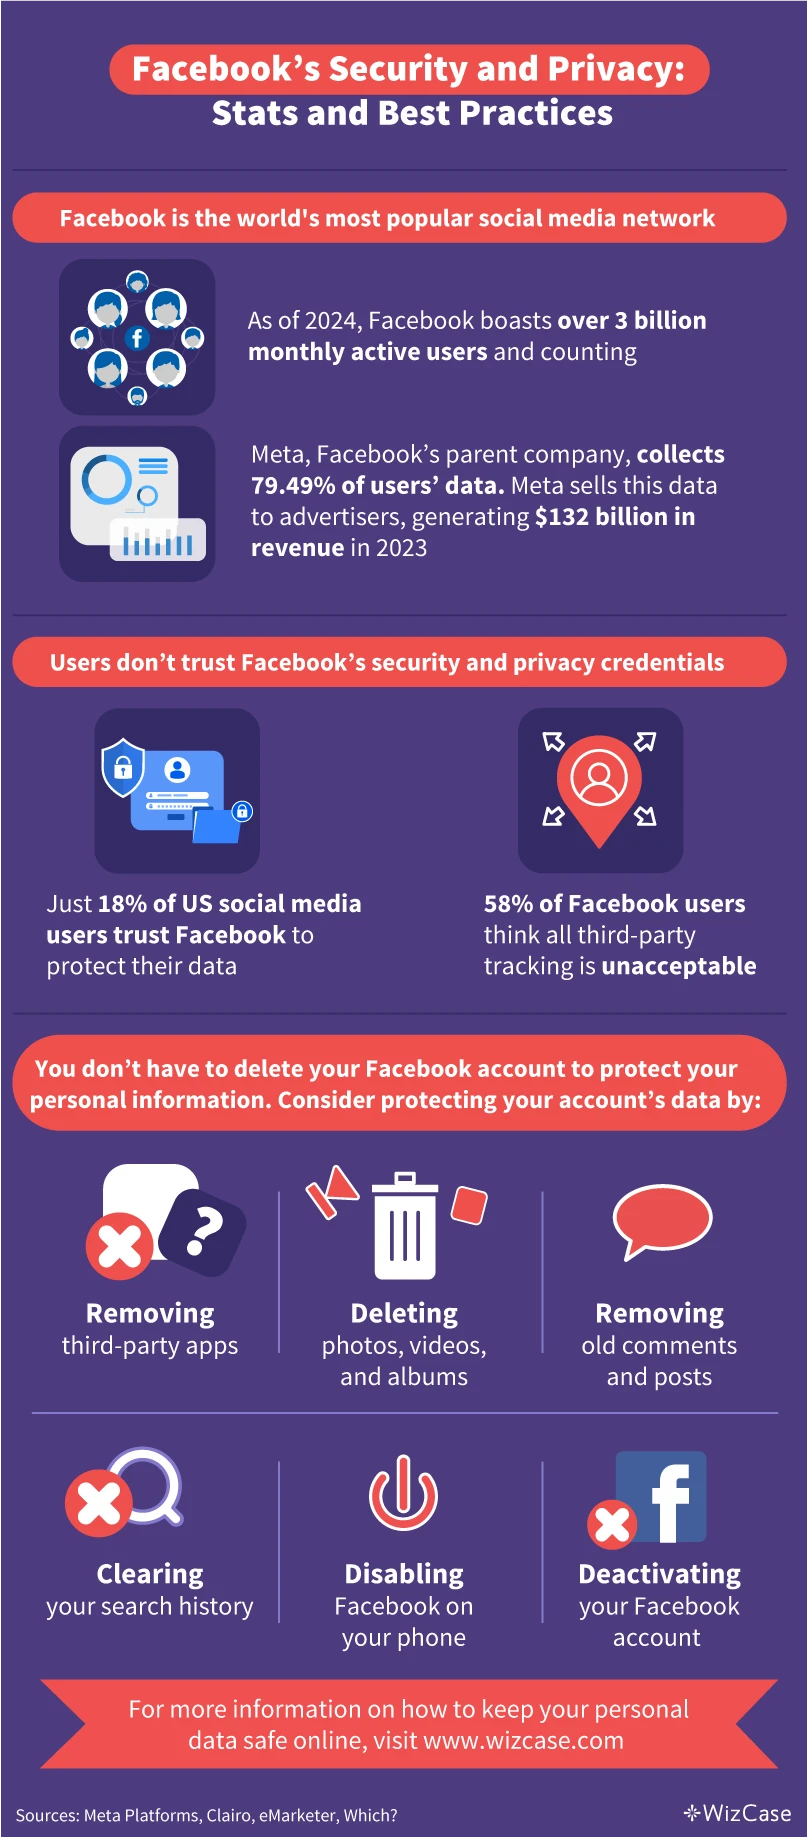
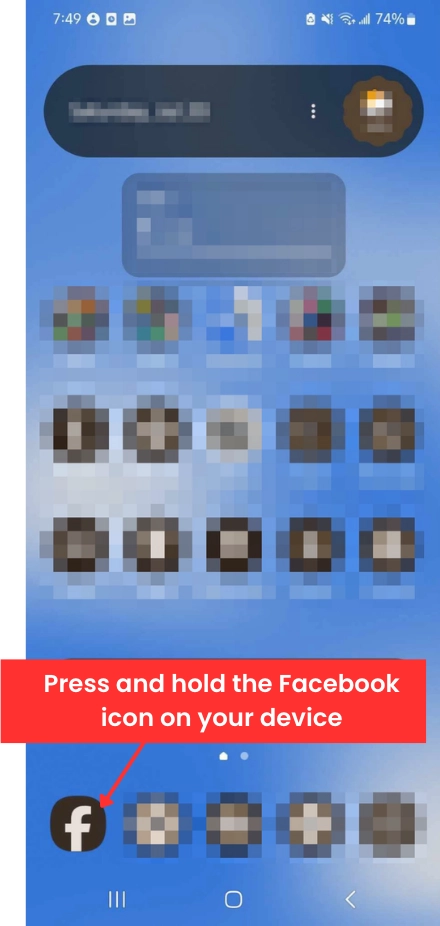
How to Disable the Facebook App on Android
- Press and hold the Facebook app icon.
![Screenshot of Facebook icon]()
- Tap “Disable” from the pop-up menu.
![Screenshot of disable pop up on Facebook]()
- Press “Disable” to confirm.

![Screenshot of disable to confirm on Facebook]()
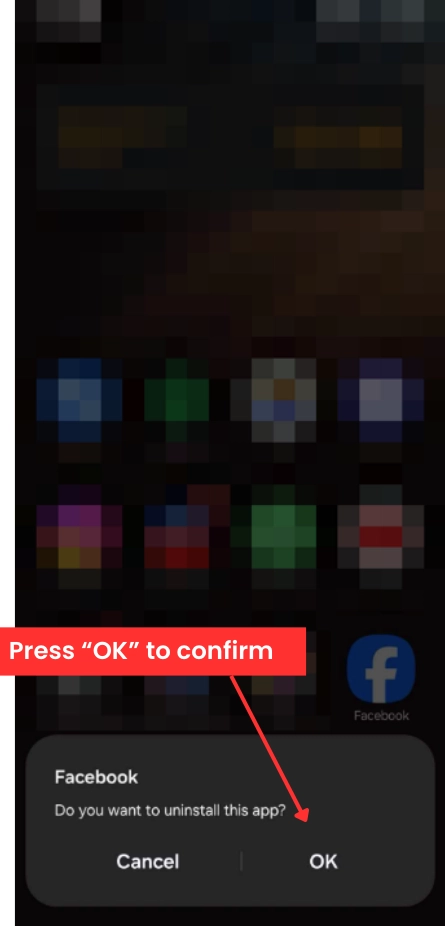
How to Uninstall the Facebook App on Android
- Press and hold the Facebook app icon.
![Screenshot of hold icon to uninstall Facebook]()
- Tap “Uninstall” from the pop-up menu.
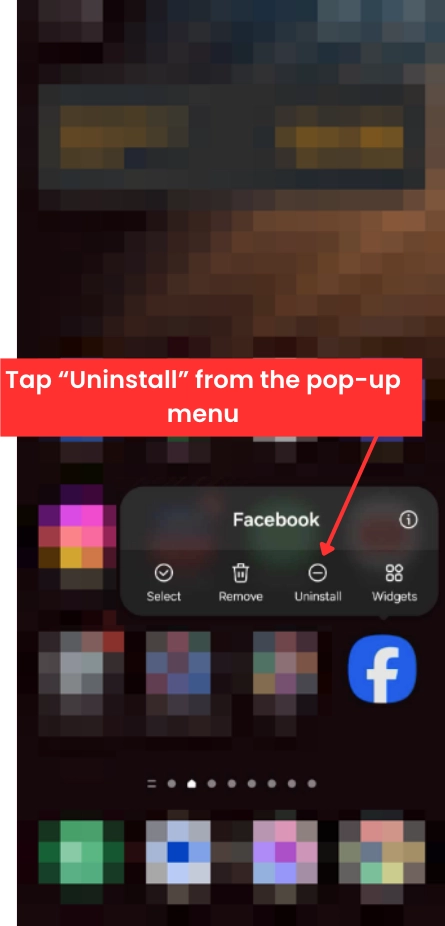
![Screenshot of uninstall Facebook]()
- Press “OK” to confirm.
![Screenshot of uninstall confirmation on Facebook]()
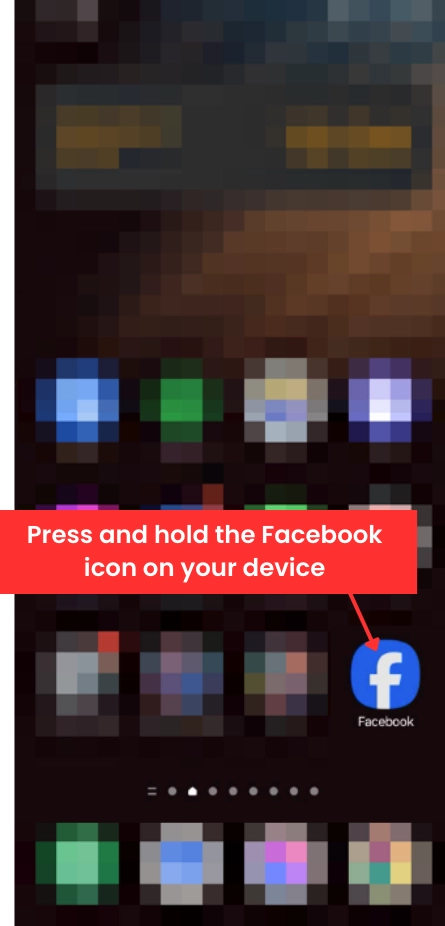
How to Uninstall the Facebook App on iOS
- Press and hold the Facebook app icon.
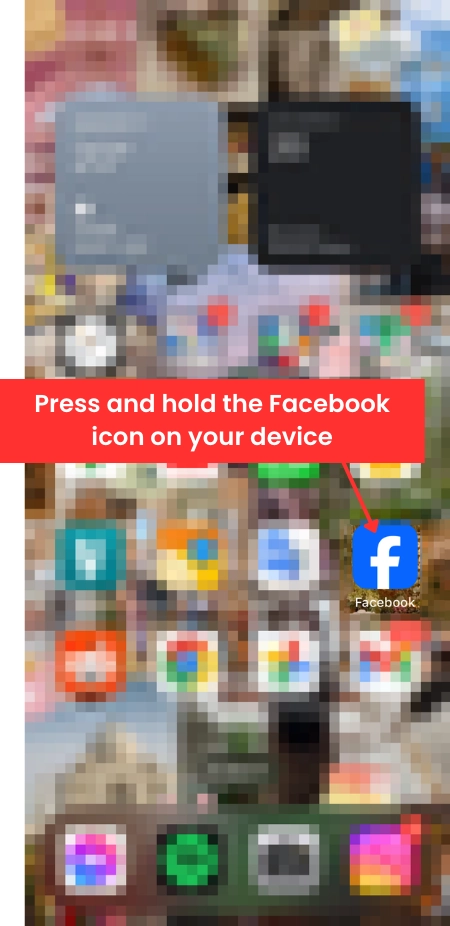
![Screenshot of press and hold Facebook icon]()
- Tap “Remove App” from the pop-up menu.
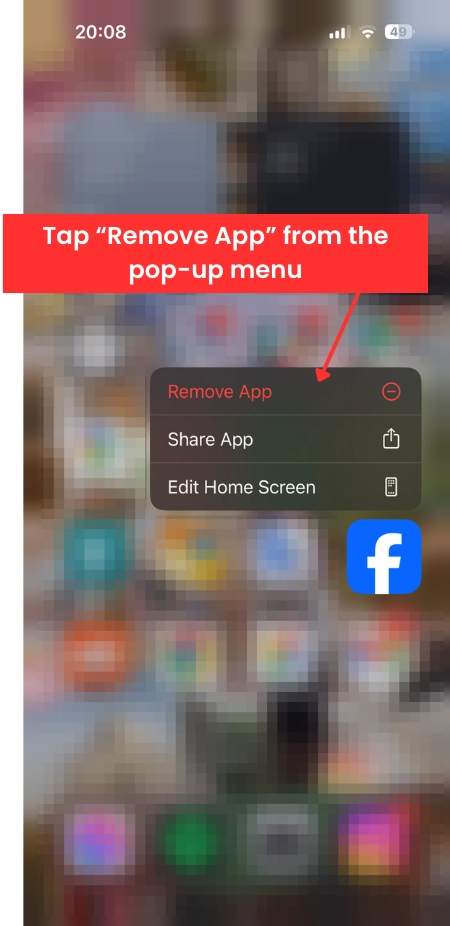
![Screenshot of remove Facebook app]()
- Press “Delete App” to confirm.
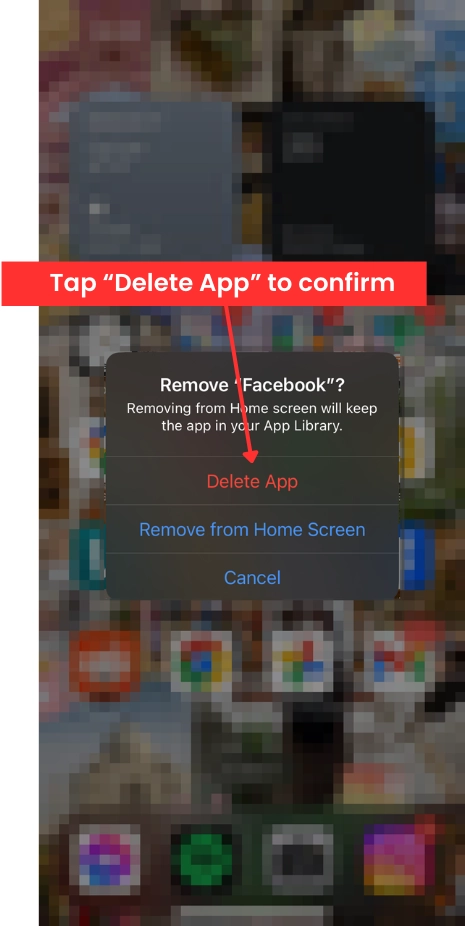
![Screenshot of delete app on Facebook]()
Take Steps to Keep Your Online Data Private
As Facebook continues to evolve, so do its measures to enhance user privacy and security.
Yet, daily interactions with many websites and online service providers still pose a risk as these entities often access and exchange your personal information. This ongoing data sharing can leave your personal details vulnerable to both authorized scrutiny and unauthorized access by hackers.
Protecting your online privacy requires an understanding of how to control who views your data and how it’s managed. Below we discuss guidelines to help safeguard your online data across all platforms.
5 Ways to Keep Your Online Data Private
- Regularly update privacy settings: Platforms frequently update their privacy features, so regularly check your settings to ensure they align with your current privacy preferences.
- Use strong and unique passwords: Cybercriminals regularly use the most popular passcode phrases to hack into social media accounts. Use complex passwords that are difficult to guess and be sure to use a different password for each of your accounts.
- Enable two-factor authentication: Add an extra layer of security to your accounts by enabling two-factor authentication, which requires a second form of verification in addition to your password.
- Limit data sharing on social media: Be mindful of the information you share online, particularly on social media platforms. Adjust your sharing settings to limit who can see your posts and personal information.
- Avoid keeping personal information in online storage: Public online storage, like Google Drive or the Apple Cloud, aren’t a safe space to keep your passwords, address, or photos. They’re known for being an easy target for hackers and cybercriminals engaged in identity theft.
Attention: WizCase owns the visual and written content on this site. If our cybersecurity insights resonate with you and you wish to share our content or visuals, we ask that you credit WizCase with a link to the source in recognition of our copyrights and the diligent work of our expert cybersecurity researchers.


Leave a Comment
Cancel