The Ultimate Privacy Guide for Mac Users
Reading time: 29 min
Last Updated: Feb 24, 2026

It’s easy to overlook Mac’s vulnerabilities due to the common myth that macOS is protected from all online threats. However, the truth is that all internet connections make any operating system susceptible to security threats — including your Mac.
Just in 2019, the McAfee Labs Threat Report revealed that approximately 30,000 new forms of Mac malware were discovered in the first quarter of the year. Unfortunately, according to AVG, the number of hacker attacks on Mac is only expected to grow. For this reason, it’s crucial to protect your Mac and avoid exposing your personal information to hackers.
Though there are many ways that your Mac’s security can be compromised, you can prevent all security breaches with a few simple steps. In this guide, I’ll give you tips on how to optimize your Mac’s security settings and protect your personal data from any possible hacker attack.
Mythbuster — Are Macs Really Immune to Malware and Viruses?
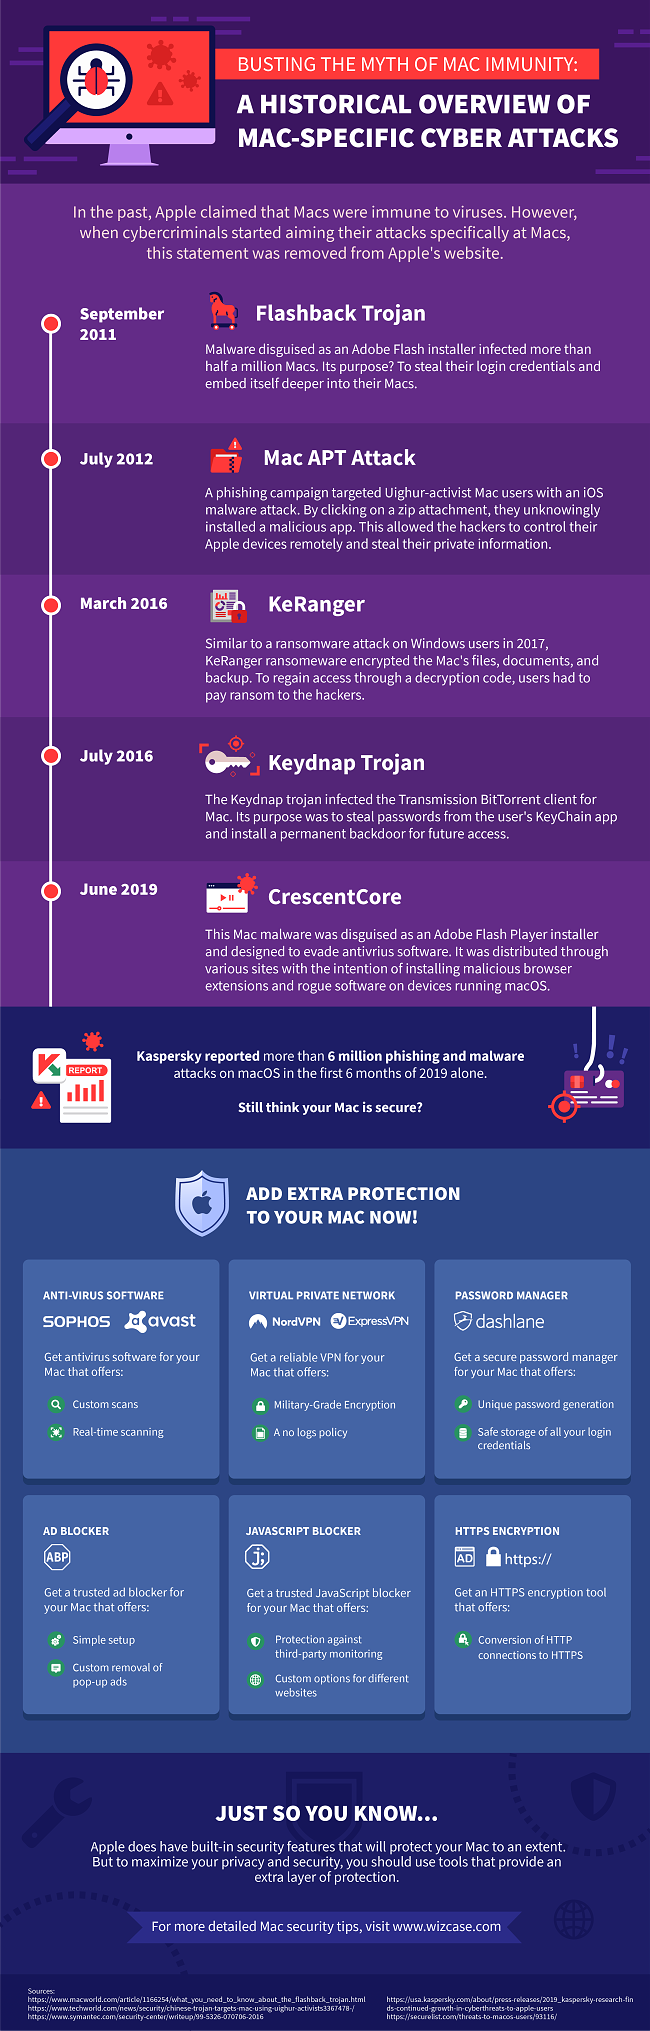
Apple used to claim that Macs were immune to viruses. While they were less likely to be a target of cybercriminals at the beginning of their existence, as they grew in popularity, more and more hackers started to focus on bypassing their security. In 2012, due to numerous Trojan attacks affecting numerous Mac devices, Apple opted to remove a prominent immunity statement from its website, a move prompted by the increasing security threats.
Despite having built-in antivirus software, all Macs are still vulnerable to various cyberattacks. Even though Apple regularly updates all security features, hackers find new ways of bypassing the updates just as often. Though the list is not exhaustive, these are the 5 biggest attacks that targeted Mac users over the past few years:
-
Flashback Trojan
Discovered in September 2011, Flashback was one of the most dangerous cybercriminal software. It aimed at stealing personal information by disguising itself as a popular Flash Player plug-in. The program was able to exploit Java vulnerabilities to silently download and install itself on a Mac without the user’s knowledge. From there, it would hook itself onto any available Mac application and Safari browser in order to collect login details and private data.
Even though Apple managed to release a Java patch update very soon after Flashback’s discovery, the trojan successfully took control of over half a million Mac devices all over the world.
-
Mac APT Attack
The Mac Advanced Persistent Threat (APT) attack started as an attack against political activists in China. However, due to the simplicity of the virus, it became widely used by hackers targeting Macs in an email phishing campaign. Cybercriminals sent a number of malicious emails to Mac users all over the world, encouraging them to click on the attached zip file. By clicking the attachment, people unknowingly installed a dangerous app on their devices creating a backdoor for hackers to steal personal information and gain control of their Mac.
Though that issue was fixed many years ago, phishing is still one of the biggest threats to the security of Macs.
-
Keydnap Trojan
In 2016, ESET researchers discovered a new Trojan Horse called OSX.Keydnap, commonly known as Keydnap. The threat was spread to Mac users through a series of suspicious emails containing an infected ZIP file. The most distinctive feature of the Keydnap was that it didn’t infect any Macs until a user activated it by double-clicking on its icon. Opening the malicious app kickstarted a process called icloudsyncd. It allowed Keydnap to continuously run in the background and collect passwords from the Apple KeyChain app and send them directly to cybercriminals on the Dark Web.
-
KeRanger
KeRanger distributed its is first hacker attack through a legitimate torrent program for Macs called Transmission. The trojan used a valid Mac app developer certificate which enabled the app to be installed without triggering Gatekeeper’s security response. Three days after installation, KeRanger could start encrypting various files and documents as well as their backups, disabling anyone from accessing them. The only way for Mac users to recover their data was to pay ransom to hackers on the Dark Web.
Despite the file being taken off the Transmission website within a couple of days, it is estimated that over 7,000 Mac users downloaded the ransomware on their devices. Apple fixed the developer certificate used by KeRanger soon after discovering the issue. However, new versions of the same or similar programs are still circulating the web.
-
CrescentCore
Distributed by multiple different websites, CrescentCore is the latest trojan disguised as an Adobe Flash Player file. However, unlike other similar viruses, CrescentCore was programmed to avoid detection by antivirus software. This made it more difficult for malware experts to find and remove it from infected Macs.
After being downloaded on a device, the CrescentCore file would first check for any anti-malware software installed on a Mac. If it detected an antivirus program, the malware file would simply stop itself from running. However, if a Mac didn’t have any extra security software, CrescentCore proceeded to successfully bypass Gatekeeper, installing itself on macOS. From there, the malware could infiltrate any Safari browser activity, collecting all personal data for ransom on the Dark Web.
The trojan file is currently still available on the web, alongside other viruses that work in a similar way.
Macs may have been a less likely target for hackers back when they were first distributed, but it’s certainly not the case anymore. As the malware designed for macOS is getting smarter, it’s important to take extra precautions to increase your Mac’s security.
Why You Need to Secure Your Mac
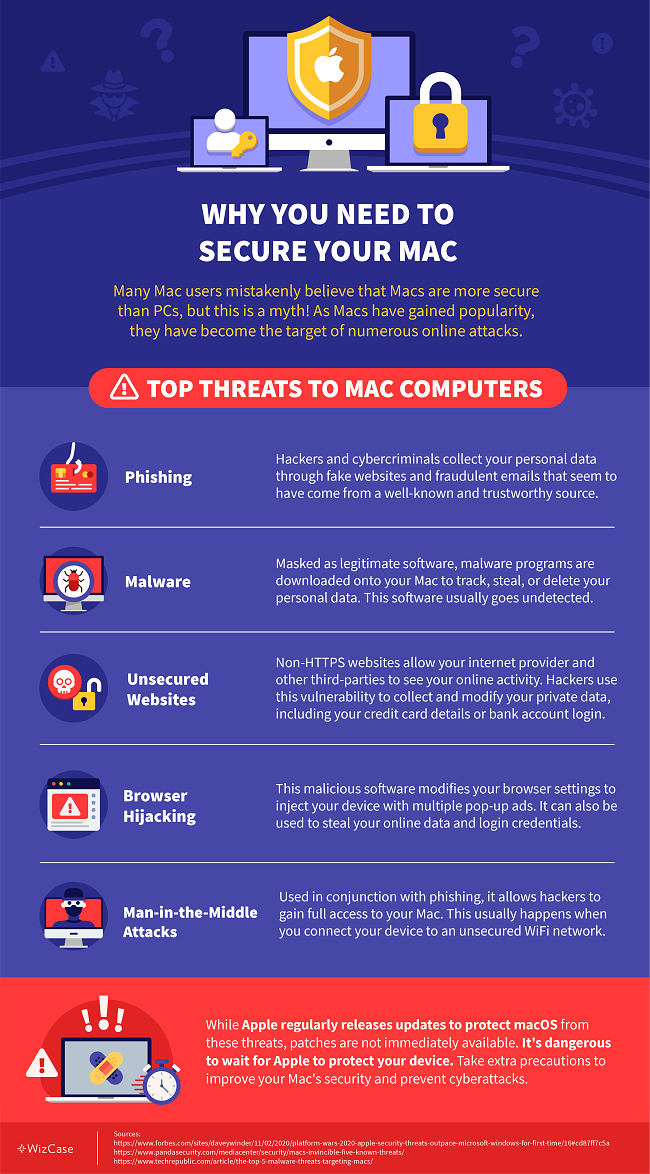
Your Mac is vulnerable to numerous online threats, including:
- Phishing: Hackers can steal private information, such as your bank account passwords or social media credentials, through fake websites and fraudulent emails. Phishing very often seems to come from legitimate, well-known organizations like your bank or internet provider, asking you to click on a link provided and enter your personal details. As some phishing attempts are more difficult to recognize than others, it’s important to remember that most professional companies would never request your private data through an email.
- Malware: Disguised as legitimate programs, malicious software can track, steal, and delete your sensitive data. Malware programs are usually downloaded without the user’s knowledge when they access unsecured or fake websites. They can come in the form of viruses, ransomware, or spyware. Any malware software downloaded on your Mac can create a backdoor for cybercriminals to continually access or even hijack your device.
- Unsecured websites: Websites without HTTPS or a padlock icon in the search bar are not secure. This enables your internet provider and any third-party organizations to see all the information you enclose on a non-HTTPS site. It means that anything you write or submit to them, like credit card details or passwords, can be easily read or stolen by cybercriminals.
- Browser hijacking: Unwanted software can be disguised as a trustworthy app or file and downloaded from unsecured websites. Once downloaded on your Mac, it modifies your web browser’s settings without permission in order to inject your device with unwanted pop-up ads. Usually, this method is used to increase sales or clicks to a particular website, but it can also be a lot more dangerous than that. Various hijacking software contains ransomware used to obtain your sensitive data and record your passwords.
- Man-in-the-middle attack (MITM): MITM is used in conjunction with phishing to allow hackers full access to your device and personal information. Man-in-the-middle attacks usually happen when you connect your Mac to an unsecured WiFi network. Hackers can easily scan through such connections looking for any vulnerabilities, such as weak passwords. Once they find a way into your device, they deploy certain interception tools to collect your private data transmitted online like bank details, social security numbers, and more.
The popularity of Macs is on the rise, but unfortunately, so are online threats and hacker attacks aimed at all Mac users. According to Kaspersky’s latest cybersecurity report, in the first 6 months of 2019, Mac users experienced nearly 6 million Mac phishing scams and over 87,000 malware attacks aimed directly at their Apple devices.
While Apple often releases crucial updates to improve the security of its users, they may not be issued quickly enough to prevent threats on your macOS. To be sure your online information is protected, follow my recommendations to safeguard your Mac.
What Is Gatekeeper and Is It Enough Protection?
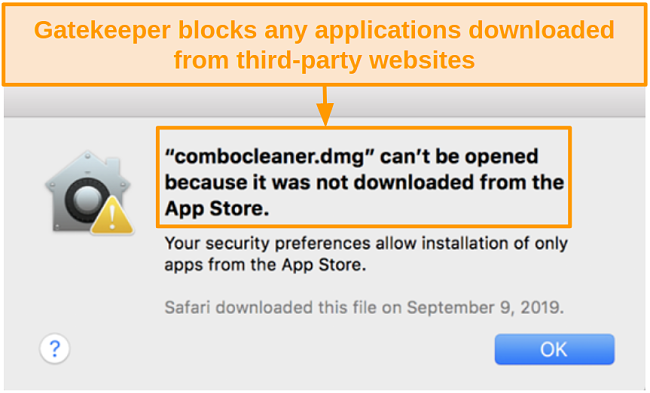
Gatekeeper is a built-in security feature used in Macs and other Apple products. It protects your Mac from opening malicious apps by requesting sign in details and scanning through downloaded files before running the program. This prevents you from installing files downloaded from third parties that aren’t safe or approved by Apple.
If you want to install an app from a third party website, Gatekeeper will prompt this message:
To check whether Gatekeeper is enabled, simply follow the instructions below.
2 Steps to Ensure Gatekeeper Is Enabled:
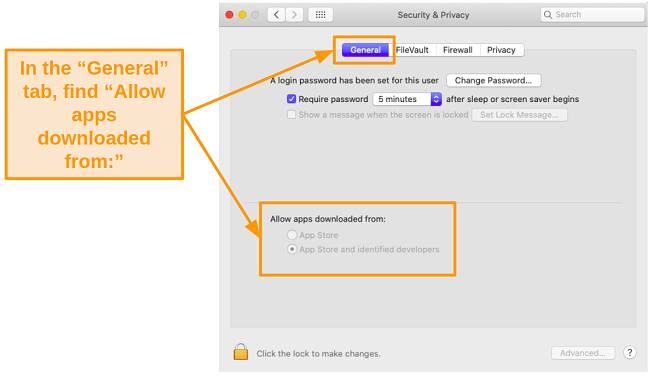
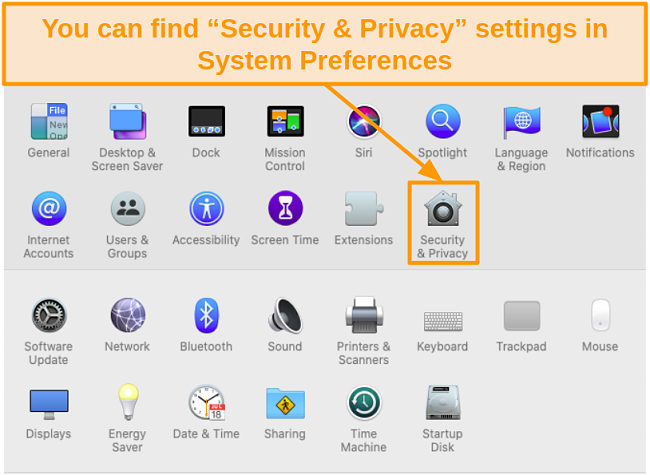
- Open System Preferences and choose Security & Privacy.

![Screenshot of Mac Security and Privacy icon in System Preferences]()
- Click the General tab and find “Allow apps downloaded from.” If “App Store and identified developers” is selected, Gatekeeper is enabled.
![Screenshot of Mac Security and Privacy settings]()
However, Gatekeeper isn’t invulnerable. According to Filippo Cavallarin’s latest report, Gatekeeper comes with multiple vulnerabilities that hackers can use to bypass Mac’s security, usually by tricking you into downloading malicious files. Very often, these files mimic popular and trustworthy programs and are advertised online as free to encourage download clicks. To truly protect your device and data, optimize your Mac’s security settings.
How to Optimize Your Mac’s Security Settings
Cyberattacks shouldn’t be your only concern – your Mac’s default settings may not be optimized for protecting your device from online threats such as malware, trojans, and MITM attacks. Use these quick checks to enhance your Mac’s security:
Quick Guide: 5 Mac Settings You Can Change to Optimize Security
- Sharing Services: Disable any unnecessary sharing services on your Mac.
- Location Services: Manage which apps can access your location.
- Firewall Settings: Activate your Mac’s firewall and enable Stealth Mode.
- Guest User: Set up a guest user account to limit others from accessing your personal files.
- Spotlight Suggestions: Disable this feature to maintain your privacy.
1. Disable Sharing Services You Don’t Need
You can significantly improve your Mac’s security by turning off any sharing services you’re not using. The majority of Mac users don’t need apps for screen sharing, printer sharing, or remote login. Follow these steps to disable sharing on your Mac:
5 Simple Steps to Disable Sharing Services on Your Mac:
- Open System Preferences and select Sharing.
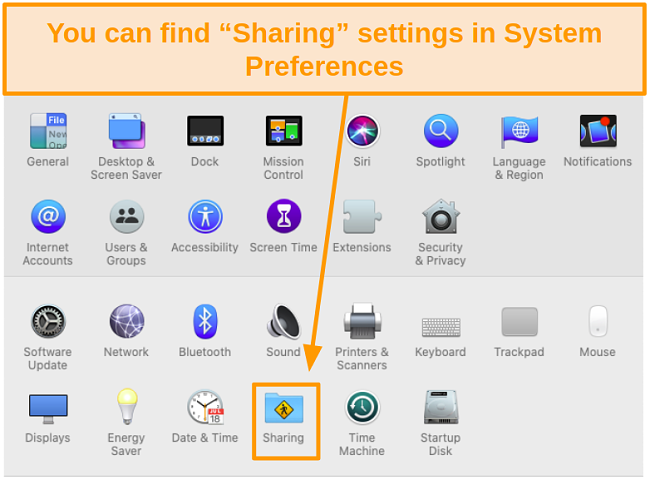
![Screenshot of Mac System Preferences highlighting Sharing icon]()
- Click the lock icon in the lower left corner and enter your administrator password.
- Find the list of sharing services on the left.
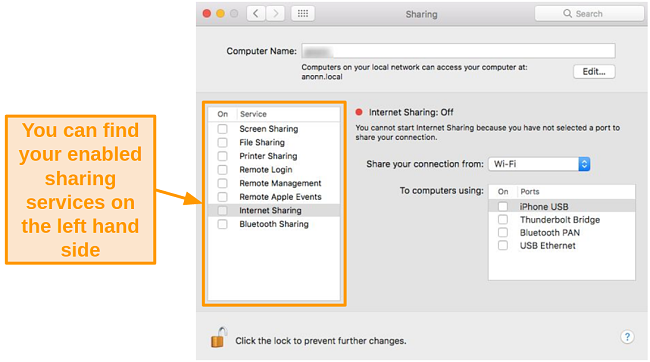
![Screenshot of Sharing options on Mac]()
- Check which boxes on the left-hand side are ticked. Uncheck the boxes for sharing services you don’t need.
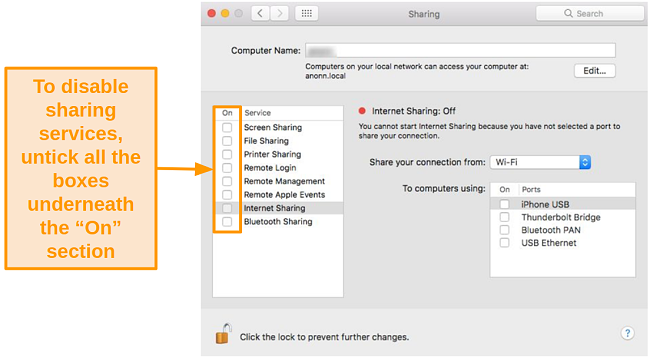
![Screenshot of Sharing options highlighting where to enable and disable sharing services]()
- Click the lock icon to save your changes.
2. Manage Which Apps Can Access Your Location
Location privacy is more important than you think! Hackers can use your location to track you and steal your identity. Make sure to disable location services for any apps you don’t trust by following these steps:
5 Simple Steps to Disable Location Services on Your Mac:
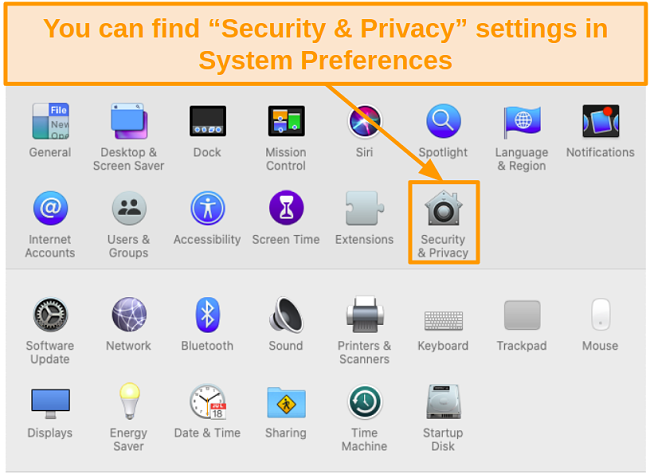
- Open System Preferences and select Security & Privacy.
![Screenshot of Security and Privacy icon in System Preferences]()
- Choose the Privacy tab and make sure you’re in Location Services in the left-hand menu.
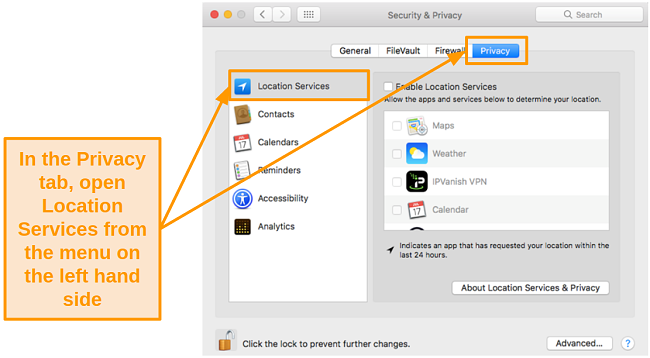
![Screenshot of Location Services in Privacy settings]()
- Click the lock icon in the lower left corner and enter your administrator password.
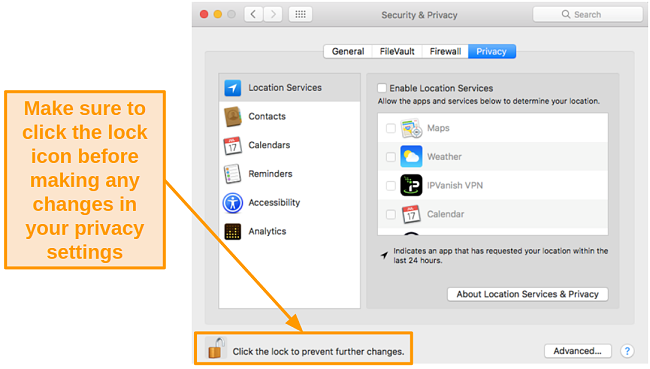
![Screenshot of the lock button in Mac settings]()
- Uncheck the apps that don’t need access to your location.
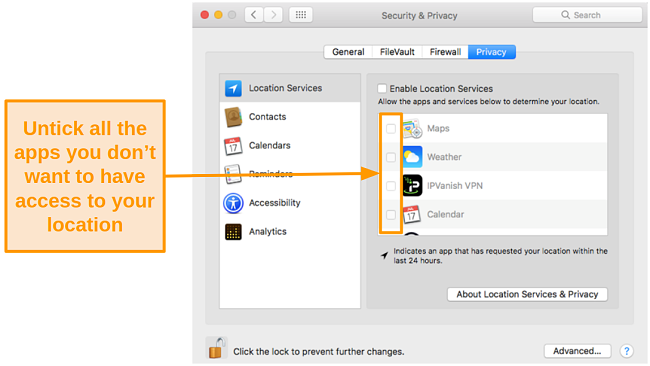
![Screenshot of disabling all location services]()
- Click the lock icon again to save your changes.
3. Activate Firewall and Stealth Mode
MacOS’s firewall feature stops unwanted network traffic. Stealth Mode prevents Mac from responding to unexpected network requests. Both of these features make your Mac less vulnerable on public networks. You can follow my 5 easy steps to activate them:
6 Easy Steps to Activate Firewall and Stealth Mode on Your Mac:
- Open System Preferences and Select Security & Privacy.
![Screenshot of Security and Privacy icon in System Preferences on Mac.]()
- Choose the Firewall tab.
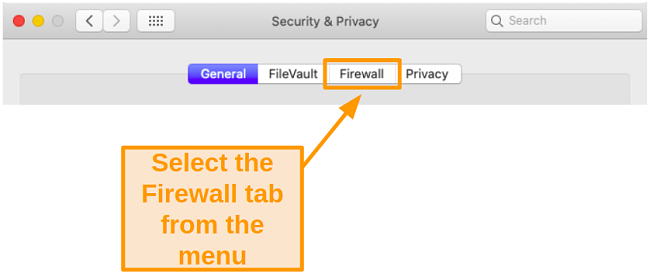
![Screenshot of selecting the Firewall tab]()
- Click the lock icon in the lower left corner and enter your administrator password.
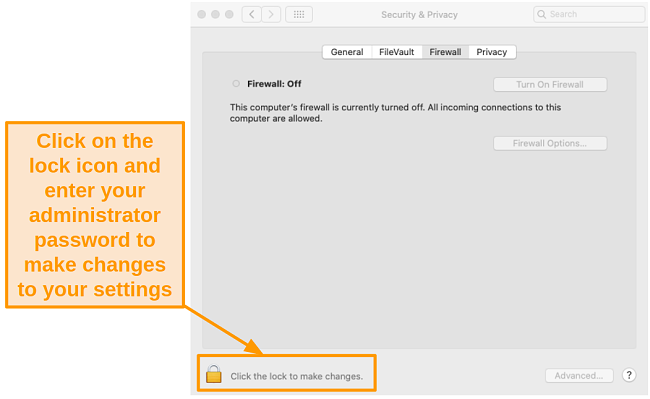
![Screenshot of unlocking Firewall settings to make changes.]()
- Click the Turn On Firewall button and then click Firewall Options below.
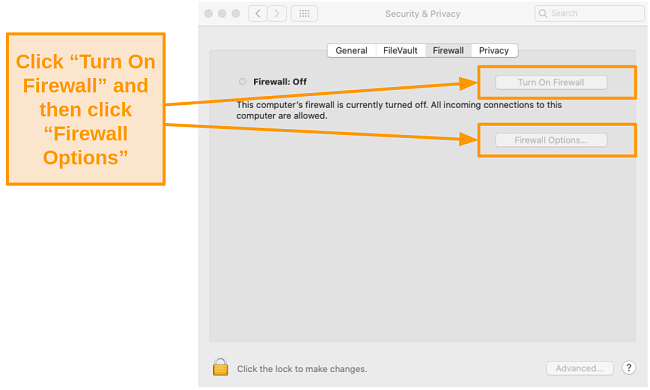
![Screenshot of turning on the Firewall in Privacy Settings.]()
- Check the Enable stealth mode box and click OK.
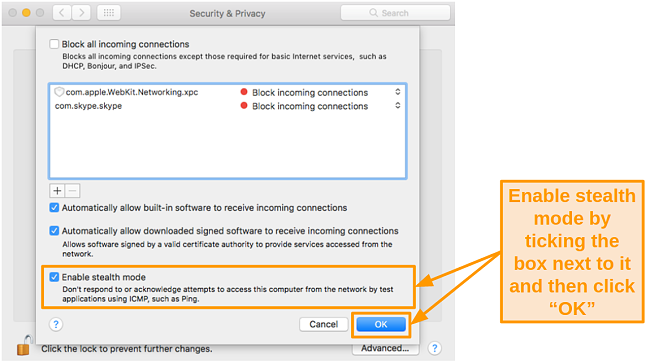
![Screenshot of enabling stealth mode in Mac Security and Privacy settings]()
- Click the lock icon again to save your changes.
4. Set Up a Guest User
When you allow others to use your Mac, you give them access to your personal information. Fortunately, the Guest User feature in macOS lets others use your Mac without compromising your privacy. That way you can keep your personal data to yourself, including your apps, browser history, and search queries.
Because the Guest User feature is turned off by default, follow these 4 simple steps to activate it on your Mac:
5 Simple Steps to Activate the Guest User Feature on Your Mac:
- Open System Preferences and select Users & Groups.
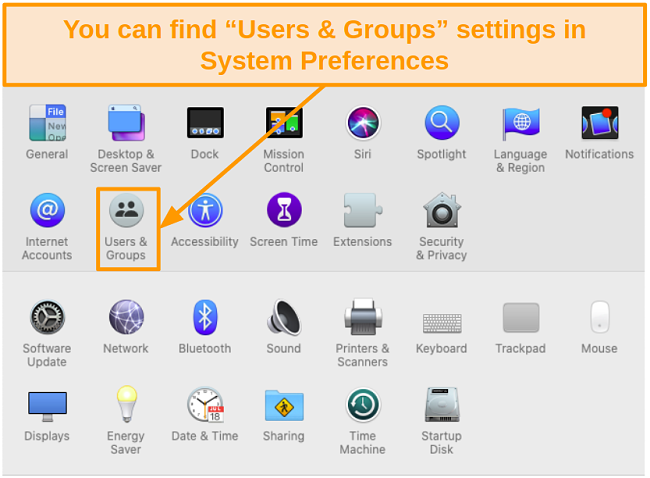
![Screenshot of Users and Groups icon in System Preferences]()
- Click the lock icon in the lower left corner and enter your administrator password.
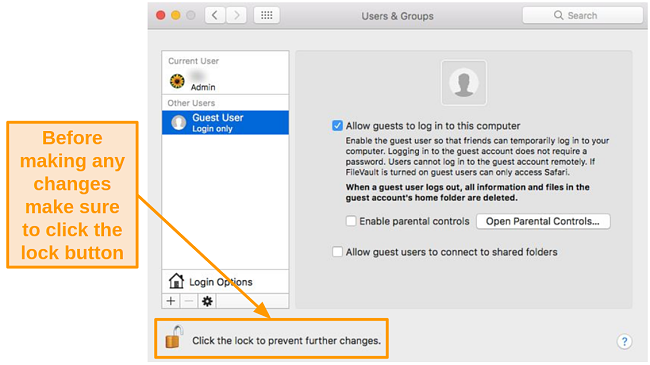
![Screenshot of the lock button in Mac settings]()
- Click on Guest User under Other Users on the left.
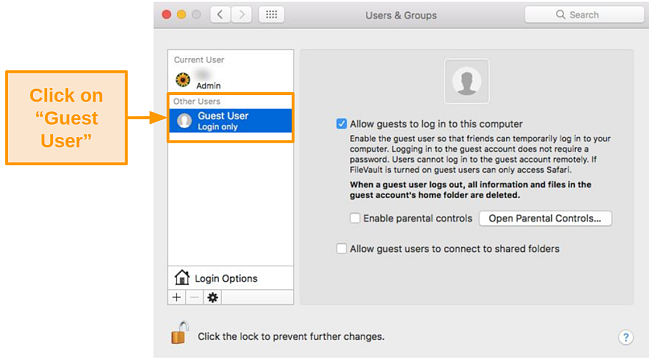
![Screenshot of Guest User settings]()
- Check the box next to Allow guests to log in to this computer.
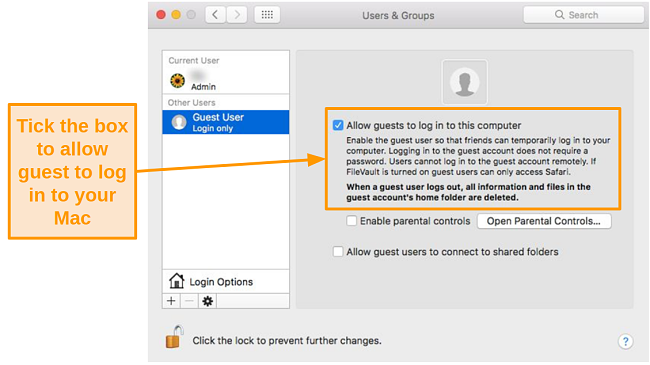
![Screenshot of allowing guest users to log in to your Mac]()
- Click the lock icon again to save your changes.
5. Disable Spotlight Suggestions and Web Searches
Spotlight might look harmless, but it’s quietly sending your search data to Apple to give you content suggestions. The data is also shared with third party providers like Bing to display relevant results for your searches. Fortunately, you can keep Spotlight searches within the contents of your Mac by following these 3 steps:
3 Basic Steps to Disable Spotlight Suggestions on Your Mac:
- Open System Preferences and select Spotlight.
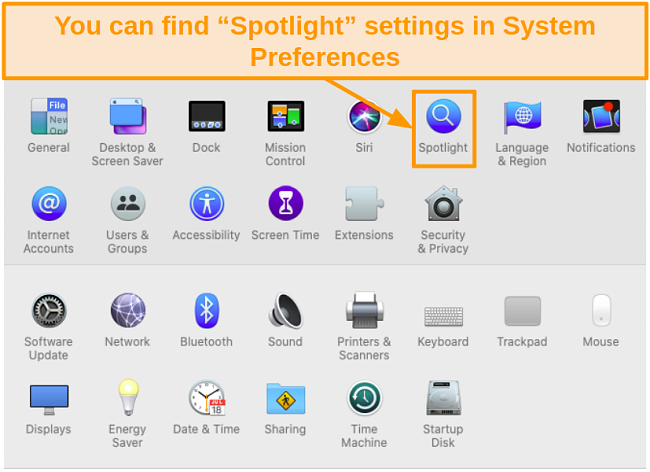
![Screenshot of Spotlight icon in System Preferences]()
- Uncheck the box next to Allow Spotlight Suggestions in Look up.
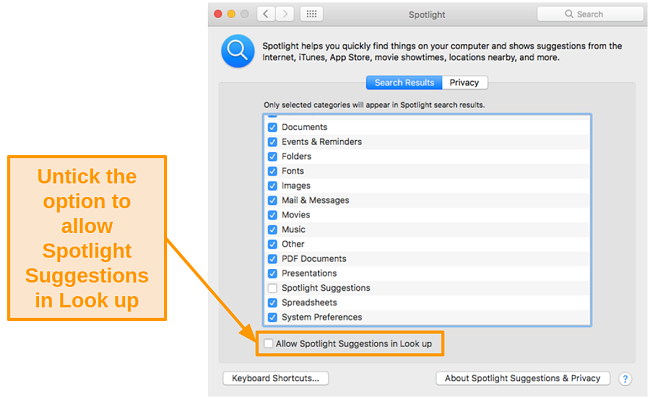
![Screenshot of disabling spotlight suggestions in look up]()
- From the list, uncheck the Spotlight Suggestions box.
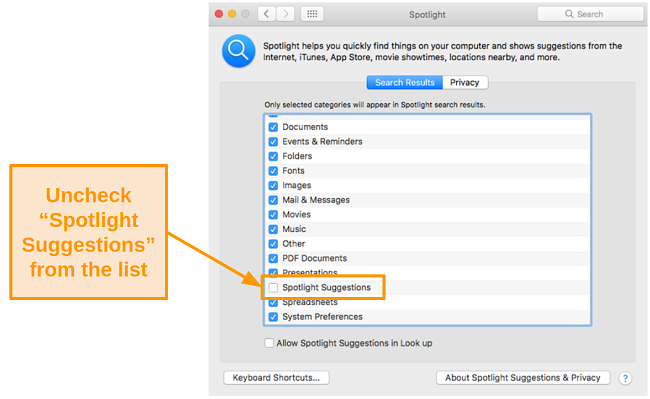
![Screenshot of disabling spotlight suggestions]()
6 Essential Security Tools for Mac
Since popular cyberattack methods do not rely on bypassing internal security features, you need to use the right tools to successfully protect your Mac from security breaches.
Below are my top 6 recommendations for various tools I’ve tested that will enhance your Mac’s security:
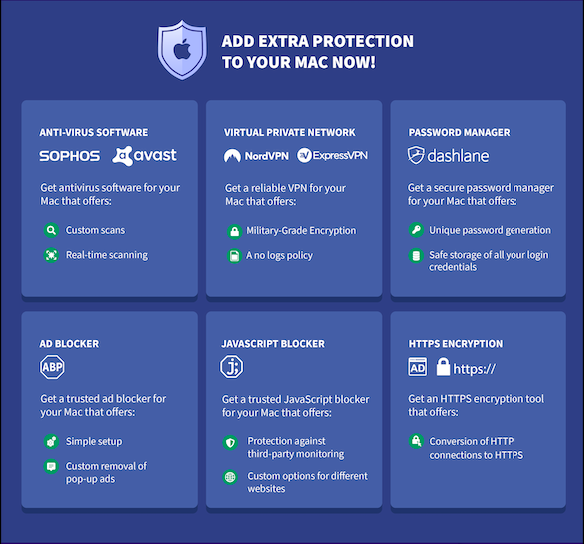
Quick Guide: 6 Essential Security Tools for Mac
- Antivirus Software: Protects you against malicious files and malware.
- Virtual Private Network: Hides your IP address to protect your privacy.
- Password Manager: Securely stores all your login credentials and passwords in one convenient place.
- Ad Blocker: Prevents adware from invading your privacy and stealing your personal information.
- JavaScript Blocker: Disables JavaScript to protect you against malicious injections.
- HTTPS Everywhere: Encrypts all of your web connections with HTTPS.
1. Antivirus Software
Although your Mac’s built-in virus protection makes it more secure than other PCs, hackers can still target Mac users. Hackers can make changes on your computer by tricking you into downloading malicious files off the internet. Fortunately, you can prevent installing malware on your Mac with antivirus software.
Most antivirus software perform drag-and-drop scans on files manually selected by you, as well as full-system macOS scans. Both methods will keep your Mac fully protected from malware, phishing, and hacking attempts. You can set the software to routinely remove malicious files on your computer.
Tip: I found that Sophos and Avast worked best on my Mac. They offer custom scans for individual folders, files, or your entire device. Sophos even offers real-time scanning, so you’ll be warned as soon as malware attempts to bypass your Mac’s security.
2. Virtual Private Network
Your Mac’s built-in protection can’t prevent IP theft. Hackers can use techniques like browser hijacking to obtain your IP address and discover your network, connected devices, and which OS you’re using. With your information, they can design a targeted attack that damages your files, OS, and more – without you knowing.
The best way to stop hackers from stealing your IP address is by using a VPN. Only premium VPNs can provide long-term security for your Mac.
Tip: NordVPN and ExpressVPN were the best premium VPNs I tested. They provide AES 256-bit encryption, automatic kill switches, and no-logging policies. Your Mac’s IP address can’t be recorded, stored, or monitored by any third parties when you’re connected to the internet.
3. Password Manager
Using the same difficult password across all of your sites and apps may seem like the best solution. However, this will place your security at risk since cybercriminals only need to obtain your password once to access your personal information.
While the Safari browser on your Mac has a built-in password manager, it isn’t the most secure option. Hackers can easily conduct a cyberattack to hijack your browser’s contents. If they succeed, you could potentially lose access to all of your online accounts. To keep your Mac secure, make sure to use a trustworthy password manager software such as Dashlane. These password tools will not only store your existing passcodes, but also help you create new, stronger passwords by analysing and improving your suggestions.
4. Ad Blocker
Advertisers can collect your personal data and display ads in your Mac’s browser. These ads come in various forms, such as banners or pop-ups. Very often, they are bundled with malicious software that can compromise your Mac’s privacy. To prevent this, you can install an ad blocker.
You can change the settings of your Safari browser by following the 4 steps below:
4 Steps to Disable Pop-Up Ads in Safari:
- Open the Safari app on your Mac and click Safari at the top of the toolbar.
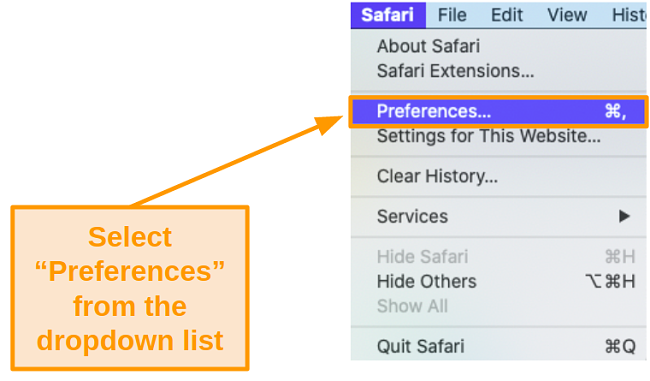
![Screenshot of the dropdown list under 'Safari' on the toolbar.]()
- Select Preferences and click on Websites at the top of the window.
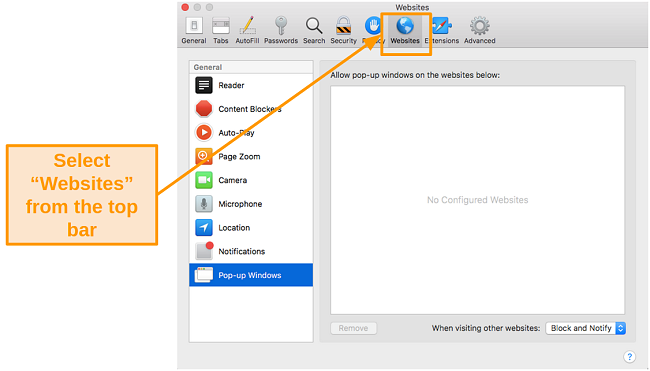
![Screenshot of Websites settings on Mac]()
- Choose Pop-up Windows from the General section on the right.
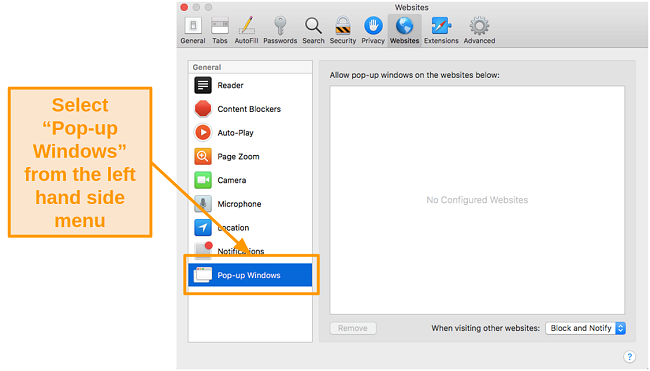
![Screenshot of pop-up windows settings in Safari]()
- At the bottom of the window, select Block and Notify from the dropdown.
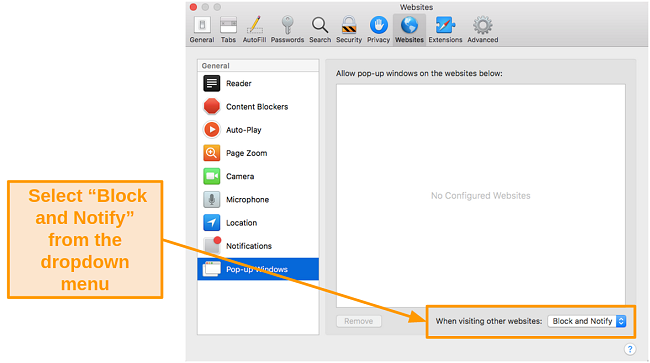
![Screenshot of blocking pop-up windows on Safari]()
Tip: I tested various ad blockers on my Mac, and I was especially impressed with AdBlock Plus. Not only is it easy to set up, but it’s also free. Once activated, AdBlock Plus will prevent ads from popping up in your browser and protect your Mac from malicious apps.
5. JavaScript Blocker
JavaScript gives a dynamic experience when browsing the internet. This programming language is used for online buttons, forms, and other content. However, having JavaScript enabled on your Mac can put your security at risk. Many cybercriminals use it to inject malicious code into websites to steal your sensitive information.
To avoid this, you can disable JavaScript in your Safari app’s settings by following these 3 simple steps:
3 Simple Steps to Disable JavaScript in Safari:
- Open the Safari app and click Safari at the top of your screen.
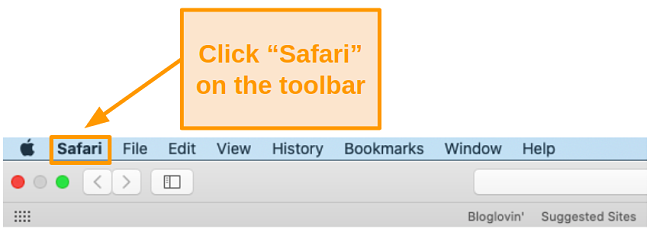
![Screenshot of 'Safari' on the Mac toolbar.]()
- Select Preferences from the toolbar and click on Security at the top.
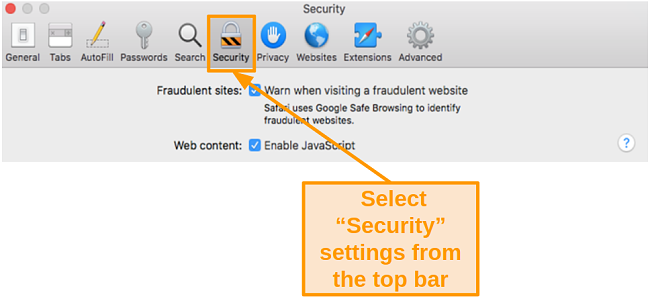
![Screenshot of Security settings in Safari]()
- Uncheck the box next to Enable JavaScript next to Web content.
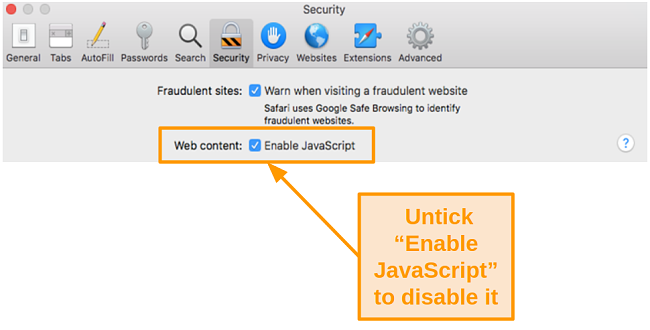
![Screenshot of disabling JavaScript in Safari on Mac]()
Tip: Installing a JavaScript blocker will give you more control over how your Mac displays web pages. I use JS Blocker to manage JavaScript on my Mac. With this tool, I can easily disable JavaScript to block advertisers from monitoring my online activity. This makes it an excellent tool to manage your browsing experience and protect your Mac from potential threats.
6. HTTPS Everywhere
HTTP websites leave you vulnerable to DNS hijacking, eavesdropping, tampering, and other online threats. If you browse on an HTTP website, cybercriminals can steal your information when your Mac’s connection is unencrypted. To keep your online data private, you should always use HTTPS when connecting your device to the internet. Unfortunately, not all websites use HTTPS encryption.
The EFF (Electronic Frontier Foundation) has been offering HTTPS Everywhere browser extensions for free for many years. The extension automatically applies the HTTPS encryption to most HTTP websites, making them more secure. With the HTTPS extension added to your browser, you can be sure that nobody can spy on you while you’re online.
Best Browser for Mac — How Secure Is Safari?
Most browsers aren’t focused on privacy and collect your personal data instead, which can easily be intercepted by hackers. To maximize your online privacy, you should use a secure browser when browsing on your Mac.
One of the most secure browsers is Safari, which is already included on your macOS. Safari has a cross-site tracking feature to prevent third parties from tracking your activity across websites. To activate it, follow the 3 steps below:
3 Basic Steps to Prevent Cross-Site Tracking on Safari:
- Open the Safari app on your Mac and click Safari at the top of your screen.
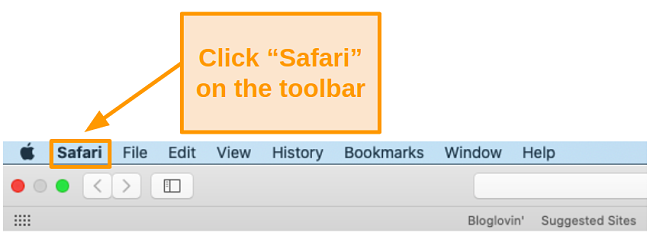
![Screenshot of the 'Safari' option on the Mac toolbar.]()
- Select Preferences and click on Privacy.
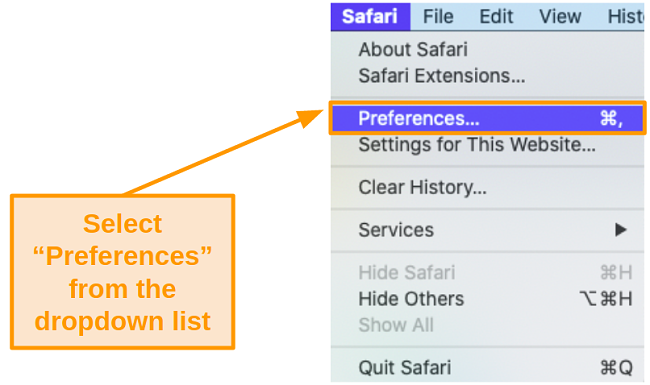
![Screenshot of the dropdown list under 'Safari' on the toolbar.]()
- Check the box next to Prevent cross-site tracking.
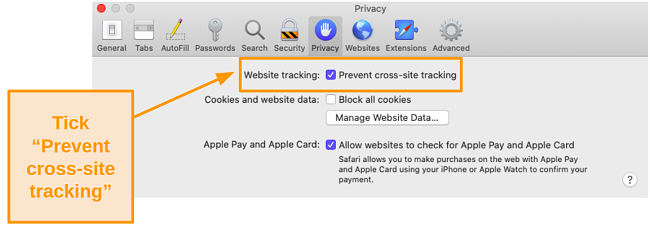
![Screenshot of cross-site tracking option on Mac]()
Safari has various built-in features to protect your privacy. In case it’s not compatible with some of your websites or services, there are alternative browsers. Below are my top 3 picks that I’ve tested on my Mac:
Quick Guide: 3 Best Alternative Browsers for Mac
- Firefox: Open-source browser that protects your Mac against phishing and malware.
- Epic Privacy Browser: Open-source browser with strict security features to optimize your privacy.
- Opera: Fast, secure browser with an easy-to-use interface.
1. Firefox
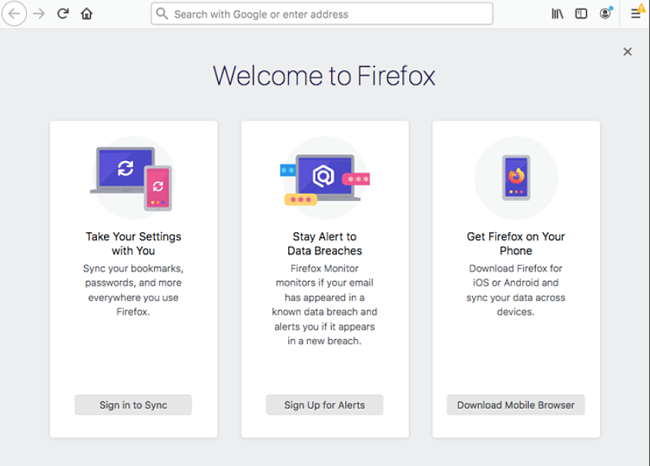
Firefox is an open-source browser that securely syncs your passwords and provides protection against phishing and malware. Its “Do Not Track” feature prevents websites from tracking your online activities. This browser is easy to use, flexible, and secure.
2. Epic Privacy Browser
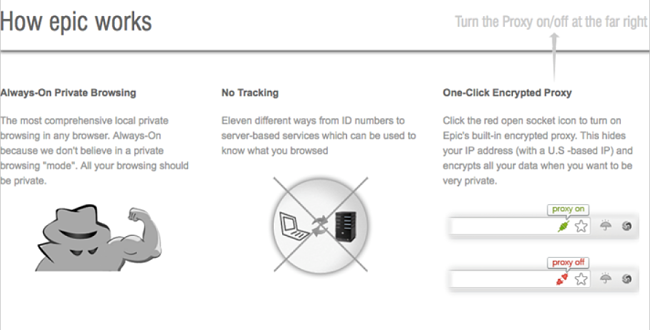
The Epic Privacy Browser is an open-source browser focused on security. It even has a “No Add-Ons” policy because the developers consider all extensions potential threats.
It disables all Google services to avoid using Google’s servers. When you connect to a search engine, Epic routes your request through a proxy server to hide your IP address. If you use this browser, Google has no way of tracking you, making it an excellent choice for privacy-focused Mac users.
3. Opera
Even though it’s not as well known as its competitors, Opera is one of the most secure browsers. With its integrated VPN, it hides your IP address to protect your Mac against online threats. Opera also offers other safety features such as protection against malware, ads, and fraud. As an added benefit, its easy-to-use interface makes it perfect for those who find other browsers confusing and difficult to navigate.
3 Most Secure Search Engines for Mac
Popular search engines like Google, Bing, and Yahoo keep track of your online activity as well as your Mac’s IP address, unique identifier, and all the search terms you use. In some cases, they share your information with third parties without your knowledge and profit off this violation of your privacy.
This is especially true for Google, which makes profits from data collection. All of its services collect the data transmitted from your Mac, including Google Search, Google Maps, and Google Ads. Luckily, you can still manage your privacy when using these services.
Tip: If you’re tired of Google spying on you, check out this list of alternatives to Google products.
It’s important to remember that you can’t stop these big search engines from collecting your information. Instead, you should try one of my recommended search engines for Mac:
Quick Guide: Top 3 Secure Search Engines for Mac
- Startpage: Allows you to browse privately without selling your personal data to third parties.
- Searx: Open-source metasearch engine that gathers data from search engines without violating your privacy.
- DuckDuckGo: Popular search engine that saves your search history but not your IP address.
1. Startpage

This Netherlands-based search engine uses a proxy instead of your IP address. It has a strict policy against logging online activity and it doesn’t sell any of your data to third parties.
Startpage allows you to browse photos and videos privately. In addition to browsing privacy and data security, it also offers filtering options to enhance your searches.
2. Searx
![Screenshot of Searx homepage]()
Searx is an open-source metasearch engine that gathers information from other search engines without violating your privacy. You can choose which search engines you get results from.
3. DuckDuckGo
DuckDuckGo was founded in the US in 2008. This popular search engine gives you results from more than 400 sources. Popular sources include Bing, Wikipedia, and Yandex.
Though it saves your searches, it doesn’t store your IP address or unique identifier. None of the stored information is personally identifiable and your privacy will never be compromised.
3 Most Secure Email Clients for Mac
Important! Emails get uploaded to an email server before they’re delivered to the recipient. This is where cybercriminals can intercept your sensitive information.
Apple’s Mail app uses Secure/Multipurpose Internet Mail Extensions (S/MIME) to encrypt your emails. If you’re using a webmail system such as Gmail or Yahoo Mail, your emails are protected by a HTTPS encryption.
I’d strongly advise you not to rely on only these two encryption tools to keep your emails safe — they only work during the transmission process. Once your email is uploaded to the server, the encryption disappears and the information is exposed.
Instead, you should use a secure email system to protect your personal information. After testing various email clients, these are the best 3 for Mac:
Quick Guide: Top 3 Secure Email Clients for Mac
- ProtonMail: Allows you to send anonymous emails through end-to-end encryption.
- Tutanota: An open-source email client that uses end-to-end encryption and two-factor authentication to safeguard your privacy.
- Hushmail: Allows recipients to read emails on a secure web page.
1. ProtonMail
ProtonMail is one of the most trusted private clients for sending anonymous emails for free. Based in Switzerland, this email client uses end-to-end encryption.
Unlike Apple Mail and other popular email clients, ProtonMail stores all of your information in an encrypted format. This means you’re protected both during and after the email has been sent.
For an extra level of security, you can set messages to be deleted from the recipient’s inbox after a certain time. All of these features make it one of the best email clients for your Mac.
2. Tutanota
Tutanota is an open-source client that allows experts around the world to regularly verify its security. This Germany-based email client offers a free and paid version. It uses end-to-end encryption and two-factor authentication (2FA) to ensure that only you have access to your messages.
3. Hushmail

When you send an email with Hushmail, the recipient can read the message on a secure web page. While this happens automatically if the recipient uses Hushmail, other recipients can easily check the “Encrypted” option to enable the feature.
How to Safely Use the Dark Web on Mac
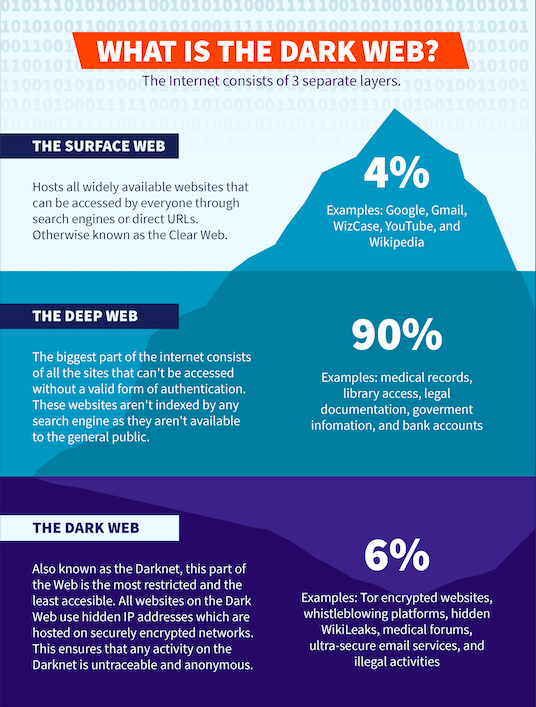
Not every Mac user is aware that the internet consists of three layers: the Surface Web, the Deep Web, and the Dark Web.
The Surface Web (or Clear Web) consists of all the widely available sites you access every day. These websites can be easily found through various search engines like Google or Safari.
The Deep Web makes up the biggest part of the online world and includes all sites that aren’t available to the general public. As these websites are not indexed by any search engines, to access them you need a valid form of authentication like a username or password. A good example of a Deep Web site is your online banking account or university library.
The Dark Web, or the Darknet, is a part of the Deep Web, but it’s a lot more difficult to access. As all of the websites on the Dark Web are hosted through encrypted networks to hide their IP addresses, you need an ultra-secure browser like Tor to even find them. This makes all the activity on the Darknet fully anonymous and untraceable.
Despite its negative reputation, the Dark Web provides access to various websites and information that you wouldn’t be able to access through your Mac’s usual browser, including online marketplaces, digital medical services, and more.
Though it’s legal to access the Dark Web, it’s important to remember that apart from its positive aspects, you can come across various illegal activities. To browse through the Darknet, you first need to know how to safely access it from your Mac.
Using a Tor browser while exploring the Dark web will protect your device by encrypting your data and deleting your browsing history after use so you can’t be tracked or targeted.
To install Tor, follow these 5 easy steps:
5 Easy Steps to Install Tor Browser on Mac:
- Go to the Tor Browser Download page.
- Scroll down and double-click on the Apple icon to start downloading Tor browser.
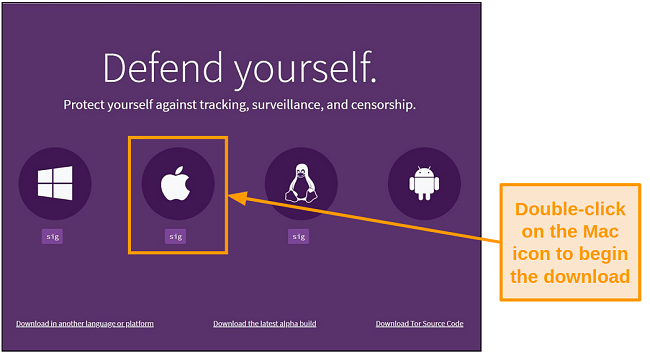
![Screenshot of the Tor homepage with the option for Mac downloads.]()
- Once downloaded, you’ll need to move the Tor Browser file into the Applications folder to prompt installation.
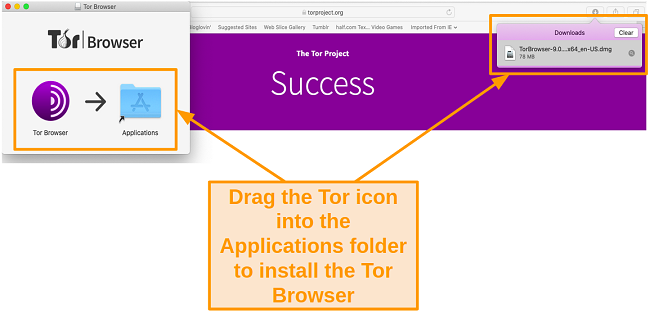
![Screenshot of the Tor installation phase.]()
- Launch Tor using the Launchpad or the shortcut in your toolbar. Before Tor opens, you’ll have a choice to either connect immediately or configure your connection (depending on your location).
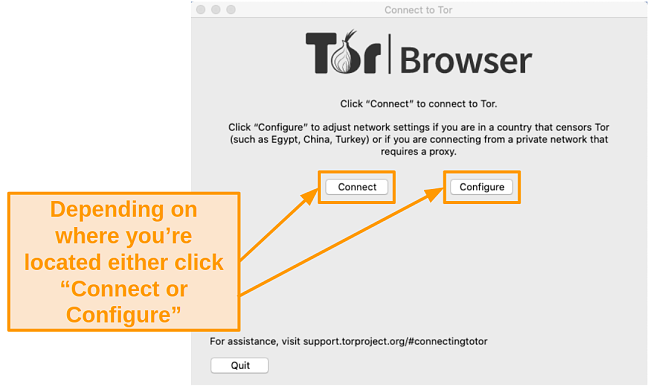
![Screenshot of Tor connection menu that allows you to either connect or configure your connection]()
- Open the Tor Browser and start browsing the Dark Web anonymously on your Mac!
Unfortunately, the Dark Web is a popular platform for many illegal activities due to the anonymity it provides. That’s why it’s crucial to remember that to be fully protected, you need to take additional safety precautions before connecting to Tor. To stay fully anonymous and safe on the Dark Web, I highly recommend getting a secure VPN provider for your Mac, such as NordVPN.
4 Best Security Practices for Mac
There are 3 main ways in which your Mac’s security can be compromised: over the internet, through malicious emails, and by direct access. This means that as soon as you’ve purchased your Mac, you’ll need to implement safety measures to safeguard your privacy.
To help you maximize protection against these threats, I compiled a list of 4 of the best security practices for your Mac:
Quick Guide: 4 Best Security Practices for Your Mac
1. Make Sure All Your Apps Are Updated
Apple regularly releases security updates for their apps. You can find security patches and other updates on the Apple Support page. Make sure you enable automatic updates to get the latest security patches as soon as they’re available.
To enable automatic updates on your Mac, take the following steps:
3 Easy Steps to Enable Automatic Updates on Your Mac:
- Open System Preferences and select Software Update.
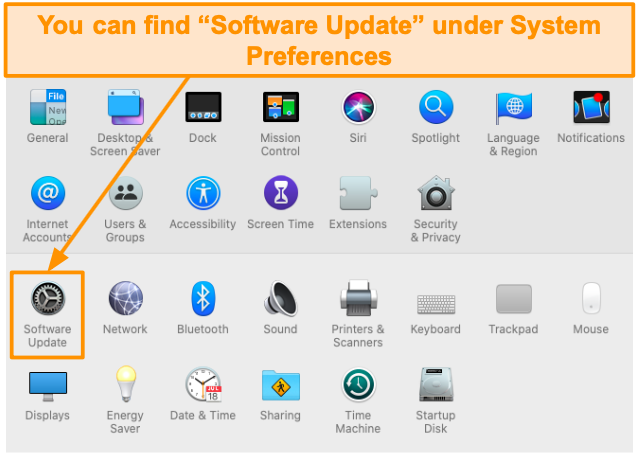
![Screenshot of Software Update under System Preferences.]()
- Check the box next to Automatically keep my Mac up to date.
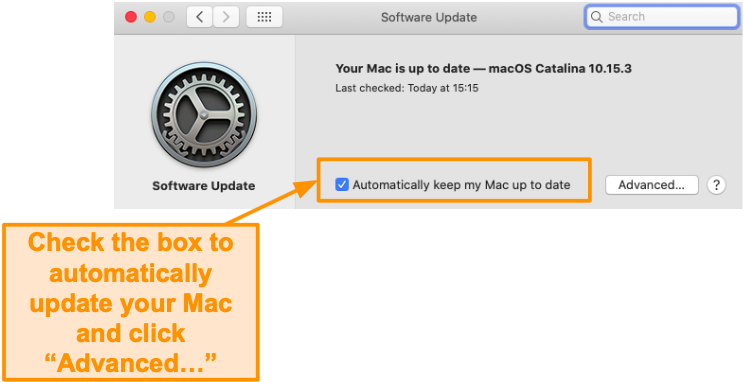
![Screenshot of enabling automatically updating a Mac.]()
- Click on Advanced. Then, check all 5 boxes and click OK.

![Screenshot of enabling all updates options.]()
Alternatively, you can use the App Store to install app updates. To do this, simply follow the 3 steps below:
3 Steps to Manually Install App Updates From the App Store:
- Click the App Store icon in your dock.
- Choose the Updates tab from the list on the left-hand side in the App Store.
- Click on the Update All button to update all apps to their latest available version.

![Screenshot of updating all apps in the App Store]()
2. Encrypt Your Hard Drive
There have been many reports of stolen identities and financial fraud. Usually, criminals obtain this sensitive information from unsecured files that were stored in the victim’s laptop or computer. Luckily, encrypting your hard drive will keep your personal data safe, not only in case of a cyberattack, but also if your Mac gets stolen.
MacOS comes with a built-in encryption feature called FileVault, which uses 256-bit XTS-AES-128 encryption to protect your Mac’s startup disk. When you activate it, hackers will need a recovery key or a login password to access your Mac. To enable this feature, follow the 4 simple steps below:
4 Simple Steps to Enable FileVault on Your Mac:
- Open System Preferences and select Security & Privacy.

![Screenshot of Security and Privacy icon in System Preferences on Mac]()
- Choose the FileVault tab.
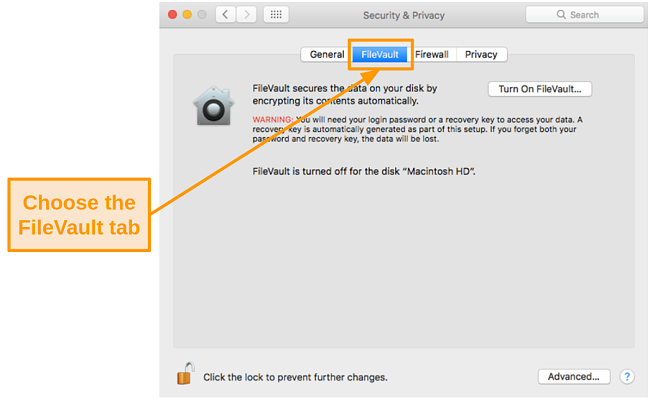
![Screenshot of FileVault settings on Mac]()
- Click on the lock icon in the lower left corner and enter your administrator password.
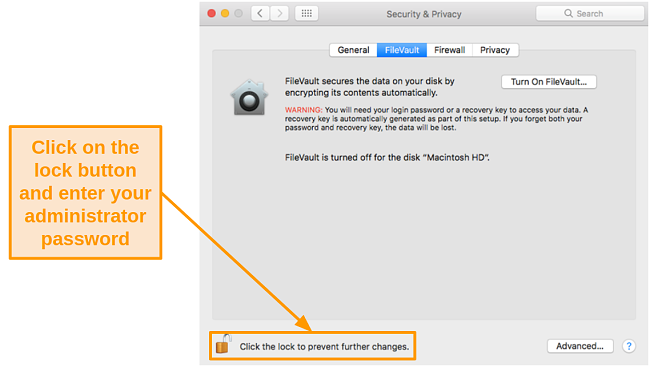
![Screenshot of allowing changes in Mac settings by clicking the lock button]()
- Click the Turn On FileVault button.
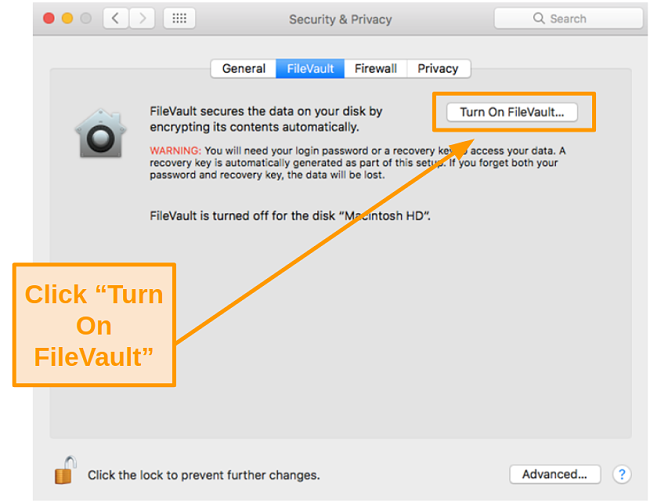
![Screenshot of turning on FileVault on Mac]()
3. Watch Out for Phishing Scams
Most phishing scams are designed to steal your sensitive information. Cybercriminals pretend to be working for legitimate companies to trick you into giving them your login credentials and passwords. They can use these details to access your bank accounts, credit cards, and other personal online profiles.
To avoid becoming a cybercrime victim, you should learn how to identify different phishing methods. Follow the instructions below to stop potential threats from compromising your Mac’s security.
Tips to avoid phishing attacks:
- Never share sensitive information such as your Apple ID or confirmation codes with anyone.
- Use two-factor authentication to prevent unauthorized access to your Apple account.
- Only use Apple Pay for transactions with people you know and trust.
- Ignore random warnings from untrusted sources that pop up while you’re browsing on your Mac. Don’t click “OK” unless you trust the source.
- Don’t give out personal information to unknown parties, even if they claim to be calling from Apple.
- Never click on links or open attachments in suspicious emails.
- Report any suspicious activities directly to Apple.
The Safari browser on your Mac also has a feature that protects you against phishing and malware. Follow these 3 basic steps below to activate it:
3 Basic Steps to Activate Phishing and Malware Protection on Safari:
- Open the Safari app and select Preferences.

![Screenshot of System Preferences under the Apple menu.]()
- Click on Security at the top.
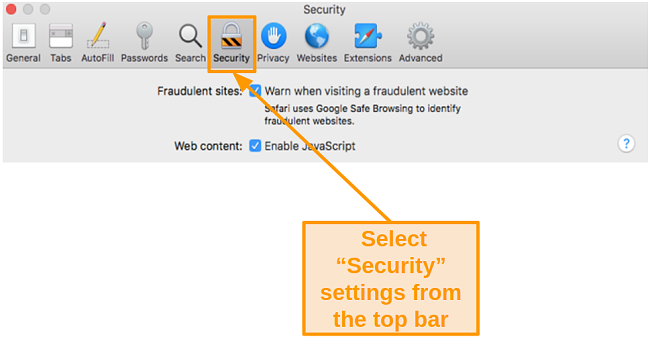
![Screenshot of Security settings in Safari]()
- Check the box next to Warn when visiting a fraudulent website.
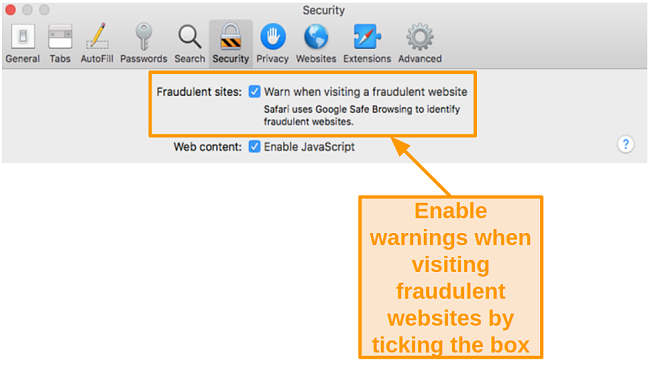
![Screenshot of enabling warning when visiting a fraudulent website in Safari]()
4. Enable Two-Factor Authentication
To ensure that only you can access your Apple account, you should enable two-factor authentication (2FA) on your Mac. When you activate this feature, Apple will send you a confirmation code whenever you try to log into your Apple ID. Hackers can’t get into your account by using your username and password — they’ll need access to your phone as well.
I provided steps for activating two-factor authentication on both the Mojave and Catalina operating systems:
4 Steps to Enable Two-Factor Authentication on MacOS Mojave or earlier versions:
- Open the Apple menu and go to System Preferences.
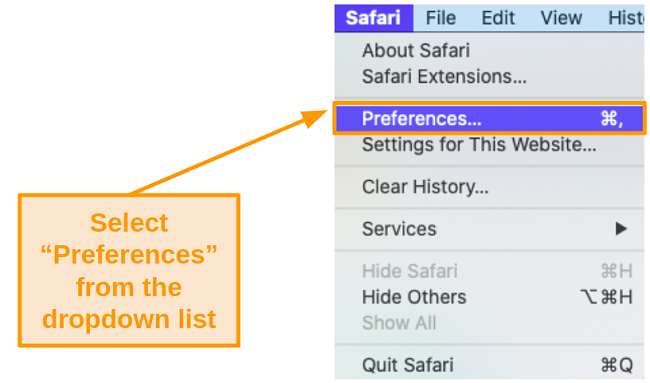
![Screenshot of System Preferences under the Apple menu.]()
- Click on iCloud.
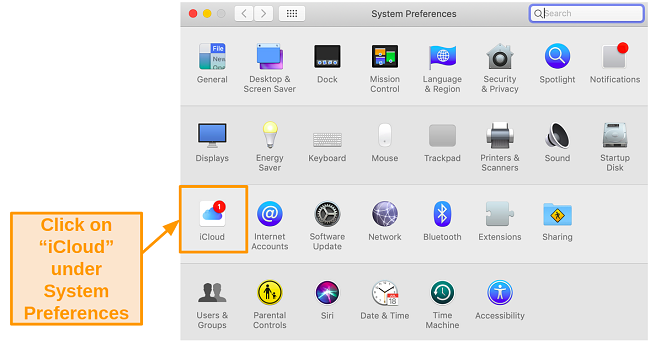
![creenshot of System Preferences on Mac with Mojave.]()
- Select Account Details and then the Security tab.
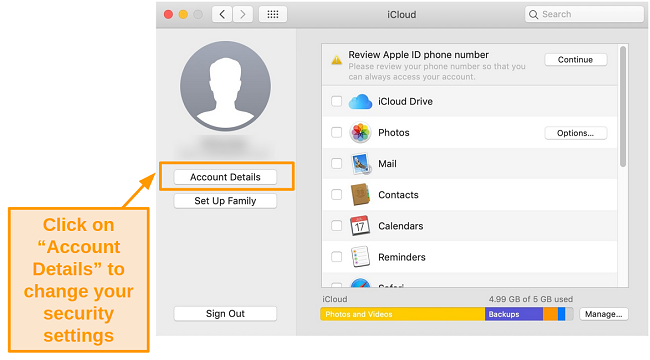
![Screenshot of the iCloud tab on the Mojave operating system.]()
- Click Turn On Two-Factor Authentication.
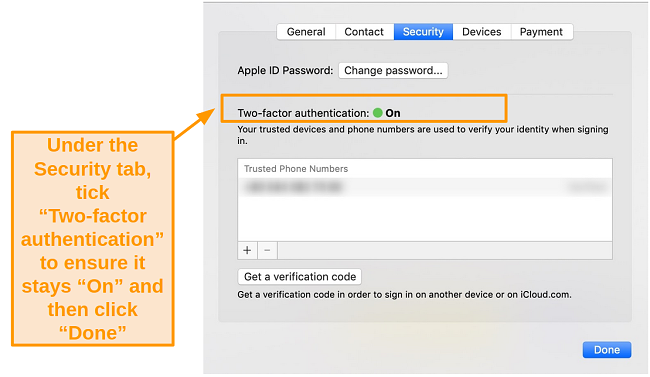
![Screenshot of Security settings on Mac under iCloud on the Mojave operating system.]()
4 Simple Steps to Enable Two-Factor Authentication on Catalina:
- Open the Apple menu and go to System Preferences.
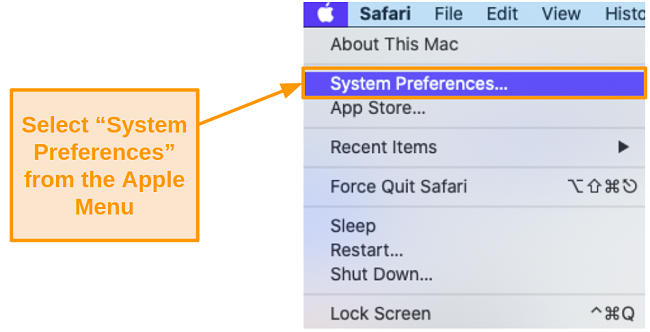
![Screenshot of System Preferences under the Apple menu.]()
- Click on Apple ID.
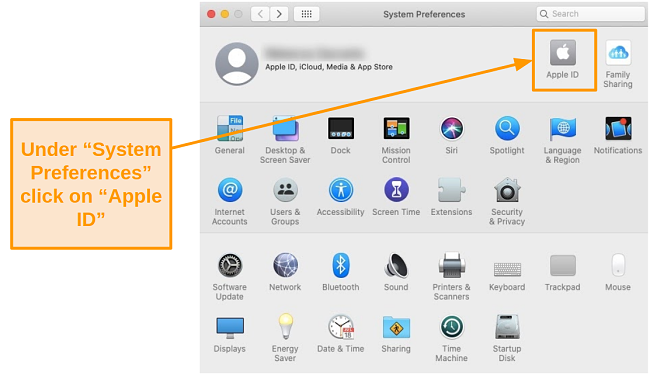
![Screenshot of the Apple ID option under System Preferences on the Catalina operating system.]()
- Select Password & Security from the left-hand side.
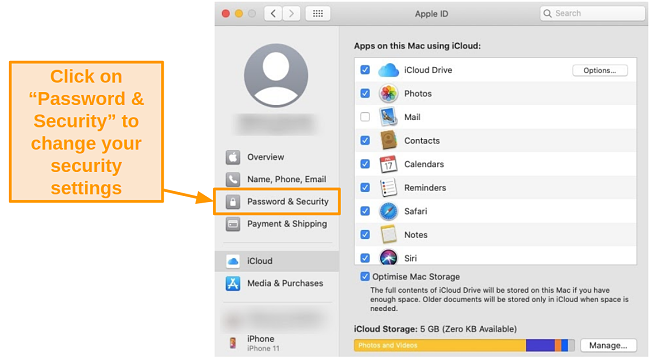
![Screenshot of usage and security settings under the Apple ID tab on Catalina.]()
- Click Turn On Two-Factor Authentication.
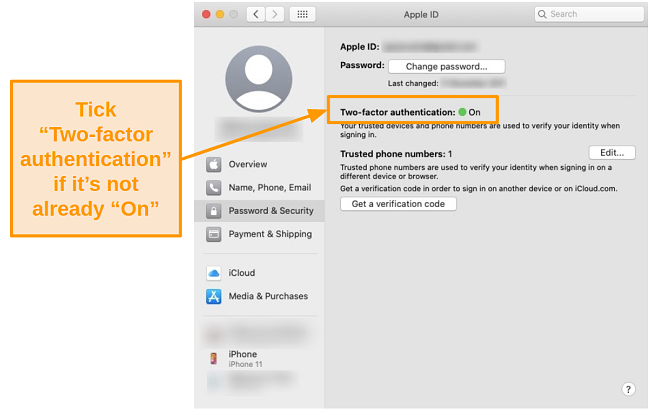
![Screenshot of security information and settings under Apple ID on the Catalina operating system.]()
Get Serious About Protecting Your Privacy on Your Mac
Macs are a great choice for both work and leisure. However, you can’t ignore the importance of securing your personal data, especially after recent cyberattacks on macOS. Mac users have become vulnerable to various online threats that attempt to compromise their private information and security. The attacks are only going to get worse as hackers are learning more about bypassing Mac’s security updates.
Luckily, there are many ways to keep your personal data and Macs safe, like optimizing your settings and installing security tools.
Always stay vigilant and remember — even as a Mac user, you’re still susceptible to online hacker attacks that put your device in danger.


Leave a Comment
Cancel