
Download NordVPN for Windows, macOS, and More
Reading time: 6 min
Last Updated: Jun 3, 2026

With NordVPN’s military-grade security protocols, you can rest assured that your data will be safe. You don’t have to worry about hackers, governments, businesses, or advertisers snooping on your activity and information. It doesn’t matter if you’re surfing the web in your home, or connecting to a public Wi-Fi. As long as your internet traffic travels through NordVPN’s encrypted tunnel, you can stream, download torrents, and surf without worry.
Whether you use an Android phone, Mac, Windows PC, or an iPhone, you’ll be protected with this powerful tool. NordVPN can help you defend up to six devices at the same time.
Update 2026: While NordVPN is a good option, don’t forget to check out the best VPNs for 2026. My team and I rigorously tested each VPN to ensure high speeds and strong privacy measures.
Editor’s Note: We value our relationship with our readers, and we strive to earn your trust through transparency and integrity. We are in the same ownership group as some of the industry-leading products reviewed on this site: ExpressVPN, CyberGhost, Private Internet Access, and Intego. That said, our detailed reviews follow a strict methodology that examines all relevant performance factors to help you arrive at your own informed conclusion.
Before You Download NordVPN
The first thing you’re going to have to do if you want to use NordVPN is to create an account.
To create an account simply follow these steps:
- Navigate to NordVPN’s home page.
- In the menu along the top of the page, click the “Pricing” button.

![Pricing instruction]()
- Select the offer that best suits your needs. Note: Signing up for a longer length of time can save you a lot on the monthly rate.
- Scroll down and input your email address.
- Further down the page, select a payment method (credit card, cryptocurrency, Alipay).
- Input your payment details and click “Continue.”
- Follow the prompts given to complete the payment. Depending on how you paid, you may have to take some additional steps.
- Go to your inbox and find the NordVPN confirmation email.
- Open the email, and follow the given instructions to confirm your account and set up your password.
How to Install NordVPN on Windows in 4 Easy Steps
Compatible with: Windows 7, 8.1, and 10.
- Download NordVPN for Windows.
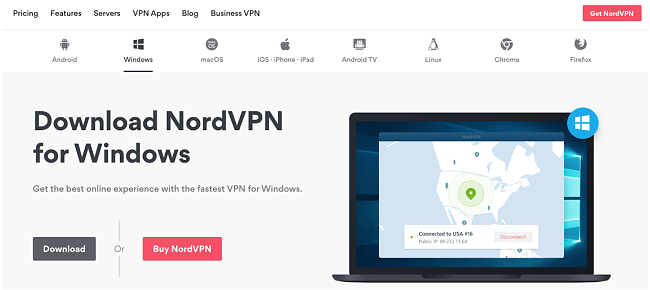
![Screenshot of NordVPN's Windows download page]()
- Run “NordVPNSetup.exe” and click “Install”.
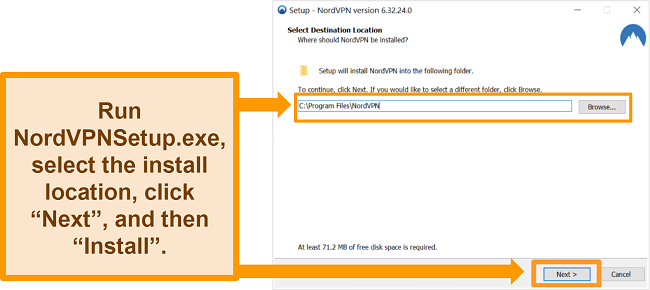
![Screenshot of NordVPN's Windows installer]()
- Open the NordVPN application and enter the email and password that you used to sign up.
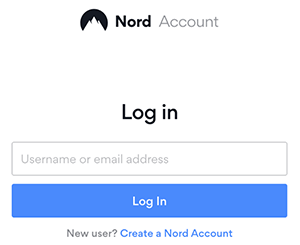
![Screenshot of NordVPN's Windows login screen]()
- Connect to a server using the search function, map, or server list. Congratulations — you can now use the internet safely!
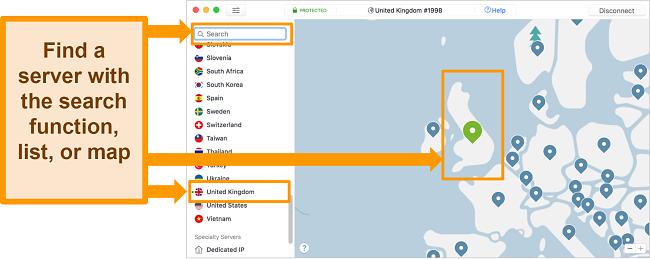
![Screenshot of NordVPN's Windows server list]()
Step-by-Step Guide to Manually Set up NordVPN on Windows
NordVPN offers several protocols to let you balance safety and speed depending on your needs. OpenVPN (UDP and TCP) and NordLynx (WireGuard) are automatically available on the Windows app. You can even manually configure IKEv2 to protect yourself with the most secure VPN protocol available. Don’t worry if it sounds complicated — it’s not. Let me guide you through the process step-by-step.
- Sign up for a NordVPN account and save your login details.
- Download NordVPN’s Windows certificate.
- Run the file from the download location — click “Open” in the pop-up that appears.

![NordVPN.exe install pop up on Windows]()
- Click “Install Certificate”. A new screen will appear.
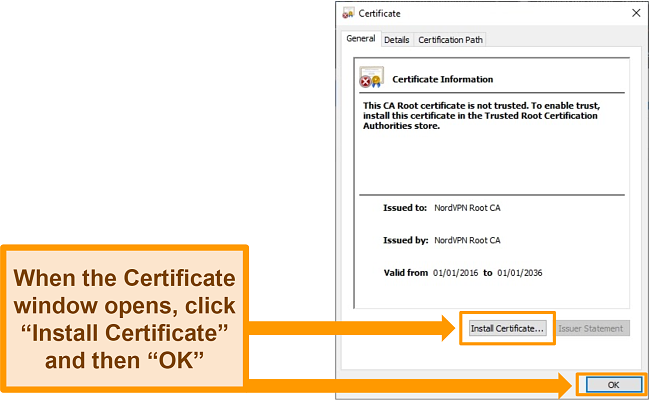
![Screenshot of the Windows "Install Certificate" page when setting up a manual NordVPN configuration]()
- Choose “Local Machine” and then click “Next”. A new window will appear.
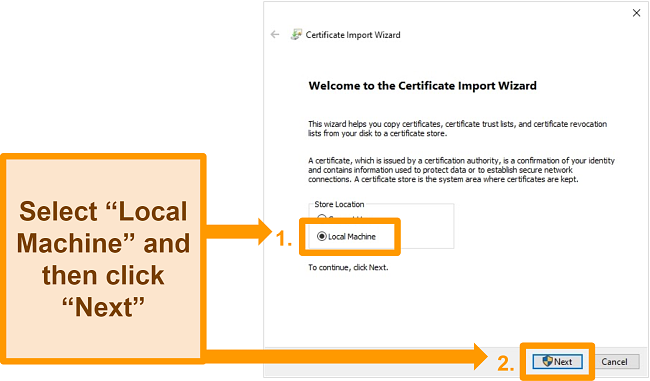
![Screenshot of the Windows Certificate Import Wizard's Local Machine setting]()
- Select “Place all certificates in the following store” and then click “Browse”. A pop-up window will appear.
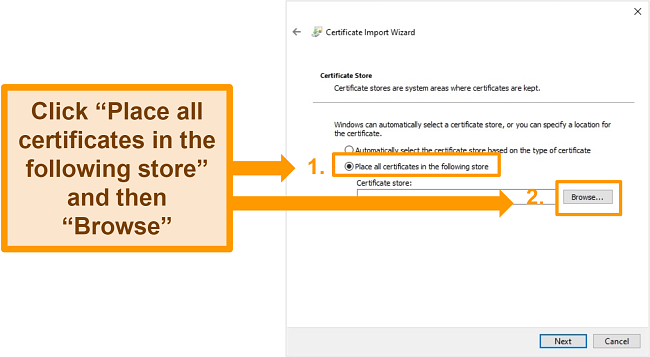
![Screenshot of the Windows VPN certificate install process]()
- Choose “Trusted Root Certification Authorities” and click “OK”. Follow the on-screen instructions until you’ve clicked “Finish”.
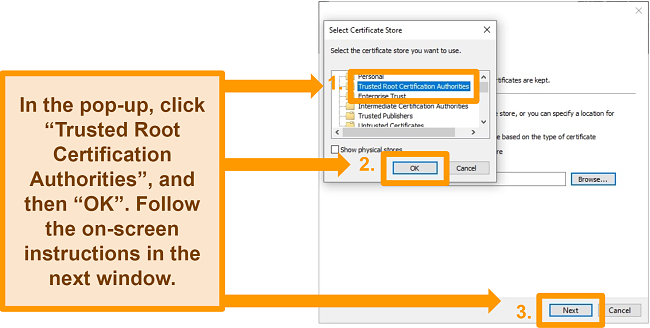
![Screenshot of selecting the Trusted Root Certification Authorities option in the Windows VPN certificate import process]()
- Click “OK” when the pop up advises you that the import was successful. Press Windows + R on your keyboard then type in certmgr.msc then click “OK”.
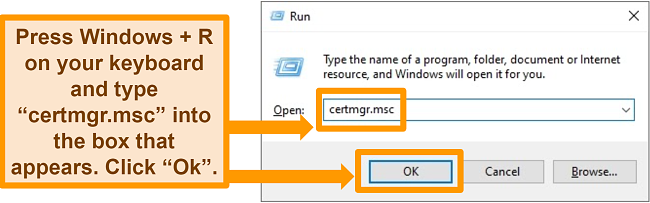
![Screenshot of running certmgr.msc in Windows Run app]()
- On the left of the screen, click “Trusted Root Certification Authorities” and then “Certificates” underneath it. In the results on the right, right click on “NordVPN Root CA” and select “Properties”.
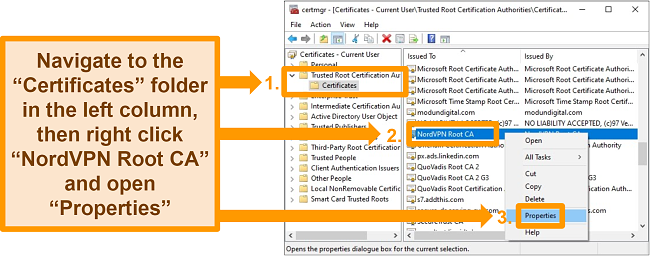
![Screenshot of Windows certmgr app displaying all current certificates]()
- Select “Enable only the following purposes” and leave only “Server Authentication” enabled. Click “OK” and “Apply”.
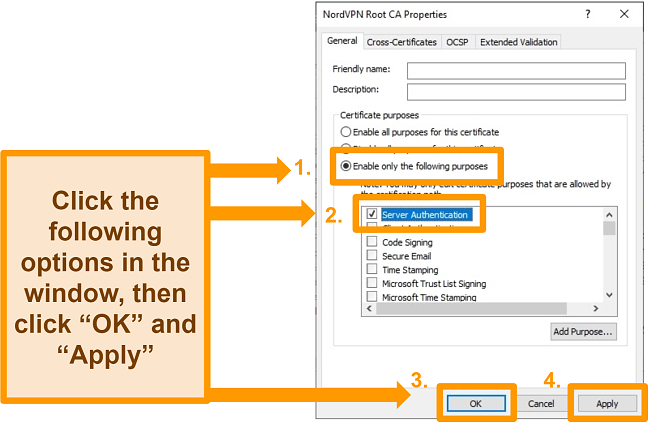
![Screenshot of the Windows NordVPN Root CA certificate settings]()
- Open the Windows Start Menu and click the “Control Panel”. Open “Network and Internet”.
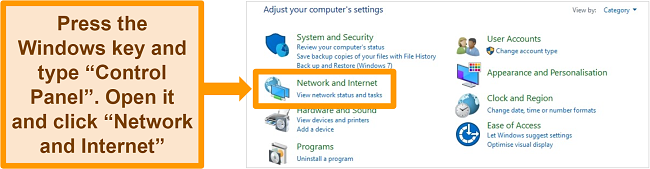
![Screenshot of the Windows Control Panel Network and Internet option]()
- In the next window, click on “Network and Sharing Center”.
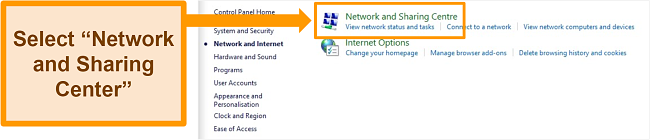
![Screenshot of the Windows Network and Internet settings menu]()
- Select “Set up a new connection or network”.

![Screenshot of the Windows "Set up a new connection or network" setting]()
- Select “Connect to a workplace” and click “Next”.
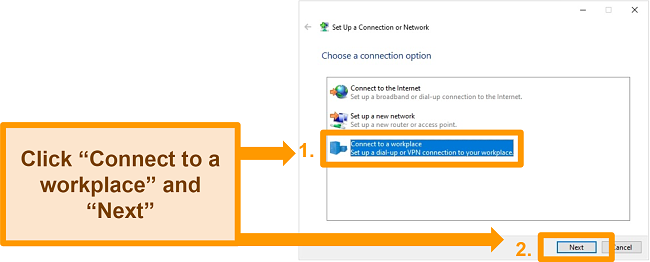
![Screenshot of the Windows "Set up a new connection or network" setup first step]()
- Select “No, create a new connection” and “Next”.
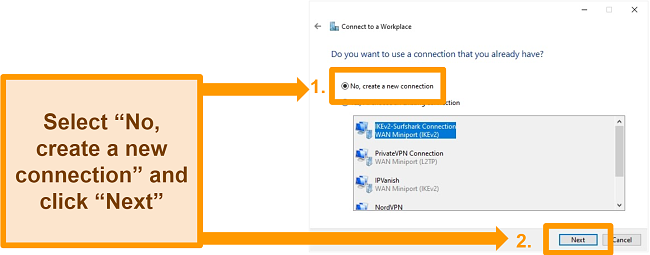
![Screenshot of the Windows "Connect to a workplace" setup]()
- Choose “Use my Internet connection” (VPN). A new window will appear.
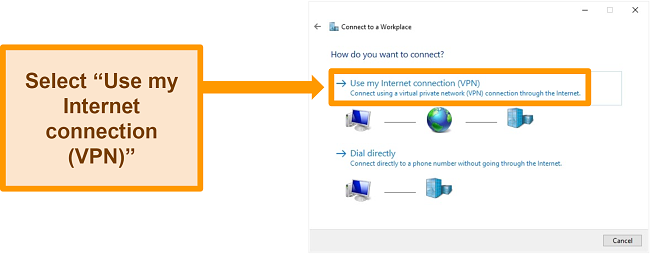
![Screenshot of the Windows "Connect to a workplace" how you want to connect setup screen]()
- Find your suggested server and enter the host name into the “Internet address” field. Then enter a name of your choosing (I used the server name) into “Destination name” and click “Create”.
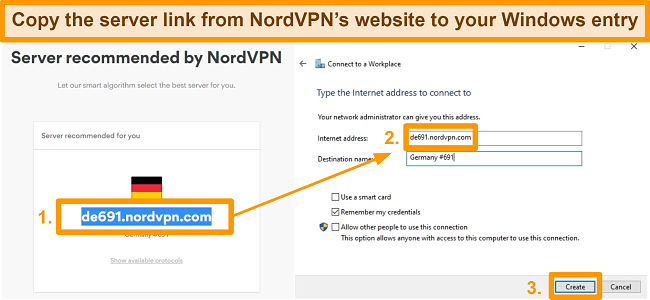
![Screenshot of copying a suggested server URL from NordVPN's website into the Windows]()
- Return to “Network and Sharing Center”. Choose “Change adapter settings”.
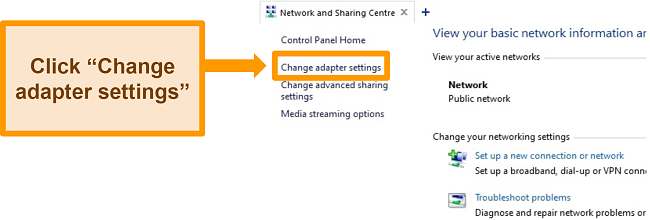
![Screenshot of NordVPN's Windows network and sharing center change adapter settings]()
- Right-click the adapter you created. Click “Properties” and open the “Security” tab.
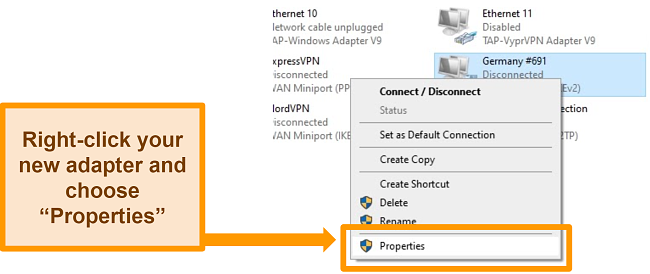
![Screenshot of the Windows network adapter screen]()
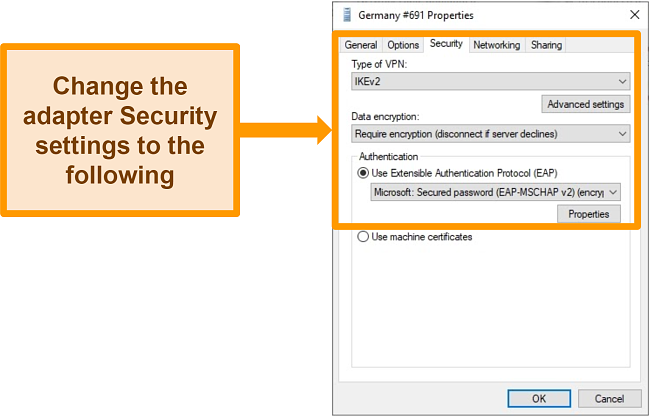
- Type of VPN: “IKEv2”
- Data encryption: “Require encryption (disconnect if server declines)”
- Authentication: “Use Extensible Authentication Protocol” and then “Secured password (EAP-MSCHAP v2) (encryption enabled)”Change these details:
 Next, go to the “Networking” tab and uncheck “Internet Protocol Version 6 (TCP/IPv6)”. Click “OK”.
![Screenshot of changing the Security properties of a Windows network adapter]()
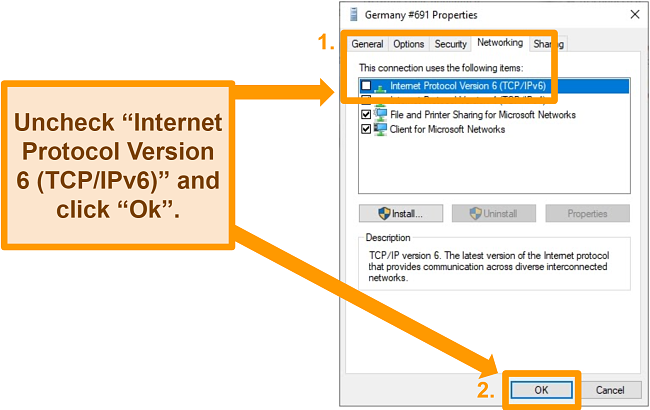
![Screenshot of changing the Networking properties of a Windows network adapter]()
- Left-click the WiFi or Ethernet symbol in the system tray. Choose “Network & Internet settings” in the pop-up.
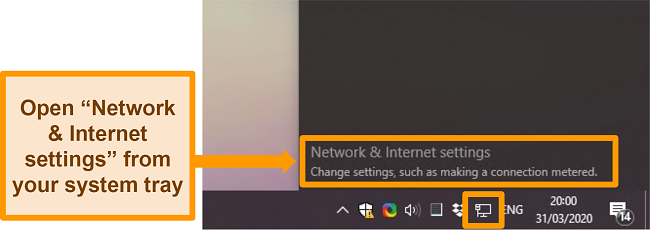
![Screenshot of opening the "Network & Internet settings" from the Windows system tray]()
- Choose “VPN” and click “Advanced options” on the connection you set up earlier.
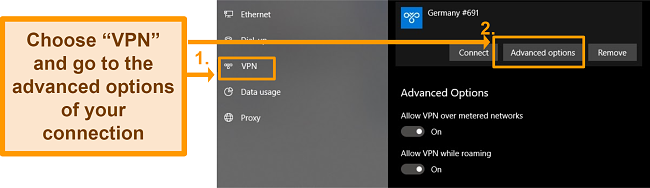
![Screenshot of changing the advanced options for a manual VPN configuration in the Windows VPN settings]()
- Click “Edit”.
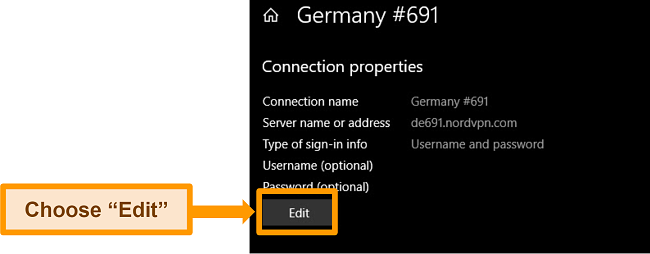
![Screenshot of the settings overview of a manual VPN configuration in the Windows VPN menu]()
- Enter your NordVPN login details. Click “Save”.
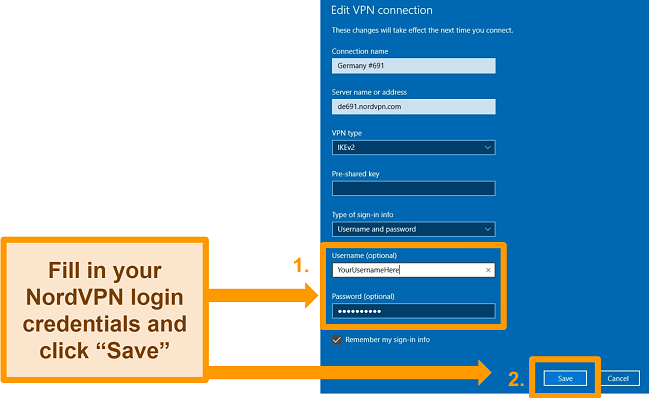
![Screenshot of the edit page for a Windows manual NordVPN connection]()
- Return to the VPN connections overview and click “Connect”. Congratulations! Now you can enjoy using NordVPN on Windows.

![Screenshot of a Windows manual NordVPN connection set up with a German server]()
Installing NordVPN on Mac
Compatible with: macOS Yosemite 10.10 or higher.
- After you’ve signed up for a NordVPN account, download the OpenVPN version of NordVPN’s software from the macOS downloads page.
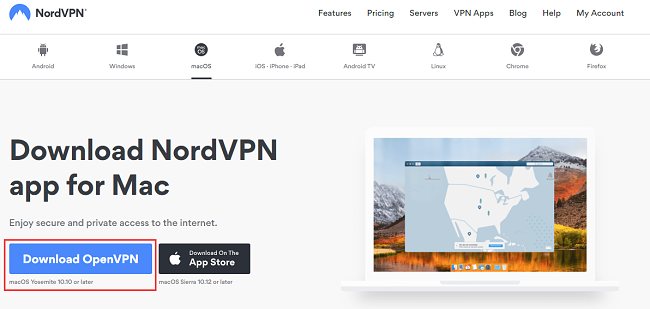
Click the “Download OpenVPN” button
- From your downloads folder, open the NordVPN.pkg installation file.
- A new window will open. Follow the prompts that you’re given until the software installation is complete.
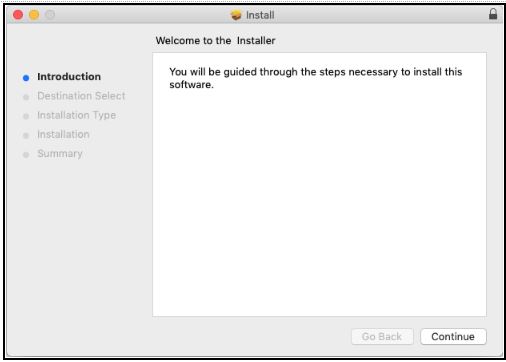
Follow the prompts until the installation is completed
- Once installed, navigate to your Launchpad and find the NordVPN icon and click on it.
- You’ll now be asked for permission to install Helper, which allows NordVPN to create a VPN tunnel. Input your password and click OK.
- Agree to the Terms of Service, and sign in to your new account.
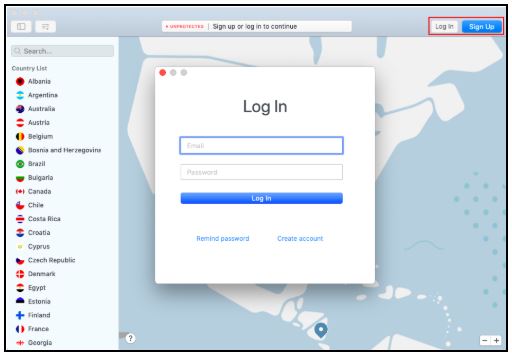
Log in, and choose a server to connect with
- Now you’re free to choose a server to connect with or click “Quick Connect” to automatically connect to one that’s recommended.
Installing NordVPN on Android
Compatible with: Android smartphones, Android tablets, or Android TV.
- After you’ve signed up for a NordVPN account, go to the “Play Store” and search for NordVPN.
- Once you’ve found it, tap the “Install” button.
- After the installation is complete, find the NordVPN icon and open it.
- Sign in to your new account.
- Connect to a server by either clicking “Quick Connect” or choosing one manually.
Installing NordVPN on iPhone or iPad
Compatible with: iPhone and iPad.
- After you’ve signed up for a NordVPN account, open the “App Store” and search for NordVPN.
- After you’ve located the app, click the “Download” button.
- Find the NordVPN icon on your home screen and open it.
- Agree to the Terms of Service, and sign in to your new account.
- Once you’re logged in, you can either choose a server to connect to or tap the “Quick Connect” button and have one chosen for you.
Final Thoughts
During my detailed NordVPN review, I was able to get a first-hand look at how fast NordVPN really is. From regular browsing to streaming Netflix, Hulu, the BBC iPlayer, and more there was no lagging, the streams were in HD and I couldn’t detect any slowdowns.
Other Top VPNs to Download (Any Device) in 2026
Editor’s Note: We value our relationship with our readers, and we strive to earn your trust through transparency and integrity. We are in the same ownership group as some of the industry-leading products reviewed on this site: ExpressVPN, CyberGhost, Private Internet Access, and Intego. That said, our detailed reviews follow a strict methodology that examines all relevant performance factors to help you arrive at your own informed conclusion.

Leave a Comment
Cancel